Need reloading bench suggestions

Status
Not open for further replies.
Joined
Feb 29, 2012
Messages
1
Hey guys, I'm struggling with my reloading bench and am in desperate need of some help. I had a makeshift bench I have been using for years with good results. However, now that I'm reloading some of the medium to larger sized rifle calibers (.308, .30-'06), the current bench jut isn't cutting it. Are there commercially available reloading benches that you can buy? I'd like to make one myself but I know myself well enough to know that that project won't end well. Any thoughts or suggestions would be greatly appreciated.
 
Sams club here sells a nice steel framed bench with butcher block top for under two bills. It's about 3' wide and 8' long. My buddy has two for his reloading shop. They seem to work great. HEAVY.


Keep your head low and your powder dry.
 
Sams club here sells a nice steel framed bench with butcher block top for under two bills. It's about 3' wide and 8' long. My buddy has two for his reloading shop. They seem to work great. HEAVY.


Keep your head low and your powder dry.
I've seen those benches at Sam's Club. I think it will work very well as a reloading bench.

Welcome to the forum...
 
Reloading Bench

Look at Harbor Freight. Nice bench for under 150.00 Sturdy, 4 drawers, side vice. Self below the top. Set up took about 30-45 minutes and can be done with 1 person but a second set of hands comes in handy.

Good luck and keep reloading..
 
There are picture threads about reloading setups on every forum that will give you ideas. This is my bench. I built it, took about a week working on it in the evenings. Longest part of the job was waiting for the paint to dry. I gave it 3 coats. Uprights are the fake wood they use for deck rail supports. I straddled the uprights with a steel plate for extra rigidity. All the stress is in the heavy upright so I don't get any bench flex at all. Cost me about $200 in material.

MainReloadingBench.jpg
 
I bought a "Goriilla Rack" from Sam's - that and a sheet of plywood doubled up gives me a work bench 8' long and 24" deep - about $100 total with a lot of shelf space underneath
 
Billy, I was in your spot a months ago. I had a standard "work bench" but needed something else for reloading. I decided to build my own but couldn't decide on the size. Below is the thread for it(very bottom). I also attached pictures of how it now looks. Its two sections of 5 feet long and 2 feet deep. For a total of 10 feet long 2 feet deep and 46inches high. That way i can disassemble it and get it back up the stairs (in the basement). The top is 1 1/8 plywood with mica top, i found it at the local big box hardware store already cut in 2 foot widths, i trimmed it to 5 feet (from 6) but depending on the length you build it to, it would be that much eaiser. I wanted to mostly reload on one side and have a cleaning/gun station on the other. I like the Mica top, it makes clean up easy and its much cleaner than just wood. I went with 46inch tall because i wanted it higher up because i stand when i reload. I'm 5'11" and thought 46 would be too tall, but it works great, most everything is about elbow level, just where you want it. Also it keeps things out of reach from little hands (3 year old types).

I used 4x4s on the outside corners and 2x4s on the inside posts. I think the entire bench cost around $150 in materials. I notched the 4x4s to make a flusher fit, but i wouldn't recommend doing that unless you are pretty good with a table saw. I haven't put flooring on the lowest level because i don't need the storage yet, and it works great for a foot rest, simular to a those at a bar. I will eventually put cabinet doors on it to secure it more. I looked at every type of bench you could buy and they all had good things and bad things, i decided to make my own so i could make one that best fits me, and it was cheaper. I hope all this helps.

ReloadingBench01.gif

http://www.thehighroad.org/showthread.php?t=631512
 
'doesn't want to build a complicated bench' ^

Billy, I know how you feel, I'm no carpenter either. Here is mine. A 2x4 basics kit(search google/amazon), the corner hardware is heavy moldings and ensures I didn't have to be a carpenter. You can get the lumber yard or home depot/lowes to make the cuts in the 2x4s and and the ply comes in precut sizes already, and there is a whole bunch of 2'x4' sheets to choose from in any lowes of home depot, for instance.
My top is doubled 3/4" hardwood ply glued and screwed.

It went together with a cordless screwdriver, a couple coats of water based poly on the top, solid as a rock and can literally hold a ton or two on the shelves. I lagged it to wall studs and loaded it with bullets and tools, it doesn't move.

If I was going to buy outright I have seen a nice stack on at Cabelas. Search Stack On reloading bench with google to see it.
 

Attachments

  • IMG_0032.JPG
    IMG_0032.JPG
    32.5 KB · Views: 64
  • IMG_0054.JPG
    IMG_0054.JPG
    72 KB · Views: 62
I have a very simple setup since I have a smaller apartment. The bench top is 3/4" particle board but if need be I could replace and make it thicker but so far it has worked really well for my needs. The bench is a stack-on that I paid about $70 for and even Walmart sells them. My presses are 2 Lee Pro 1000 and a Lee Reloader Press that I use the Lee Bench plate to hook to the table.
 

Attachments

  • IMG_0215_Sm.jpg
    IMG_0215_Sm.jpg
    51.6 KB · Views: 92
I like that set-up, Joe. Plenty enough bench to do what you need.
 
Hey guys, I'm struggling with my reloading bench and am in desperate need of some help. I had a makeshift bench I have been using for years with good results. However, now that I'm reloading some of the medium to larger sized rifle calibers (.308, .30-'06), the current bench jut isn't cutting it. Are there commercially available reloading benches that you can buy? I'd like to make one myself but I know myself well enough to know that that project won't end well. Any thoughts or suggestions would be greatly appreciated.

In general the top strength is the most important followed with frame. The 2 sheets of 3/4"-1" plywood GLUED and Screwed together is key in making a solid top. The heavy hardwood butcher block tops are really nice and solid. With the heavier caliber you get more torque on the top. The frame on my bench is 2x4's lag screwed together so they don't loosen during flex. Fully braced with 2 secondary shelf for supplies also secured to the frame. If you can secure the bench to the wall will also make a bench solid with less movement.

My second bench is a Hallowell Heavy 10ga Steel bench with wood top on top of the steel. It has 2 metal storage cabinets on each end. To secure it I have a 1000# end mill setting over one of the cabinets. With raw materials on the other end. So if you can find a steel case desk and add a heavy top would work if you like to sit while reloading.
 
Thanks GTI and I load mostly pistol 9mm, 45 acp and 45 colt though I also load for a 45 Colt rifle and 12 ga brass shot shells. 45 Colt and shot shells mostly black powder the rest smokeless. I do shoot about 100 rounds a week though only one gun as I rarely take two. The only time I shot more than 1 is for NCOWS and usually about a 114 rounds in the course of a day once a month.
 
The key to any loading bench is to have it solid with no flex when using your equipment. You can get a good steel bench at an industrial supply house or build one out of wood. If you should build one, design it so you can take it apart if you need to move it. I have one of each type and they have served me well for 30 years.

View4.jpg

View5.jpg
 
Very nice benches fellas!

I recently built a bench, I only had a 4ft long wall to put in the house, yes, my GF let me build one and put it in the house!!!!!!

I bought some 1/2" plywood, had it cut from to make 2 pieces of 2'X4'. I bought a 12' 4X4 and had it cut to 3' legs and bought a couple of 2X4's. I cut the 2X4's into a frame for the 2' X 4' plywood. I then put the 4X4 on the inside and secured with lag bolts. I then nailed the 2 pieces of plywood on top into the 4X4 posts and further secured them to the 2X4 frame with deck screws. I had to cut a section of the 2X4 where my RCBS Jr3 press was mounted as the ram movement hit the 2X4 frame. I thought I was going to have to reinforce it but the 1" total plywood top is fine, I may reinforce it for giggles.

I then took my router and rounded the top and stained with a mix of oil based stain/clear mix, boiled linseed oil and mineral spirits. I just bought some more plywood and 2X4's for shelving underneath (planning on 2 shelves for cases and whatnot).

It's held up great with much "reefing" on the press as hard as I wanted and loaded 200 45acp and decapped some 30-06 and no problems at all and no tipping over.

So...It's 2' deep and 4' wide and sits on a 4' wide wall perfectly. Now my GF won't lose me in the man cave and with a Jr3 press, I sit in the living room, after decapping, sizing brass, clean the primer pockets, deburr and prime in the living room while watching TV and talking to GF and when she is at work, load the shells.

Sorry, no pictures of it.

It's stout and you can make it as big as you want with that. I used the 2 pieces 1/2" plywood but you obviously buy thicker plywood, but I had a budget and walked out the door with all needed for $37+change. The plywood was in their "scrap" pile. "Eh....give me 10 bucks...."

I use self tapping screws to mount my Uniflow and remove when not needed and may put some bolt inserts in the plywood to mount my press. It's currently held by 5/16 lag bolts as the edge of the plywood runs into the 2X4 frame and can't bolt it at the moment.

Sorry for the run on, working nights at the klink and too much coffee!!!!!!

L8R

Aaron
 
BENCH2.gif
Building a bench doesn't have to be hard.:) 
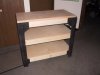
This is a 2'x8' "torsion beam" design where the beam is just three nailed and glued 2x4's. If you mount presses through the beam with long carriage bolts, the resistance to movement and twisting is phenomenal.
BENCH4.jpg
This picture shows end 2x4's screwed on to the single 2x4 legs to stiffen and strengthen them....and keep them from ever kicking out.
Because the torsion beam takes all the stress, the top only needs to be one 3/4" plywood top, fastened down with screws to the beam and the 2x4 support screwed to the wall. It doesn't even need cross supports because subtracting the beam (4.5") and the back support (1.5") you only have 18" in between...you're not going to notice any flex at all with 3/4" plywood screwed down and spanning 18", even if you put something heavy on it....ok, like a tool box full of wrenches that takes two men to lift that high.

Material and cut list below except for the plywood top. Have Home Depot rip your plywood top to give you a 24" wide piece, then rip what's left to make two 12"-ish shelves.

BENCH1-1.gif
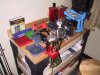
The picture below is such a bench garnished with an optional drawer stack (admittedly a little more skill involved), and 2 extra 2x4's at each leg (with quarter round moulding to fancy up the joints)
A 1x2 face was nailed on around the top once formica was glued down and trimmed flush against the edge of the plywood. My presses were mounted first, and the face trim was fit around them, to have minimal projection in the room. My carriage bolts sometimes were drilled between the beam 2x4's which is why you want to glue the laminations....plus I use very large fender washers below to spread the load to the rest of the beam. Worked really well.
IMG_0430.gif
Next drawing attempts to show how the legs were prettied up.
MyBench3.gif

The best part about this design is that you can find an old drafting stool and reload sitting or standing, since there is "knee" space under the bench. It's a simple matter to nail a shelf underneath, but as you can see from my photo, the shelf is recessessed, to preserve the knee space.
 
Last edited:
My loading bench started out over 30 years ago as the bench in my BILs ham shack. It is a hollow core door and had 4x4 legs. The top was just nailed on to the legs. He ran 2x4 stringers on the inside of the legs from front to back with another 2x4 between the back legs above the front to back stringers. He didn't want to move it when he was posted to Rapid City, and gave it to me. I have moved it three times. Since it was just nailed together it came apart relatively easily. After the last move it got a little shakey so I attached the top to the legs with the flat mending plates you get where they have the joist hangers. After 8 plates and 32 sheet metal screws it's not going to move. I also added a half shelf between the leg stringers. The back rail ensures that I don't push anything off. If the lumber yard will cut the 4x4s to length for you and cut a 2x4 to the height of the door and two more to the width of the door the wood work is done. All you need then are the mending plates 32 1-1/2 sheetmetal screws to attach the legs to the top, and a dozen 3 inch deck screws to attach the stringers and rails to the legs. Predrilling the screw holes will make driving the screws easier. You will have a table that is solid and that can be taken apart if necessary. Adding a 12 inch deep shelf down below is just frosting on the cake. Set the stringers high enough that you can get a 5 gal bucket under the shelf for use as a trash can.

Enjoy your foray into woodworking.
 
GW Staar - wow, that is absolutely gorgeous!
Your bench puts my little rinky-dink setup to shame.

When God was handing out the aptitude for woodworking/bench building I must have been at recess or something.
Sometimes I wish I had that skill, but then again, I can confidently say, no one will ever impose upon me to build 'em a bench - :neener:

Slight of hand and other tricks! :) You'd be surprised how little skill in involved. You do have to cut 2x4's to the specified lengths and you have to hammer nails and/or screw in cabinet or deck screws. Time and effort is saved if you use a chop saw or skil saw and an impact screwdriver.

Formica looks hard, but it is a breeze to work with. Formica cutters are just scoring tools that with a straight edge scores the formica (with a "V" shaped scratch)....then you bend it towards the score...and snap it apart. Gluing formica means you just paint the stuff on with a formica trowel (both the formica back and the bench top) let them dry and drop it on. The trick is to get the piece where you want it because contact cement only gives you one try at placement. I use wood dowels, or arrows spaced every 6 inches...layed on the top (it doesn't stick to the dryed contact cement)...then place the formica. Starting in the middle remove a couple of dowels....press it down...continue removing dowels each way towards the ends until it is stuck down in perfect position.

You always cut your piece large and trim the front and sides with a router. (large means 1/4" extra on all sides except the back. Special formica bit at Home Depot makes sure you don't cut into the bench.
Before routers came along we used a course file held tight against the bench's edge. You draw the file downward and forward only...remove it and repeat...downward stokes only. Even today routers are great until you get to a wall. Then you still have to use a file to finish.

You can buy 1x2's for the face trim at Lowes or Home Depot hardwood or softwood. You can even buy a drawer stack from them and stuff it under the bench. Hope this inspires someone to try it.
 
Last edited:
I built the bench below for mt son out of scraps from a unusually long shipping crate we received at work, and topped it off with a $16 sheet of AC plywood. Total cost with glue, fasteners and wood was about $30. When I asked for a photo, he just had to lay his CMP Garand on top to make me feel bad....

IMG_0804.jpg
 
^^^ This. IMO no need for anything fancy. Use enough sturdy wood and/or screw to the wall, and you're set.
 
Honestly, if you know how to use a Saw and a Cordless Drill, order the 2x4 Basics kit from Amazon for $69 shipped, go buy lumber at Lowes/HD and make it exactly what you want it to be size wise. I made one 3 years ago, loaded 15k+ rounds already and its still solid (and mine isnt even bolted to the walls yet).

IMG_5782.jpg
 
Status
Not open for further replies.
Back
Top