
You are using an out of date browser. It may not display this or other websites correctly.
You should upgrade or use an alternative browser.
You should upgrade or use an alternative browser.
The Sam Cade Thread of Knifey Goodness
- Thread starter JShirley
- Start date
- Status
-
Not open for further replies.
Sam Cade
Member
Sure. Let me collate some things. 
Deltaboy1984
Member
Sweet this should be Great.
bikerdoc
Moderator In Memoriam
If you do it I will also,
Sam Cade
Member
You guys want process and equipment pictures too?
My quench plates are steel 45lb weights.
My quench plates are steel 45lb weights.
bikerdoc
Moderator In Memoriam
Yes please, if it not too much trouble, We have much too learn from you. Talk about sharpening also please.
Readyrod
Member
This is going to be sweeeeeeeet!!!!!!!!!!
Pics, vid, animation, shadow puppets, etc.
Sam Cade
Member
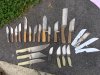
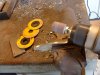
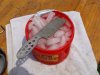
A quick lap around the kitchen and desk turns these up, arranged in roughly chronological order:

It isn't everything I've made, I'm pretty ruthless with my testing and have broken lots of test pieces.
There are also multiples of most of the later knives since I've sold some.
The sheepsfoot on the far right I've sold the most of.
A grand total of four.
There are also quite a few knives that I don't have pictures of that have since departed the shop.
I've made more of the little three finger -'merican "tantos" (dead center in the picture) than anything else (because they are so fast to make) but I've given most of them away. The one pictured was the first one I made and got volunteered for my first electro-etching experiment.
Attachments
Sam Cade
Member
Sam Cade
Member
You, Sir, are very skilled.
Thanks. I'd consider myself an advanced learner. By the 10,000 hour rule I should be getting good sometime around 2025.

My initial training was in industrial quality control, so I've got a good handle on production processes and have been wrenching and pounding on farm machinery my whole life so hand tools don't have much mystery. That isn't a terrible foundation to learn to build knives with. Not as good as being a trained machinist or such, but not bad.
Deltaboy1984
Member
Nice work Sam.
Sam Cade
Member

bikerdoc
Moderator In Memoriam
I am in awe of your skills.
Sam Cade
Member
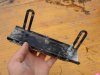
Ok folks, this is how I do it.
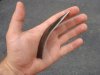
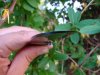
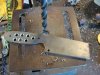
First thing I do is trace out my pattern onto my blade stock and cut the length from the bar.

I'm mostly interested in the shape of the tang, the blade shape is just a suggestion.
I notch and rough cut the profile with an angle grinder and a fiberglass cutting wheel.

Since I don't want to breath fiberglass, light myself on fire or maim myself, this entails a full safety panoply.

After the rough profile I clean it up closer with the grinder.

First thing I do is trace out my pattern onto my blade stock and cut the length from the bar.
I'm mostly interested in the shape of the tang, the blade shape is just a suggestion.
I notch and rough cut the profile with an angle grinder and a fiberglass cutting wheel.
Since I don't want to breath fiberglass, light myself on fire or maim myself, this entails a full safety panoply.
After the rough profile I clean it up closer with the grinder.
Attachments

Sam Cade
Member
Sam Cade
Member
Sam Cade
Member
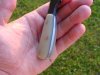
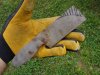
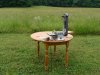
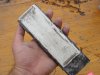
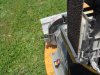
After notching out out the choil it is time to head to the grinder.

The ice bucket keeps me from burning my fingers.
I'm grinding on a 2x42 craftsman mounted on a table.
It is small enough to carry outside on nice days.

The little Craftsman only has a 1/3 HP motor (older ones were 1/2 HP) and runs redorkulus fast so it isn't perfect for knife grinding but does get the job done.
The stock platen is pretty miserable. It isn't true and is made of thin mild steel.
I stuck a 2" ceramic tile onto mine and it works beautifully...boy is it ugly though.


The ice bucket keeps me from burning my fingers.
I'm grinding on a 2x42 craftsman mounted on a table.
It is small enough to carry outside on nice days.
The little Craftsman only has a 1/3 HP motor (older ones were 1/2 HP) and runs redorkulus fast so it isn't perfect for knife grinding but does get the job done.
The stock platen is pretty miserable. It isn't true and is made of thin mild steel.
I stuck a 2" ceramic tile onto mine and it works beautifully...boy is it ugly though.
Attachments
Last edited:
Sam Cade
Member

Sam Cade
Member
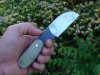
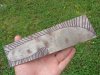
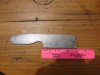
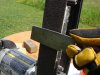
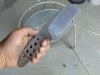
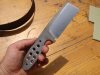
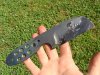
Ground to 36 grit.

Bit of wobble in the grind line there. *sigh* That is what I get for rushing.
Finished up and ready for heat treat.

I rather enjoy this part.

Yeee-haaa!

Bit of wobble in the grind line there. *sigh* That is what I get for rushing.
Finished up and ready for heat treat.
I rather enjoy this part.
Yeee-haaa!
Attachments

Sam Cade
Member
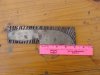
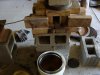
It would probably cut butter at this point.

Heat treatment is:
1.Normalize.
2.Normalize.
3.Normalize.
4. Heat to a bit past critical
5.Quench in warm canola oil.

6. And temper twice at 410 F.
...and we will pick this back up at around 8 PM tonight once the final cycle ends.
Heat treatment is:
1.Normalize.
2.Normalize.
3.Normalize.
4. Heat to a bit past critical
5.Quench in warm canola oil.
6. And temper twice at 410 F.
...and we will pick this back up at around 8 PM tonight once the final cycle ends.
Attachments

- Status
-
Not open for further replies.