Putting a little more power in a $15.00 Daisy

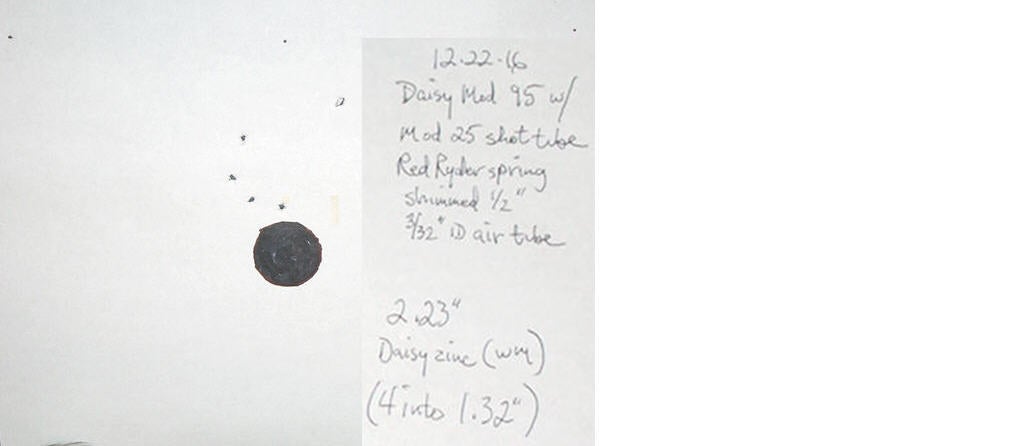
I tried the Daisy Match Grade Avanti BBs, the MV increased by ~10 fps, average was 324 fps, ES was 3 fps.

I was able to tweak the rear sight to get the windage correct. I'm glad I didn't need to resort to anything more involved. It looks like the gun had been dropped or the rear sight snagged on something.

The lever was too loose, I found it to be worn where the receiver pinches it, so I substituted the original Model 95 lever for the straight metal lever from the Model 104. It wasn't being used because the 104 has a Red Ryder buttstock and curved metal lever.

Anyone got any ideas in the following?
  • When did daisy start using phillips head screws?
  • When did scope holes start/stop?
  • When did rubber seals start, leather end?
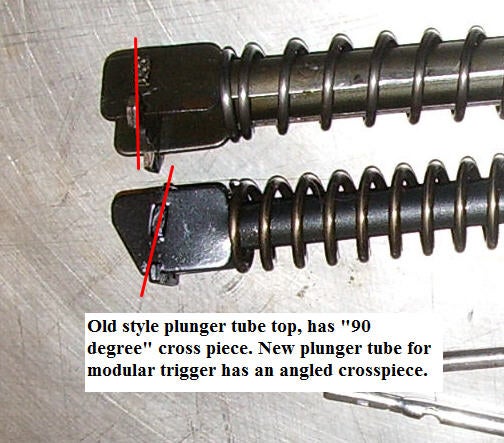
  • When did lever pivot change?
  • When did shot change from lead to steel?
  • What model(s) had strongest spring/highest velocity?
I'm starting to think at least one model that used an uber strong spring was the cock-on-closing Number 3 Model 27 from the late '20s- early '30s, that used lead shot. In the diagram below, the spring is shown to have about 25 coils and elsewhere this gun was said to be a beast as far as power goes. So I'm wondering if the $25.00 spring I saw on Gun Broker might not have come from this, or a similar gun. The spring spec's were:
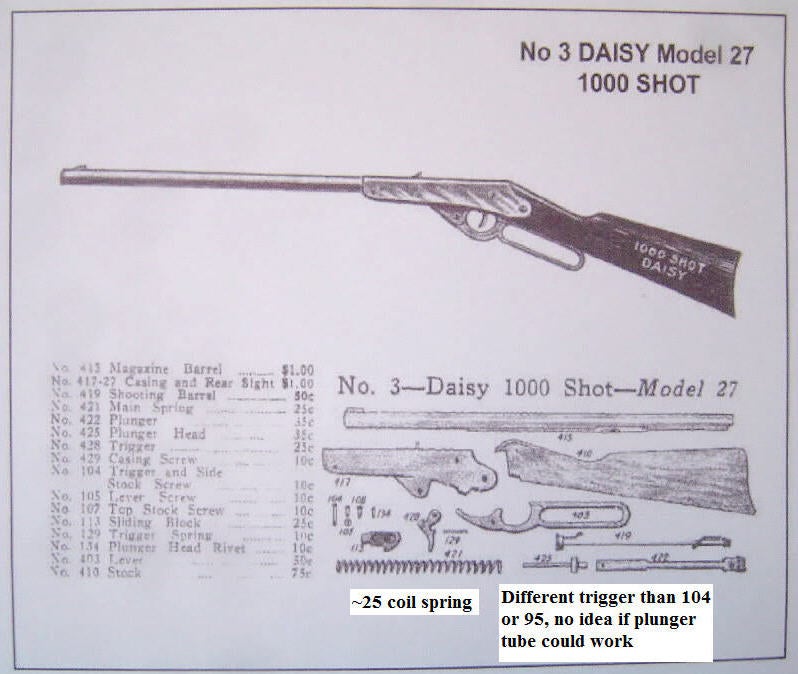
  • 0.095” wire diameter
  • 0.720” spring OD
  • 7-7/8” free length
  • 25 coils
Extra points for:
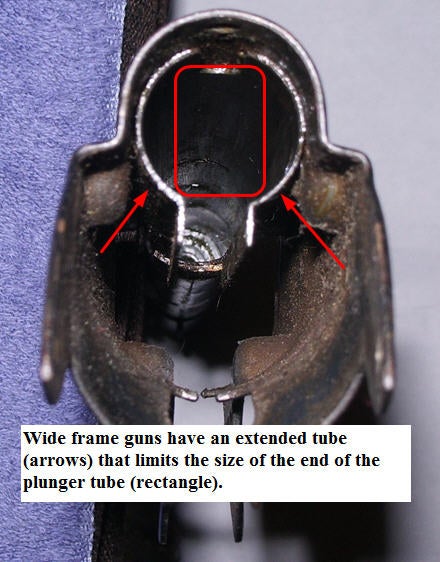
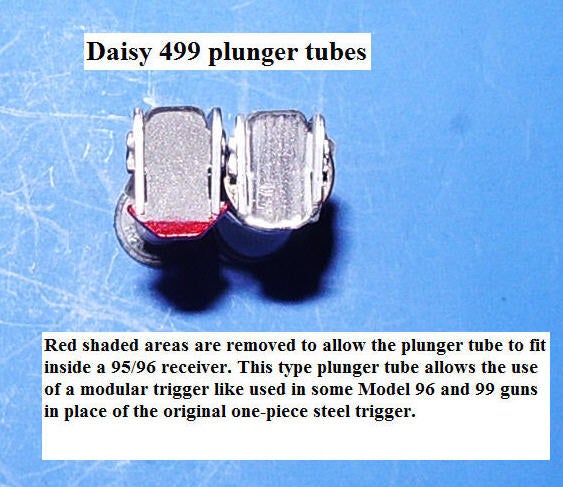
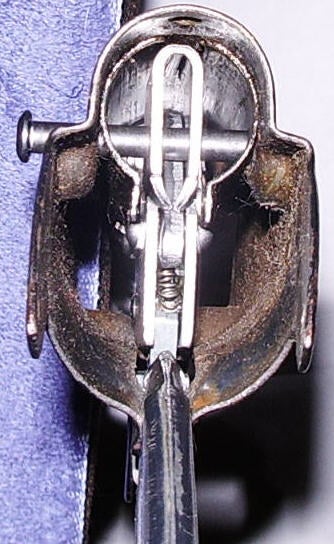
  • A description or diagram showing how the cock-on-closing mechanism worked.
  • What other models cocked when closing the lever?
Daisy_No3_Model_27_1000_Shot_w-text.jpg
 
Last edited:
One detail of the Model 95 that makes no sense to me is the screw elevation adjuster for the rear sight. Why they didn’t just use a sliding elevation adjuster on them all (newer guns than mine, did) is beyond me. Besides the rear sight requiring a screwdriver to adjust windage, the elevation adjustment screw is captive in the tube and cannot be removed. This means the piston has to be ‘shoe horned’ past the exposed end of this captured screw to keep from damaging the piston. I made a simple assembly tool from some fairly stiff, thin flexible plastic to go between the screw and piston so the piston wasn’t damaged when it was inserted into the compression chamber. But such an unnecessary hassle.
I have the Model 95 back apart to work on the trigger and plunger tube to get the trigger feel lighter and less 'notchy'. So while it's apart I took a photo to show the screw I was talking about. Real pain to work around...

DAISY_MOD_95_ELE_SCREW_w-text.jpg
 
Looking forward to trying out the sights sent to me by Loonwolf, thanks! I’ve got the Model 95 working well, even though it’ll never see 350 fps, let alone 400 (400 fps MV was my ‘soft target’ when I first started out to make my “ideal” Daisy lever action BB repeater- little did I know... haha). But it’s shooting very smoothly at 320 fps- which seems to be the sweet spot for the Daisy Red Ryder-type plunger assembly when a preload spacer is used. (I’m still trying to figure out what model(s) used the stronger spring I mentioned before. Hopefully the plunger tube that goes with this spring can be used as well.)

Anyway, the shallow V rear sight on the Model 95 is poorly suited to take full advantage of the modified gun’s capabilities. It’s just too coarse for work out past 20 yards, in my hands anyway. But the semi-post front sight should work well with a more precise rear sight, especially with a small white dot added.

As a side note, the best sights on any Daisy I’ve used so far has been on the new Red Ryder. The rear sight is a notch that matches up to the ramp front sight well. Once the RR sights are set correctly for windage (which can be a chore because there’s no windage adjustment, per se), they’re very easy to use even at extended ranges. I find the Model 25 “combo” rear sights to be located too far rearward for using the V, but closer to correct if using the peep. Thing is, the front sight is better suited for use with the V. Anyway, I don’t seem to shoot well using an aperture sight. Maybe if I practiced more I would do better but I just like what I like and old dog/new tricks and all that…

The target below was shot at 10m with the Model 95 using a Red Ryder spring shimmed 1/2”, a Model 25 shot tube to replace the original worn gravity fed shot tube and the factory Model 95 sights. I took 5 shots, sitting with the forearm resting on my open hand and hand resting on a folded towel. I will do a comparison for accuracy between the old and new shot tubes at a later date but I wanted to see if this gun- as it now sits- had potential for good accuracy. 4 shots were pretty decent, one opened the group up quite a bit. I’m sure I could shoot a better group, but cherry picking a tight group isn’t gonna happen. Instead this is an honest representation of what the gun and I could do on that day. I think the results are encouraging.

DAISY_MOD_95_TARGET1a.jpg
 
I chalk it up to using the new Model 25 shot tube in place of the original gravity fed tube. I'm becoming a real fan of the 25 shot tube- everything I've used it in, including the new production Model 25 I bought for testing, has performed well.

The new Model 25 had the highest MV of the new unmodded guns, and both used guns that I replaced the gravity feed shot tube with a new production Model 25 shot tube have picked up significant MV, all else being equal (one was the '70s Model 104, the other was a mid-'60s Model 95). And the Model 104 is more accurate to boot. It remains to be seen if the 95 with the 25 shot tube will be more accurate than with the original shot tube but considering its age of the 95 tube (just shy of 50 y/o) and the fact the MV picked up with the 25 shot tube, it stands to reason it will be. Anyway, I'll shoot both shot tubes, same day, same BBs and see what happens.
 
Last edited:
I took 0.2" of pretravel out of the Model 95 trigger, it's much better now. Not quite as good as the nice Model 104 trigger, but close. I'll shoot the 95 again for accuracy to compare the original gravity shot tube to the Model 25 shot tube, this time with the trigger adjusted. Won't be today though, way too windy here... :(
 
I came across a "Millennium" model Red Ryder, made in 2000 (obviously). It has no 'Made in China' stamping. It was shooting poorly- velocity was dismal at around 150 fps average and with shots varying greatly. Tore it down completely and found a shot tube that has a seam that's leaking badly (blurry photo below)- light shows through the seam for 3/4 of the length of the tube! Now, on current production Red Ryders, the shot tubes are made using seamless tubing- like you'd expect. No idea of what the shot tube ID is, but it would have to be too large considering the seam being split like it is. Also no idea if this particular shot tube has been tampered with but there was no obvious evidence of this gun having ever been apart.

The Millennium spring is different than current production. It is weaker, about the same spring rate as what originally came in my '70s Model 104. But it's not the same spring- it has different wire OD and different coil count. This may be just a sourcing issue. Different vendors may be supplying springs that are within some percentage of a target specification, or something like that. But the takeaway is the performance would not be as good as a current RR. My hopes that there'd be superior components used to build a Red Ryder in the USA was not looking good.

But then, some good news: The plunger tube is beefier than current tubes- and to me this is a big deal because the plunger tube is the limiting factor to hotrodding these BB guns. So soon I'll be comparing the measurements of the Millennium tube to all the other tubes I have as well as seeing how well it holds up to more spring rate.

And lastly, even though the trigger is the plastic type with a safety, the anti bear trap rack is missing, so to me that's also a plus. In fact I didn't know such a trigger was ever made.

I'm holding a flashlight under the seam while trying to take a photo of the light through the BB-sized hole in the end of the shot tube:

DAISY_2000_SHOT_TUBE_SEAM1.jpg
 
Thats pretty neat that the plunger tube is stronger, should make getti g some extra power a little more doable.
 
That's a fact! I'm starting to believe there's a lot of variation involved with the individual parts that go into these guns. I don't know if Daisy still manufacturers the parts in house (tend to doubt it now that they're made in China) but if they used to be sourced from "lowest bid" vendors, that might explain why there are so many differences in the parts that go into these guns.
 
I just received a nice used Model 96. Out of curiosity I googled the patent number stamped on the barrel shroud- it relates to the powerplant, specifically attaching the air tube to the plunger assembly using a steel pin. Apparently, prior to this the air tube was rigidly mounted. It also mentions using buna rubber for the barrel seal and plunger head in place of leather. The text says the rigidly mounted air tube type powerplant was failing after as few as 6,000 shots, and the leather seals were toast after 10,000 shots! I'm sure this was a worst-case scenario because many of these guns are still shooting using their original parts. Maybe easier manufacturing and assembly using these parts drove the changeover as much as better durability, but either way these changes were pretty major evolutionary steps.

DAISY_MOD_96_US_PATENT_2758586-0_-small.jpg
 
After shooting the Model 95 and 96, It got me again thinking about the 499. Thing is, Pyramyd wants ~$140.00 for a 499 but that’s a bit much for my limited airgun budget even though this includes a better rear sight that sells for $16.00 separately if bought from Daisy ($25.00 elsewhere ;)). BUT- I already had quite a few 499 parts on hand, including a rear sight, front sight inserts, trigger, shot tube assembly, plunger assembly and abutment. (I bought them to see if there was any use for them in any of my modified Daisys- which, other than the rear sight, there really isn’t.) And I had a spare curved metal lever. So being already half the way there I ordered up a receiver, a Boyd-made stock and forearm (these three parts are the bulk of the cost at $17, $23 and $16 respectively), a spring anchor and a screw assortment. Total cost of the parts to assemble a 499 is a little north of $85.00.

I won’t get into the assembly of the 499 because there’s really nothing to it. The only real difference between building the 499 and any other lever Daisy BB gun is installing the abutment. I easily drove it into place using a long wooden dowel. I didn’t bother to stake it as it’s plenty tight as it is. After repeated dis- and re-assemblies it’ll probably loosen, but I don't see needing to remove it any time soon. The plunger spring is so light that it takes no effort to hold it in position to assemble the plunger assembly, and no effort to compress it to install the spring anchor. There’s no air tube so no worries about aligning it through the barrel seal like on the others.

After assembly, I shot it to settle things in. Being a single shot is a downside but even so I still put quite a few Daisy Match Grade Avanti BBs downrange. It's addictive! The lever pull is crazy-easy and the trigger pull is sweet for a Daisy BB gun. The stock feels very good to me. The LOP is much of the reason why, being longer than most other Daisy lever guns I own at 13.5" (same as my 96). The gun has good 'heft' to it as well, thanks mostly to the hardwood stock. The 499 weighs 3-1/4 lbs., the Red Ryder weighs 2-1/2 lbs. in comparison. After breaking it in, I shot a short string through the chrono. The average MV of 6 shots was 235 fps (240 fps advertised), with a close ES of 2 fps. The most interesting thing about this to me is the velocity being that high. I contribute much of this to the tighter shot tube bore. One thing’s for sure- it’s not the spring! The spring used in the 499 is ~50% weaker than current production Daisy lever action repeater springs. Plus the 499 has no air tube (I’ve read that the “pool cue” hit from the air tube supposedly adds 50-80 fps to the MV). So the 499 is just more efficient at using what it has, or so it would seem.

I'm anxious to see what the accuracy is like. It's been rainy, windy and even snowing here in GA for the last week so once the weather cooperates I'll shoot a target or two. Then I plan to swap springs for a new Red Ryder type spring to see what the MV is like compared to a stock Red Ryder. That might be interesting- the potentially more efficient powerplant of the 499 vs. the pool shot air tube action of the RR with equal springs. Hopefully the accuracy will still be good.

Daisy-1_499_12-30-16.jpg
 
Last edited:
I want to thank the Moderators here at THR, first for indulging my many posts in this thread, and also for allowing me to edit older posts to make corrections/additions.

One post that will now be more useful to anyone wanting to order parts from Daisy is HERE. It shows the most recent parts diagrams, and several parts lists now have parts available that were not listed previously, a few of which are listed below.

RED RYDER MODEL 1938B
  • Brass Barrel Band, $2.00. Brass or brass plated, don’t know until one gets here. BTW, the blued band is now listed as “black”- or I think that’s the case, unless they’re now painted instead of blued like they’ve always been. My money’s on it still being blued.
  • Shot Tube Assembly, $4.00. Previously this was available only as part of the “Main Barrel and Plunger”, $12.00.
  • Lever Latch, $0.50. This is the nylon insert used in the new style metal lever. Sometimes missing from used guns.

MODEL 499
  • Upgrade Sight, $16.00. The standard 499 sight (was $3.00, now $5.00) is shown HERE. It gets the job done- and is what I’m using until my current order arrives but adjusting it on the fly is difficult. The upgraded micrometer type sight is a bargain compared to buying it for ~$25.00 from online vendors. There is an even better sight available, but not from Daisy.
  • Medallion, $1.00. Aluminum, embossed with "Official Shooting Education BB Gun by Daisy". NOTE- Not self adhesive, as I said before editing.
  • Trigger Parts, numerous, all cheap. All the individual parts that go into the 499 trigger module are now available. A boon to competitors who modify them, and to folks like me who just tinker a lot!
 
Last edited:
Shot a pair of targets using the 499 today, the one shown is better by a scant margin. The best that I can say is it's not the gun's fault. Still, it's the best I've done using a Daisy lever BB gun. I'll shoot some more targets after I get the "upgraded" aperture sight mounted.


DAISY_499_TARGET_1-13-17.jpg
 
I have a trigger module from a Model 99 (photo #1) and wanted to use it in my 95 because unlike many Daisys that use a 1-piece steel trigger, its trigger is terrible. But I found the modular trigger won't work with a plunger tube made for a steel trigger because of the angle of the rear cross piece that the trigger latches onto. A 1-piece trigger's plunger tube has a "90º" cross piece with a very slight angle at the very bottom to smooth the release a bit, whereas the modular trigger uses an angled cross piece (photo #2). Turns out a Model 499 plunger tube has the correct angle, as do plunger tubes used with the new plastic triggers, it's just that the 499 tube is a bit stronger. But because the 95/96/99 wide frame guns are made with an extended tube/compression chamber that restricts the size of the plunger tube, the 499 plunger tube won't fit into the receiver (photo #3) without modification.

Photo #4 below shows where to remove metal to allow a 499 plunger tube and a modular trigger to work in a wide frame gun that originally used the 1-piece steel trigger and matching plunger tube. The same concept of removing metal applies to plunger tubes that use the plastic trigger (Red Ryder, 105 Buck, Model 10, etc.). Photo #5 shows the modular trigger in place in the junk Model 95 receiver used for this mock-up. As a proof of concept, I used a lightweight 499 spring on the modified 499 plunger tube because it’s easy to install and remove from the receiver. I added an old plunger head and left off the air tube (it’s not like I was going to shoot BBs from it) and I put a used barrel seal in the receiver so the installed dimensions would be the same as a working gun.

I haven’t installed this set-up into my Model 95 yet but judging by the mock-up, the preliminary results are very encouraging. The trigger release is smooth and the reset when the gun is cocked is very positive. The difference in trigger pull weight is dramatic- it feels like it's less than half of what it was. I will measure the trigger pull with my scale before and after and report the results here.

PHOTO #1
M95_MOD_TRGR1.jpg


PHOTO #2
DAISY_1_piece_tube_over_modular_tube.jpg


PHOTO #3
M95_EMPTY_RECVR1a1.jpg


PHOTO #4
499_p-tubes_w-text1A.jpg


PHOTO #5
M95_recevr_w-mod_triger_1A.jpg
 
It’s been a while since I’ve had a chance to work on my spring air Daisys. I’ve been sidetracked by a Daisy Model 74 CO2 rifle. Trying to get 300 fps out of it and it’s not cooperating.

I don’t recall seeing the pull weights of Daisy BB guns posted so I thought I’d do it here for the guns I have on hand atm.
  • Red Ryder #2 plastic trigger, no return spring, replaced sear spring with return spring 1lb 2oz
  • 499 2lb 1oz
  • Red Ryder #1 plastic trigger, no return spring 2lb 12oz
  • 104 steel trigger 2lb 12oz
  • 95 steel trigger 3lb 3oz

I hope to get back to work on the spring guns soon. I have plenty I want to do, including:
  • Add rear return spring to Red Ryder #2
  • Make a Daisy parts order
  • Make a JG parts order
  • Install Model 99 trigger module into the Model 95
  • Refinish 96 stock and forearm
  • Mount optional sights on 499 and retest accuracy
  • Install Red Ryder spring in 499 and retest accuracy
  • Modify 499 buttstock to fit Model 95
  • Mount rear sights to Model 104
  • Make Red Ryder scope mount from an AimSports 12" x 0.031" uncut rail
 
Last edited:
I just received a Model 1105, akin to the current production Model 105 Buck in length. It differs in that it has a plastic stock, an old school removable shot tube and a lever-actuated automatic safety that doubles as an anti-beartrap- but the trigger is not plastic like the 105. Instead, it’s a two-piece all metal affair.

Anyway, I got this gun mainly out of curiosity- I wanted to know what the deal was with this gen 2 trigger, like what is the feel like, can it be tuned for a lighter pull and/or better feel, and was it a better part to use on a modified Daisy that has a stronger spring? Well, it’s every bit as hard to pull as the one-piece steel trigger it replaced, it can be tuned for a lighter pull but not any more easily than the earlier trigger (metal removal required, non-reversible). And it’s no better or worse than the earlier trigger for use with a stronger spring. Plus Daisy uses two springs on the gen 2 trigger, both of which are mounted in the end of the stock. Makes reassembly a pain, but truth be told only the ‘sear’ spring needs to be used. So all in all, no advantage.

The plunger tube and spring is the same as was used in the ‘70s era lever guns like what originally came in my ’73 Model 104, which means the 1105 plunger tube has to be used with one- or two-piece steel triggers (won’t work w/a plastic trigger assembly) and means that the spring is a little weaker than current production. It also means the gen 2 trigger will not work in a new production receiver, even if the plunger tube is swapped for the older style because of the different trigger mounting hole locations.

When I first shot it, the BBs barely made it out of the barrel. Pulled the gun apart and found the abutment/barrel seal stuck to the plunger head- a common occurrence. After pulling the seal and plunger head apart, lubing and reassembling using the same parts it came with I chrono’ed it. It was around 190 fps. On a hunch I removed the original shot tube and screwed in a Model 25 shot tube and chrono’ed it again and got 220 fps- a solid 30 fps increase with no other changes. Every other gun I’ve tried this with, the gun has picked up MV- with no exceptions. Now, this is still lower than what it should be, and it’s not surprising given the condition of the seals. But I’m more of a fan of the Model 25 shot tube than ever!! Resealed, I’d expect this little gun to do 250 fps at least. Swapping out the old spring for a new production spring and a little preload will have it at 320-330 fps, no problem.


Four generations of Daisy lever action BB gun triggers.
TRIGGERS-4A.jpg

1. Early one-piece metal trigger 2. Two-piece metal trigger 3. Early plastic trigger with safety, w/o anti beartrap 4. Newest production plastic trigger having safety and anti beartrap link.
 
To the above triggers, add the "modular" metal triggers found in 'wide frame' guns. The trigger on the left is used in some Model 96 and 99, the one on the right is used in the Model 499B, it's secured by two screws instead of one and has a safety, but otherwise looks similar. The screw and nut seen at the bottom of the 499 trigger is there to hold the pawl in position while out of the gun. It's replaced by a pin that's retained by the inner walls of the receiver when assembled into the gun.

DAISY_MODEL_96-99_AND_499B_TRIGGER_ASSYS.jpg .
 
Thanks again Cobalt for letting us come on this journey with you. I get a kick out of reading and checking out the pictures in each new post :D
 
I installed the new rear aperture sight (p/n 5899) on my ‘built from a parts list’ 499 today. The 499 sights comes in three flavors, this sight is the “better” version. The base version is a simple affair that’s hard to adjust compared to a micrometer type sight. The “best” Avanti sight (p/n 5996) costs WAY more than what I paid for the 5899 sight from Daisy, and is overkill for this application (read- the sight would be wasted on this shooter!)

I sighted it in using standard Walmart zinc plated Daisy BBs. Being cheap, I didn’t want to waste another target on this exercise so I used a black stick-on dot on the backside of the target I had just used. This group would be shot using the good Avanti precision ground BBs. The results are below.

DAISY_499_OPTIONAL_REAR_SIGHTS_2-23-17.jpg

This is the nearest I’ve ever come to a “one hole” group. And if there was ever any doubt as to the value of using the good Avanti BBs in this gun, there isn’t now!
 
Thanks again Cobalt for letting us come on this journey with you. I get a kick out of reading and checking out the pictures in each new post :D
I appreciate that, LoonWulf. If nothing else I figure this thread will answer some of the questions about Daisy lever BB guns that I couldn't find answers for. :thumbup:
 
All, I really appreciate all the research and info on this subject. Thanks!
I have a 1938B that needs the loading gate removed and replaced. What's the trick to this?
Thanks in advance!
hinz57
 
All, I really appreciate all the research and info on this subject. Thanks!
I have a 1938B that needs the loading gate removed and replaced. What's the trick to this?
Thanks in advance!
hinz57
That's a darned good question! There must be a trick to it but I haven't figured it out. I thought just pushing in on the exposed part would allow it to slide out, but I wasn't able to get it toi come out that way. I'm afraid I'll bend the shroud if I get too heavy handed with it so I stopped before anything bad happened. Fortunately I didn't need to replace it, I just wanted to see how it worked.
 
That's a darned good question! There must be a trick to it but I haven't figured it out. I thought just pushing in on the exposed part would allow it to slide out, but I wasn't able to get it toi come out that way. I'm afraid I'll bend the shroud if I get too heavy handed with it so I stopped before anything bad happened. Fortunately I didn't need to replace it, I just wanted to see how it worked.
Yes....I worked on trying to roll it up on itself every way I could see. Ended up breaking the plastic. Really didn't want to damage the metal. When I get the new part, I hope it will be obvious how to insert it. Maybe insertion is possible, but not removal. Thanks!
 
Back
Top