1851 Navy & beginner

Status
Not open for further replies.
I just fired a cap with keeper on! It was quite harder to put a cap on a nipple with keeper already on the cap. When fired, there was no sparks. (Or much much less sparks than from two caps I fired last week.) The cap stayed at its place the same as it was before firing it. Tight and retaining its form.
I'm not joking. Read again. No fragments. No sparks. And I wear glasses, those real glasses almost all my life.
 
Is the top of the cap exposed? Could the top of the cap fly out somehow?
Since you wear glasses, possibly they will protect you. Most safety glasses I've seen have side guards which normal glasses lack.
I still think safety glasses are best, or goggles if they need to fit over the glasses.
Prescription safety glasses are available.
Just protect the eyes somehow, OK?
 
Could the top of the cap fly out somehow?
I don't think so. It has nowhere to fly out. The sides of the cap are completely sealed with a tube. I used vinyl tube, but in a future I'll use silicone tube which is even much stronger. Only the top of the cap is exposed. And that's where the hammer lands. So the hammer prevents it to fly out. I wrote in my report that the top was opened like a can. But not completely opened, not detached. It was more in a form of a crack. When I took that spent cap off the nipple and out of the "keeper" - it looked almost as new! The form intact, except for the crack on the top. Amazingly well preserved, really. So no danger of any bits flying.

I'm off to bed now, thank you all for caring about me, I appreciate it.
 
Last edited:
Ok, now I have a silicone tube, same diameter, 4mm wide inside. Silicone tube is more resistant and durable than vinly tube, while at the same time thinner and softer. Softer means it's much easier to put a cap into a silicone tube than into a vinyl tube. Thinner means it's much easier to put such cap (wearing keeper) on nipple and to pull it off nipple. It wasn't easy yesterday to put a cap on nipple when thick vinyl keeper was on the cap. I'm really starting to like this idea. 1 meter of such tube costs less than $1. I can make 500 "keepers" for $1.50 USD.
 
Damn, I'm doing something wrong, went thru something like 1500 CCI#11's this summer, about 8000 in the past three years or so, Walker, 1860 Army,1851 Navy, Remington NMA, ROA and the Spencer and don't think I used one keeper, all pushed on with the thumb. Did have a couple of "clicks", the 1860 is great for that if I don't set the cap with the hammer, Most of them split, some fell off, some look like 4 petal flowers,the ROA's have to be picked off whole, but all were picked up from the bench put back up into the empty tin and discarded. The 1851 has one odd ball nipple that's a tight fit with the 11.

Just my opinion, these are simple, not complicated pieces of machinery don't overthink it.
 
Well, everyone says that it's very common for spent caps to cause jams. I just want to avoid that. Silicone "keepers" can do that job - to prevent spent caps falling somewhere where we don't want them. That's their sole purpose and they fulfill it, it works. I don't know how often would I have jams, I still haven't fired my revolver. But why not adress the most common and well known problem before it happens?
(And as a positive side effect, keepers keep the cap in one piece in one place when fired, no bits flying around. The downside of that is that it takes time to get them off nipples.)
 
Last edited:
That's why I'd try filing the safety notch on the hammer. If that works there's nothing to fiddle with. And if that didn't fix it I'd try the cap rake.

I don't mind the slow process of loading but I wouldn't really want to add the tedious installing and removing of extras.

But I also appreciate using and enjoy making paper cartridges that sure do speed up the process on shooting day.
 
There is more flying out than cap fragments. I am assuming you were joking about not wearing safety glasses. Spent powder, some still burning flies in all directions along with lead particles and lube, filler, wadding.
Hope you get your permit soon so you can finally shoot your revolver.
 
BullSlinger, I wasn't joking, because I wear glasses all my life, to put another pair of glasses over them won't be very pleasant and pretty, and my glasses will also protect my eyes, right? When you watch Duellist's videos on youtube, he doesn't wear safety glasses over his own glasses. And his glasses are small. I believe he's an expert and that he knows what he's doing. If my own glasses can protect me from other particles possibly flying towards me, then I won't wear safety glasses. If I conclude that my own glasses are not enough, I'll put safety glasses on. I bought them already. Thanks for the warning.
 
Last edited:
how tight is your barrel wedge? Are you able to remove your barrel wedge and barrel w/o tools?
I've decided to at least take the barrel and the cylinder off and then back on, before shooting it when I finally buy powder.
"Tight" is not the word. Not even "glued". The wedge seems to be integral part of the barrel. Yes, it's that tight and I have a problem. I have a mallet and pieces of wood and Ballistol... it won't move even the slightest. Damn wedge spring only makes it harder. Some report on different forums that they're able to push it with a thumb. I don't know would I be able to push it with a chisel and a big hammer.
 
On this keeper thing...... What the keepers do when you just pop the cap is one thing. What the caps will do when the backpressure from the main charge is present is another. Don't commit to the keeper idea until you actually shoot the gun with a full proper charge and ball. You may just find that they are plain and simply a really bad idea. Or more likely that like any other idea there's good and bad.

For myself a big part of my black powder shooting is to try to mimic what the folks dealt with back in the day. So I'm not all that keen on any "new fangled "Ah-Deerz". For me playing with something like cap keepers seems like it would get in the way of this sort of experience.

For the wedge being overly tight first off be sure you are beating on the right hand side of the wedge (just checking just in case :) ) and that the barrel is supported by something firm like a block of wood sitting on a sturdy bench. And that the support is right near the wedge. If you're trying to do this while the gun is in your hand or on thick padding you may not be transferring as much energy as you think.
 
Ok, we'll see about the cap keepers when I shoot the powder. For just poping the caps they're great.
I'm a vintage type of guy - but I want to improve everything I can, not slave to strictly original concept. I'm like that with audio gear, seems I'll be like that with revolvers.
I don't know what to do with this wedge. I have the finest oils (usually use them for my bike), I thought they'll help... but nothing, like it's welded.
I'm reading about the wedge, trying to understand...
https://thefiringline.com/forums/showthread.php?p=2456208
https://www.thehighroad.org/index.php?threads/help-i-cant-remove-the-wedge-on-my-pietta-1851.136624/
 
Last edited:
I've decided to at least take the barrel and the cylinder off and then back on, before shooting it when I finally buy powder.
"Tight" is not the word. Not even "glued". The wedge seems to be integral part of the barrel. Yes, it's that tight and I have a problem. I have a mallet and pieces of wood and Ballistol... it won't move even the slightest. Damn wedge spring only makes it harder. Some report on different forums that they're able to push it with a thumb. I don't know would I be able to push it with a chisel and a big hammer.

I had the same problem with my Pietta 1851 Navy (2014 [CM]) when I first got it. Guido the Gorilla installed it at the factory.

First, don't remove the wedge screw! The sole purpose of it is to catch the lip of the wedge spring upon pushing the wedge out of the arbor. You will only chance marring the screw slot.

With mine, I found a couple of different pieces of wood to support the left side of the pistol to the fore and rear of the pistol barrel on the bench on either side of the wedge to allow the wedge to clear the bench top.

Does the tip of your wedge spring protrude from the right side of the barrel lug? Mine almost did when new and very little of the wedge was showing.

After flooding both sides of the wedge with oil, I used an old plastic screwdriver handle ground flat on one side placed judiciously on the right side of the wedge and severely hit the handle with a large ball-peen hammer. Aim carefully sir! It might move well with a few whacks, and since the wedge is tapered, if it moves you are good to go.

After I got my wedge out I judiciously sanded equally both sides of the wedge (1200 grit paper), fitting it gradually until the tip of the wedge spring protruded past the barrel lug. I then cold-blued those surfaces.

Edit: I am late to the game. BCRider said it much more concisely.

Good Luck!

Jim
 
Last edited:
First, don't remove the wedge screw! The sole purpose of it is to catch the lip of the wedge spring upon pushing the wedge out of the arbor.

Does the tip of your wedge spring protrude from the right side of the barrel lug? Mine almost did when new and very little of the wedge was showing.
I can't remove the wedge screw even if I wanted to, because the wedge blocks it to be removed completely. I know all about that screw, read it long ago and tonight again. Screw the screw now, it's the wedge spring which causes me a headache. I need 3 hands: 1st hand for pushing that spring downwards, because the wedge can't move when the lip of the spring is up, "catching" (holding onto) the right side of the frame; 2nd hand for holding some piece of wood or similar whatever on the wedge; 3rd hand for holding the mallet. Just how everyone did it before me without a 3rd hand is beyond me right now.

The tip of the wedge slightly protrudes on the right side, just like on all the photos I've seen.

Thanks Jim!
 
Last edited:
They didn't wear safety glasses in 1861.

But, there were a whole lot more people running around sporting eye patches.

I have been pelted with enough flying "stuff" while shooting, especially shooting black powder, that I won't do it without wearing proper safety glasses with side shields. If your prescription eye glasses are glass, they could get broken. If they are plastic, then expect them to get pitted and possibly cracked. Some of the stuff flying back has drawn blood from my cheeks, chin, forehead, ears, etc., and I hate to think what would have happened to my corneas if they had been the recipient.

However, your eyes, your choice.
 
I can't remove the wedge screw even if I wanted to, because the wedge blocks it to be removed completely. I know all about that screw, read it long ago and tonight again. Screw the screw now, it's the wedge spring which causes me a headache. I need 3 hands: 1st hand for pushing that spring downwards, because the wedge can't move when the lip of the spring is up, "catching" (holding onto) the right side of the frame; 2nd hand for holding some piece of wood or similar whatever on the wedge; 3rd hand for holding the mallet. Just how everyone did it before me without a 3rd hand is beyond me right now.

The tip of the wedge slightly protrudes on the right side, just like on all the photos I've seen.

Thanks Jim!

1861, don't worry about the third hand for the wedge spring. The lip will move down if the wedge moves to the left. Just hit the darned wedge, hard !

Jim
 
Ok Jim, I'll smack it tomorrow, I'm done with the damn wedge for tonight. Thanks

One more thing. I don't know what the cylinder/barrel forcing cone gap is. If it is very tight (as in no visible clearance), try putting the hammer at half-cock to let the cylinder rotate and to disengage the bolt from the cylinder before you whack the wedge. The bolt may be locking up the cylinder, thus putting pressure on the forcing cone.

Stranger things have happened.

Have a good night and a better next day!

Jim
 
Track of the Wolf sells a brass drift punch that I understand will work for knocking out the wedge. I would look for something similar at your local hardware store made from brass or copper and cut it down myself.
https://www.trackofthewolf.com/Categories/PartDetail.aspx/1041/1/TOOL-KEY-B

Small diameter copper pipe (copper fuel line) crushed in a vice or smashed flat with a hammer might work if you cant get a hold of an empty brass cartridge casing.
A copper coin cut rectangular might work. Copper / Brass won't mar the finish of the gun.


Video - note the barrel is rested on something padded / non-marring:

 
Last edited:
I once had an 1860 Brass frame that the wedge wouldn't budge. I got so frustrated that I smacked it with a framing hammer. Wedge finally came out but boy did it mar finish on the barrel. I now use a hard wood dowel whittled down to proper size. Eventually the wedge and and rest of the revolver wear together and most come out easily now. You may try a plastic or rubber mallet, that may work.

1861 I also wear eye glasses to see and don't wear safety glasses. My outdoor glasses are polycarbonite lenses are are just fine for keeping flying junk out of my eyes.
 
They didn't wear safety glasses in 1861.

But, there were a whole lot more people running around sporting eye patches.

I have been pelted with enough flying "stuff" while shooting, especially shooting black powder, that I won't do it without wearing proper safety glasses with side shields. If your prescription eye glasses are glass, they could get broken. If they are plastic, then expect them to get pitted and possibly cracked. Some of the stuff flying back has drawn blood from my cheeks, chin, forehead, ears, etc., and I hate to think what would have happened to my corneas if they had been the recipient.

However, your eyes, your choice.

You shooting something shaving lead,? Over 50 years of revolver shooting nothing has ever drawn blood, sure have felt little debris now and again and, with auto loaders, more that one shell casing popped off my forehead and glasses, but no blood. I am assuming a poorly timed black powder revolver will shave lead same as any other revolver. Just curious.
Harvey
 
Ok Jim, I'll smack it tomorrow, I'm done with the damn wedge for tonight. Thanks

Lyman has been making these little gunsmith hammers for decades. This one is part of my black powder range kit. One end of the punch, stored in the hammer handle, has been filed down to fit thru the nipple hole in the cylinder, in case of a dry ball or just to unload an unfired chamber. The other end has been formed to use as a wedge punch. Brass, Nylon and steel hammer heads. The punch is soft brass. I also keep one in the center fire range kit.
 

Attachments

  • IMG_3615.JPG
    IMG_3615.JPG
    180.5 KB · Views: 10
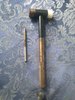
THE WEDGE IS OUT! I'm like a master gunsmith now :p

It was very easy. I was doing it all wrong yesterday, because I concentrated on pushing the wedge spring downwards. I thought that I have te keep that spring down, otherwise the wedge won't be able to move. That's why I thought I need 3 hands, as I wrote a few posts above. That's why I wasn't able to hit it properly, because all the time I was trying to keep the spring pressed down, while at the same time holding the piece of wood on the wedge WITH THE SAME HAND, while hitting (not hard) that piece of wood with plastic mallet in the other hand.

Then Jim The Saviour wrote to me prophetic words of wisdom: "The lip will move down if the wedge moves to the left. Just hit the darned wedge, hard !"

And that was the solution and the whole philosophy of the whole wedge thing - ignore the spring and hit hard! THANKS JIM! :thumbup:
With several very hard blows using the plastic mallet (mine has a head which is larger than on the average plastic mallet), the wedge was out without a problem. In that process I destroyed two pieces of wood which I prepared weeks ago for this purpose. So the wood is not ideal for this, too soft, I'll need something harder.
I will probably order today what you recommended or something similar: https://www.trackofthewolf.com/Categories/PartDetail.aspx/1041/1/TOOL-KEY-B
But I am afraid that this will leave some marks. If I see scratches, I'll go back to wood. If I have to destroy a piece of wood every time, so what?

The lip of the spring caused a tiny damage at the spot where it was forcefully pushed inside when the mallet-blow pushed the wedge. But I guess that was unavoidable, and the damage is really tiny.

It was even more easy to reassamble it. I pushed the wedge back inside with a thumb, but for the last tiny bit (for a lip of the spring to pop-up again on the right side) I gave it a smack with a mallet on the left side and that was it - back in its place again and everything very firm as it was.

I popped a few more caps today, this time with SILICONE rings ("keepers") on them (I tried VINYL ones before). I had sparks normally this time. Milky silicone keepers turned black, but they were undamaged, can be reused. Unlike vinyl tube, keepers from silicone tube don't cause any difficulties when caps with silicone keepers on them are being put on or pulled off nipples. Because they're twice thinner. All spent caps retained their form, with just a small crack on top. It's very easy, fast and smooth to take them off nipples with a tweezers - just catch with tweezers that small protruding piece of the cracked top of the cap.
 
Last edited:
Status
Not open for further replies.
Back
Top