
I like these threads, can't wait to see more, Gunny!
You are using an out of date browser. It may not display this or other websites correctly.
You should upgrade or use an alternative browser.
You should upgrade or use an alternative browser.
Another adventure in stock repair.
- Thread starter GunnyUSMC
- Start date
- Status
-
Not open for further replies.
OP
OP
GunnyUSMC
Member
I have found out over the years that I tend to get sidetracked with different projects. Most often I have too many going on at the same time, and don’t get anything finished.
What sidetracked my this time was the dog. I decided to make my dog a new dog leash from paracord. Once I had it made friends started asking me to make some for them. So I have been busy the last two weeks.

The other night my friend contacted me about the stock and I told him that I would get on it this weekend. I also told him that I was having a little trouble with the front of the stock. He said he was not to worry so much about the way it looked, just as long as it was repaired. Well he knows that I will make it look the best that I can.
The trouble with the front is that after cleaning the stress in the wood caused it to move a little. When clamped the bottom moves a little to one side.
I clamped it from a few different directions and wet it with Denatured Alcohol and let it sit for a few days and it comes pretty close now.

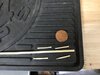
I use bamboo skewers to make my dowels because the resin holds better to them then metal and they are stronger then wood. I had to carve a small skewer smaller to fit the holes.


Getting the resin down into the cracks was done by putting a skewer into the holes I had drilled and force the cracks open. After getting the resin in, I clamped it up tight.
Now to wait for the resin to cure and do a little dressing up to make it look nice.
I should have an update tomorrow.


What sidetracked my this time was the dog. I decided to make my dog a new dog leash from paracord. Once I had it made friends started asking me to make some for them. So I have been busy the last two weeks.
The other night my friend contacted me about the stock and I told him that I would get on it this weekend. I also told him that I was having a little trouble with the front of the stock. He said he was not to worry so much about the way it looked, just as long as it was repaired. Well he knows that I will make it look the best that I can.
The trouble with the front is that after cleaning the stress in the wood caused it to move a little. When clamped the bottom moves a little to one side.
I clamped it from a few different directions and wet it with Denatured Alcohol and let it sit for a few days and it comes pretty close now.
I use bamboo skewers to make my dowels because the resin holds better to them then metal and they are stronger then wood. I had to carve a small skewer smaller to fit the holes.
Getting the resin down into the cracks was done by putting a skewer into the holes I had drilled and force the cracks open. After getting the resin in, I clamped it up tight.
Now to wait for the resin to cure and do a little dressing up to make it look nice.
I should have an update tomorrow.
Attachments
OP
OP
GunnyUSMC
Member
Don’t think I’ll have to worry about that.Watch out Gunny! What if that bamboo starts growing?? My wife says bamboo stuck in the ground will sprout.")
OP
OP
GunnyUSMC
Member
I was able to dress up the repairs yesterday, but got tired up with other things and didn’t have time to post pics.
So here they are bright and early this morning.
Here it is after removing the clamp.


And here it is, along with the tools used, I used to dress it up.
I still have to clean out the band spring channel.


I gave it another inspection and found a crack I missed. Bit it will be a quick fix and then I can start on fitting the front band.

So here they are bright and early this morning.
Here it is after removing the clamp.
And here it is, along with the tools used, I used to dress it up.
I still have to clean out the band spring channel.
I gave it another inspection and found a crack I missed.
Bit it will be a quick fix and then I can start on fitting the front band.
OP
OP
GunnyUSMC
Member
While cleaning and allowing the crack I found, I discovered that there was some glue from the old repair in the magazine tube. When I had first looked at it, it appeared that there was a linear in the tube, but there wasn’t. It was just some glue. If left in the tube it could cause feeding problems.
I didn’t have a long enough rat tail rasp to reach it so, I made a little sanding rod from a wood dowel. I used 80 grit paper. I chucked it up in my drill nd it cleaned up in a few minutes.


I decided to go ahead and fit the band springs. I had to clean the resin from the front channel, which didn’t take long.


The rear spring channel was not going to be that easy. I drilled the hole through the repair using the hole on the opposite side as my guide. I then put the band spring in place and marked the area that needed to be removed.


Using a few wood carving tools the job went pretty quick.


Now I think I’m going to take a break and get back to the stock later today.
I didn’t have a long enough rat tail rasp to reach it so, I made a little sanding rod from a wood dowel. I used 80 grit paper. I chucked it up in my drill nd it cleaned up in a few minutes.
I decided to go ahead and fit the band springs. I had to clean the resin from the front channel, which didn’t take long.
The rear spring channel was not going to be that easy. I drilled the hole through the repair using the hole on the opposite side as my guide. I then put the band spring in place and marked the area that needed to be removed.
Using a few wood carving tools the job went pretty quick.
Now I think I’m going to take a break and get back to the stock later today.
il.bill
Member
Thank you for sharing, Gunny. This thread is sweet!
I feel ALMOST inspired enough to try a little project of my own - maybe just a few more of your pictures and explanations will be enough to get me started ...
I feel ALMOST inspired enough to try a little project of my own - maybe just a few more of your pictures and explanations will be enough to get me started ...
OP
OP
GunnyUSMC
Member
I got back to work on it yesterday and this is where I am.
The front end of the stock was on bad shape with all the cracks, missing wood and being very thin.
Here’s a pic of the fore end next to my rifle.

After fixing the front I’ll have to fit the front plug .

To build up the front and make it stronger I used fiberglass cloth and thick paper.
The resin will soak into the paper, making it just as hard as wood.

First was to coat the area with resin then apply the fiberglass cloth and then the two strips of paper.
I would have taken more pics but my finger tips were covered in resin and I was on a time line.

To hold everything in place I wrapped it with wax paper and taped it in place. There was no need for clamps.

Here it is after removing the wax paper. Now all I need to do is dress it up and fit the nose cap.


The front end of the stock was on bad shape with all the cracks, missing wood and being very thin.
Here’s a pic of the fore end next to my rifle.
After fixing the front I’ll have to fit the front plug .
To build up the front and make it stronger I used fiberglass cloth and thick paper.
The resin will soak into the paper, making it just as hard as wood.
First was to coat the area with resin then apply the fiberglass cloth and then the two strips of paper.
I would have taken more pics but my finger tips were covered in resin and I was on a time line.
To hold everything in place I wrapped it with wax paper and taped it in place. There was no need for clamps.
Here it is after removing the wax paper. Now all I need to do is dress it up and fit the nose cap.
Exceptional job and great pictures. Interesting use of kraft or construction paper and resin. I've used wood hardener resin (Minwax) for impregnating some cloth substances to strengthen a furniture repair but never thought about paper as a substrate for the resin where thinness is required. Thanks for the tip.
OP
OP
GunnyUSMC
Member
When I got home today I decided that if I didn’t start on the stock right away, I just wouldn’t find the time later. So within 10 minutes I was in the shop with stock in hand.
Here’s a pic of the front magazine plug that needed to be fitted.

A quick dress up with a bastard file and a Dremel tool.

I used a round rasp to shape the inside of the magazine tube. It only took a couple of test fits before I got it in with a snug fit.


All in all it really wasn’t 5hat hard to get everything fitted.


Here it is with all the repairs done.
I called my friend to let him know that I had it finished. We talked about the finish and decided that he would do that at the same time as the buttstock. I told him that I would do a little blending with stain to help even the color before I ship it back to him and that I would have it shipped no later then Friday.
I’ll do the stain blending tomorrow and take some more pics.


Here’s a pic of the front magazine plug that needed to be fitted.
A quick dress up with a bastard file and a Dremel tool.
I used a round rasp to shape the inside of the magazine tube. It only took a couple of test fits before I got it in with a snug fit.
All in all it really wasn’t 5hat hard to get everything fitted.
Here it is with all the repairs done.
I called my friend to let him know that I had it finished. We talked about the finish and decided that he would do that at the same time as the buttstock. I told him that I would do a little blending with stain to help even the color before I ship it back to him and that I would have it shipped no later then Friday.
I’ll do the stain blending tomorrow and take some more pics.
OP
OP
GunnyUSMC
Member
When using stain to blend a finish, Alcohol base dyes work best.
You always want to star light because, you can always go darker.
I got out the Chestnut Ridge, medium brown and black.

I started with the medium brown, which has red in it, and it matched up great.
When applying the dye, I just dip my finger into the bottle, using gloves, and rub it into the ares. The longer you let it sit on the wood the deeper it will soak in and get darker.
If it had needed more red, mixing a little Chestnut Ridge with the brown would have worked. If a darker brown would have been needed, adding a little black to the brown would get it done. If you do mix your dye do it in small cups and remember that a little goes a long way.


I decided not to add age to it because it matched up pretty good. But to add age is not hard. You just cut black with some Denatured Alcohol to make a wash. Rub it over the area and then wipe it off.
I hope that y’all enjoyed this little adventure as much as I did.
You always want to star light because, you can always go darker.
I got out the Chestnut Ridge, medium brown and black.
I started with the medium brown, which has red in it, and it matched up great.
When applying the dye, I just dip my finger into the bottle, using gloves, and rub it into the ares. The longer you let it sit on the wood the deeper it will soak in and get darker.
If it had needed more red, mixing a little Chestnut Ridge with the brown would have worked. If a darker brown would have been needed, adding a little black to the brown would get it done. If you do mix your dye do it in small cups and remember that a little goes a long way.
I decided not to add age to it because it matched up pretty good. But to add age is not hard. You just cut black with some Denatured Alcohol to make a wash. Rub it over the area and then wipe it off.
I hope that y’all enjoyed this little adventure as much as I did.
Last edited:
OP
OP
GunnyUSMC
Member
Fit liquid dye is great when you want a water base dye. It drys dull and has to be buffed with 0000 steel wool, just until you see the wood grain. But you have to make sure the wood is oil free.Gunny, what is your opinion on Rit liquid dye vs leather dye or even Rit powder dye? I remember you also used Rit in stock projects.
The Rit powder is great for making your own alcohol base dye with Denatured Alcohol. You just need to use a coffee filter to strain it.
There’s a finish that I use to make Birch look close to Walnut, using Rit liquid brown, BLO and brown leather dye. It’s done in 4 steps.
#1 Apply the Rit brown to the stock and let dry. Buff with steel wool until wood grain starts to show.
#2 Apply a good coat of BLO. Let stand 30 minutes and wipe dry with a clean dry rag.
#3 After wiping the BLO off the stock apply the brown alcohol base dye. Let it sit from 15 to 45 minutes, depending on how dark you want it to be.
#4 Apply BLO and let stand for 30 minutes then wipe down with clean rags.
A lot of color will come off when you wipe it down so have extra rags.
Let it sit for 5 to 10 days to dry before applying and type of top coat. To see if it is dry, just wipe it a little with a rag. If any color comes off, it’s not dry yet.
- Status
-
Not open for further replies.
Similar threads
- Replies
- 13
- Views
- 2K
- Replies
- 21
- Views
- 944