James Fonteneaux
Member
With some hesitation I'm about to share the following story, mainly because it illustrates me being a bonehead, but hopefully it will help someone else from making the same mistakes. Let me say up front that I do not have pictures of the failure, I'm working on getting them and will post them when I can.
So after assembling a few ARs, I decided to try my hand at something else. I chose a Glock 20 style build using a polymer 80 lower with aftermarket parts to complete the assembly. (I'm not going to name the supplier here, PM me if you're interested.) So here is the first lesson, from a financial standpoint, I'd have been better off just to have bought the pistol I wanted to start with.
I get all the parts (finally) and begin to assemble them. I measure twice and cut once, as they say. The frame seemed to fit tight in the jig, the holes were drilled clean, the extra material was removed cleanly, filed then sanded down. I assembled the component parts which consisted of the aftermarket lower completion kit and the cerakoted slide and upper parts completion kit/sights. Upon attempting to cycle the slide, it would stick. Not a little, full on locked up. Remove the backplate from the upper and pull the guts out stuck. Most of the time I ended up removing the pins from the frame to remove the slide. I did this multiple times, getting increasingly pissed each time. Lesson #2, when you get frustrated, put it down until you calm down.
This leads to my most heinous error which was taking a hammer (gasp, really? Oh yeah, see above) to the pins to "aid" in their removal. Mission accomplished. What I also accomplished, and wish I had a picture of, was cracking the frame along the wall between the magazine well and the trigger module location. Thereby allowing the frame to flex and the trigger not to reset properly, thereby sticking the action repeatedly.
After several days of dealing with this, I finally found the problem and ordered a replacement frame from the same vendor I'd bought the rest of the parts from. It came in and almost slid right on, but the slide rails were too tight and it bound up. Some oil, a very small amount of work with the file, and lots of slide manipulation, and the gun will fire and cycle....sometimes. I've been working the slide several times a day while I get more ammo, and I'm ready to test it out tomorrow. So far there's been 50 rounds fired through it, most of which I had to smack the slide back into battery. As of now the slide seems to work normally (like my Glock 19 and 22), but time will tell.
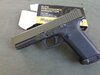
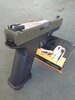
So, lessons learned... Leave the hammers for driving nails or shaping steel. Calm down and walk away. Buy what you want from the factory, and if you can't (or won't) do that, expect issues. That being said, I've learned an awful lot about how a Glock goes together, and now I have one that's one of a kind. I'm ready for the flames I may face by posting this, but I feel like it's important to do right now with all of the new people getting in to guns and maybe taking the 80% lower route. I'm pretty sure that my jig flexed when I was drilling the trigger pin holes and that was the root of the issue. My impatience certianly didn't help. Here's some pictures of the finished product, with a 7 yard target.
Edited to add, Mods please move this if it's in the wrong place
So after assembling a few ARs, I decided to try my hand at something else. I chose a Glock 20 style build using a polymer 80 lower with aftermarket parts to complete the assembly. (I'm not going to name the supplier here, PM me if you're interested.) So here is the first lesson, from a financial standpoint, I'd have been better off just to have bought the pistol I wanted to start with.
I get all the parts (finally) and begin to assemble them. I measure twice and cut once, as they say. The frame seemed to fit tight in the jig, the holes were drilled clean, the extra material was removed cleanly, filed then sanded down. I assembled the component parts which consisted of the aftermarket lower completion kit and the cerakoted slide and upper parts completion kit/sights. Upon attempting to cycle the slide, it would stick. Not a little, full on locked up. Remove the backplate from the upper and pull the guts out stuck. Most of the time I ended up removing the pins from the frame to remove the slide. I did this multiple times, getting increasingly pissed each time. Lesson #2, when you get frustrated, put it down until you calm down.
This leads to my most heinous error which was taking a hammer (gasp, really? Oh yeah, see above) to the pins to "aid" in their removal. Mission accomplished. What I also accomplished, and wish I had a picture of, was cracking the frame along the wall between the magazine well and the trigger module location. Thereby allowing the frame to flex and the trigger not to reset properly, thereby sticking the action repeatedly.
After several days of dealing with this, I finally found the problem and ordered a replacement frame from the same vendor I'd bought the rest of the parts from. It came in and almost slid right on, but the slide rails were too tight and it bound up. Some oil, a very small amount of work with the file, and lots of slide manipulation, and the gun will fire and cycle....sometimes. I've been working the slide several times a day while I get more ammo, and I'm ready to test it out tomorrow. So far there's been 50 rounds fired through it, most of which I had to smack the slide back into battery. As of now the slide seems to work normally (like my Glock 19 and 22), but time will tell.
So, lessons learned... Leave the hammers for driving nails or shaping steel. Calm down and walk away. Buy what you want from the factory, and if you can't (or won't) do that, expect issues. That being said, I've learned an awful lot about how a Glock goes together, and now I have one that's one of a kind. I'm ready for the flames I may face by posting this, but I feel like it's important to do right now with all of the new people getting in to guns and maybe taking the 80% lower route. I'm pretty sure that my jig flexed when I was drilling the trigger pin holes and that was the root of the issue. My impatience certianly didn't help. Here's some pictures of the finished product, with a 7 yard target.
Edited to add, Mods please move this if it's in the wrong place


")