Multiple cracks in Rem Mod 7 stock

Status
Not open for further replies.
Would PVA work? Correction to PVA not POA

It's a water soluble wax that can be brushed on and washed off with water or pealed off. It's used with polyester resin & Gel coat to make it set, seals off the oxygen.
 
Last edited:
POA? I wonder what that is. How can any wax be water soluble? Please supply more info, such as the maker, etc.
Other than that, if the wood is truly case-hardened then nothing applied/infused afterward will help, unless the infusion fully soaks into the entire wood mass.
 
I got the acronym wrong it should be PVA, Polyvinyl alcohol. It's used to cure un-waxed Gel coat,. most gel coat comes with it mixed in it. When applied it comes to the surface and seals it from oxygen. When you use the un-waxed you can apply coats day's apart and it will bond to the lower coat, Once you apply the PVA it cures within a couple of hours.
 
POA? I wonder what that is. How can any wax be water soluble? Please supply more info, such as the maker, etc.
Other than that, if the wood is truly case-hardened then nothing applied/infused afterward will help, unless the infusion fully soaks into the entire wood mass.
I’ve never used it. I just use furniture past wax.
I had another long day, looks like tomorrow before I’m able to post more on the repairs.
 
Sorry about the delay, just been pretty busy the last few days.
But lets jump into this.
Here are the critical points that need to be addressed. Since I don’t have the stock in hand these points may very a little. I like to use a 7/32”or a 3/16” bit for drilling the holes. You don’t want your dowels to fit tight. You want epoxy to fill in around them. What this does is give the epoxy a 360 degree hold on the area and not just the thin area between the crack.
FD7BBBBF-E536-4D3E-B2F6-5588AF3B6EF2.jpeg

Here’s the right side and the left rear. The front two may need to go in from the top of the stock, unless there’s enough meat on the inside. These holes need to be drilled down past the crack a 1/4 of an inch or more. The front one should be just forward of the end of the crack. This is to stop the crack from running. The second one is basically an anchor. The one on the right rear is at an angle and will reinforce the area.
The rear left needs to be drilled at an angle going into the wrist. I would use a 7/32” bit for this area.
B526D141-DDF5-4AC7-9203-DE5E63BFF2CD.jpeg
888B7377-DACA-4B26-AA5C-364D4EAFA552.jpeg

To add a little more reinforcement you can drill two holes from the trigger guard area into the stock. You could use a 1/4” bit and drill at an angle on both sides of the rear stock bolt hole.
258D0215-44F4-4C92-AE8F-739B41B3CFDE.jpeg 6884D3F6-0986-4511-B1A5-D2B448328329.jpeg
let me know if I missed anything, or if I need to cover something a little more.
 
Questions,

Would it be better to put one hole on each side of the bolt slot, closer to where the crack started from? I know doing so the repairs would show due to location. I do have some black and brown die pigment for the epoxy I can use to tint the epoxy with.

With the loose piece at the left rear? Would you remove loose piece to drill, and install to cover?

When you go to epoxy every thing do you spread the joint if it moves to force epoxy into it before clamping and inserting the fiber glass wrapped dowel. Do you find it easier to fill the hole with epoxy and then use the dowel to force the excess out? I have some fiber glass matting that I can use to strip out some glass for wrapping around dowel.

With the West System Epoxy they always recommending wetting the wood first, since it will soak it up to prevent starvation. Which I will do where I can. This just makes a stronger joint.
 
Last edited:
This lower crack runs vertical and not across. The corner of the piece that comes out is where it comes up through. Running mainly vertical dowels is not going to contact it back at the tang. So we may need to look for a better approach. The one on the side around the brass screw will intersect the pieces, but it get thinner toward the neck. Going vertical will connect the broken piece into good wood.

index.php


index.php
 
That’s a bunch of questions at one time :rofl:
But I’ll do my best to address them. :)
For the crack at the bolt handle cutout. You can drill on both sides of the cutout and still hide them. There should be enough wood on the inside to drill into. The only problem is that it’s a curved area. To drill straight down you will have to start at an angle and straighten out as you drill. Here’s a couple of pics of me drilling such a hole. BC1452DD-2BD7-4351-B575-A3535FC16970.jpeg
c 7D535B62-3799-4EFB-8D6D-B0DE17475435.jpeg
F51541FD-8B22-4BDA-903A-DAFAE48617DE.jpeg

There’s also another option to reinforce the area, and that is by removing some wood and laying in some fiberglass as in this pic.
D9911983-405A-4CFD-A2AA-A1E72DA96F64.jpeg

I think that the dowels would be best.

I have found it easier to hide repairs when the epoxy resin it clear.
If the dowels do show, do not stain them. The end grain will soak up the stain and become very dark. You can make cross grain wood plugs and use them to hide the repair, but let’s wait to cover that if it is needed.
Most often I drill all the holes for the dowels before I apply the epoxy. I then fill the holes with epoxy, ant some along the cracks, and then flex the cracks to get the epoxy into them.
The apply a little more epoxy in the holes and insert the dowels. Some times you will have some air in the holes, but if you wiggle the dowels as you push them in, the air will come out.
Now for the area ( left rear) where you have loose pieces. I would epoxy the area before drilling the hole. After the epoxy has cured, you can drill into the area and epoxy in a dowel for reinforcement.
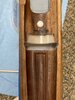
Now for the crack down by the brass screw.
Drill into the stock from the top curved area, down past the crack. You could also remove some wood along the cracks on both sides of the dowel and fill with epoxy in a second step to the repair.
6800153F-5D1F-4276-8A7D-D0C948453AF3.jpeg

If I missed something, let me know :thumbup:
 
Is it necessary to use fiberglass around the dowels? I know you holes will be large enough to handle it without any problems.

All right figured out how to get the glass around the dowel, so I will use it.

I'm using https://www.westsystem.com/ I have 105 resin, 205 and 206 hardners. Will be using the 205, slow set hardner. I also have 404, 405, 406 fillers to thicken the epoxy. This epoxy when freshly mixed will self level very quickly, it's very thin so it penetrates the wood very easily.

My plan right now is to address the loose piece and crack the best I can with just the epoxy, then clamp the side to make the joint tight as possible. At the same time I will put the dowels on the right side, allowing every thing to set. Then I will use the 406 filler to thickened the epoxy and fill in the voids up the sides. This is what it's designed for. I had wood chip out around the bolt handle opening. So I will use the thickened epoxy to fill every thing in. I will also use it where I routed out the crack on the inside as a fillet.

The 404 sets up like liquid steel. It's main usage is for mounting hardware, where screws can not pull out. It's like liquid metal and works extremely good. I will use this for the pillars and the horz impact surface.
 
Last edited:
Made some progress this morning. Got the right side epoxied with fiber glass wrapped dowels. Glued in the loose piece and the main lower crack. I broke out the side drilling a couple hole, but not bad. As bad as this stock is beat up it will not matter.
IMG_3466.jpeg

IMG_3467.jpeg

The epoxy without the 406 thickening agent is clear. I added the thickened epoxy to the top once I was sure all the bubbles were out and the hole full. Glued in the loose piece and every thing is clamped. Will take 8 hr for the epoxy to hardened on the thin joints. The holes were starting to set a little over an hour in, due to thickness.

IMG_3468.jpeg

Now for my question.

The lower crack ends where the brass screw is. Going 1/4" past the end of the crack will have the drill breaking through. I don't want to drill into the screw, I don't see a way to drill the end of the crack without drilling through. If I'm going to drill through I think it might be better to just go up from them bottom since its going to show. So GunnyUSMC with your experience what is my best plan of attack?

index.php
 
Drill two holes into the curved area from the top. There’s enough wood there. Then remove some wood from the side of the Mag well and lay in some fiberglass. This will reinforce the area and prevent future cracks.
E775F584-F505-4EBC-9EE7-0E7E3AD5EFA0.jpeg

After the repairs are done, glass bedding will reinforce the rear area.
 
To help hide the dowel that will show on the right side of the action, make a cross grain plug.
Here’s some pics showing one.
AF0AFBCD-B71D-4A16-BB42-87335BA7C1F2.jpeg 03EDBF57-5AC0-486B-B1EB-F87E33E8D6CC.jpeg

A Forstner bit is used to counter sink the top of the dowel.
FB35F8D2-2F7A-49D7-A6F7-9A1D29D7F8D1.jpeg

Use a plug cutter to cut a plug from a piece of similar color walnut.
D245BD8B-1482-4927-9C99-EF7985F8E722.jpeg 45C827B5-CC2F-46C7-8F8A-FC9DB714426D.jpeg

Aline the grain with the stock and epoxy in place.
A63B795F-ED3E-4B7C-B1E7-C473136A7439.jpeg

Once cured, shave smooth and stain to match.
0A190EEC-6317-446F-A5A8-554CA04F7772.jpeg

C4161010-7C5A-40CE-A4E0-C9AE051C0F0A.jpeg 911C983F-87A4-4FE5-8E91-15ED736B7C0F.jpeg
 
Great learning process.

Good glue, proper repairs, clamped tight, refinish.
What was "kindling" is a very shootable stock.

Have done a couple and the work is enjoyable. The satisfaction upon completion is immeasurable.
 
Drill two holes into the curved area from the top. There’s enough wood there. Then remove some wood from the side of the Mag well and lay in some fiberglass. This will reinforce the area and prevent future cracks.
View attachment 1024787

After the repairs are done, glass bedding will reinforce the rear area.

That will work. I will have to get a plug cutter. I have some walnut laying around to choose from.
 
What kind of finish is on this Rem 7 stock? If I recall the mfg date was in the 70's maybe earlier.

What stripper is needed to remove it for refinishing the stock?

What would you recommend for a finish? Remember this is a truck gun so it will get banged around.
 
Polyeurethane

Hi end paint store should have gym floor quality.
Can't get much tougher.

I wouldn't strip it. Hand sand with 400 grit, buff with 00 steel wool, then 0000.
Brush or spray. 48hr dry time
Buff with 0000
Repeat
Repeat
Repeat

4 coats, can do more, if you want.
I put 7 on Dad's golf clubs.

If you don't want the Hi-gloss, get Satin finish or do a 5th coat and buff out shine with 0000.
 
Use a medium grade stripper that takes 30 minutes to remove a finish. Just don’t let it sit on the repairs.
Like @Speedy Character side, a poly finish with hold up to rough use better than most finishes. But I’m an oil finish type of guy.
 
Made a little more progress. Worked on the left side where the major crack is. Will let this set till tomorrow so it's fully hardened. This epoxy says 10-15 hrs since I used the slow hardener. The beauty of this is I have a long working time, 60+ min. Gives the air bubbles time to workout. The thick sections around the dowels sets up first, in about 30-45 min. Tomorrow I will address the wrist section. Haven't decided if it's going to be needed. The center section of the neck is solid, it's the outer/sides where things cracked and split. The outsides I addressed with the dowels. Need to do a inlay of glass to reinforce the area where I have problems getting dowels into. Then onto the pillars.

IMG_3470.jpeg IMG_3469.jpeg

Would you install metal pillar post or epoxy ? I can do either without much trouble. The metal post would be a little less work since the rear one is chipped out in the front.

index.php
 
Making some progress on this badly broken stock.
IMG_3471.jpeg IMG_3475.jpeg IMG_3476.jpeg IMG_3484.jpeg

Found that this barrel was set to far forward in the stock, loading the rear pillar, so I moved it back about 1/64" when I set the Horz impact block. In doing so I discovered the radius channel in the stock does not match the receiver. So the receiver was only being held by the 2 pillar screws and support in a very thin center area.
IMG_3480.jpeg IMG_3480.jpeg

Now in the process of doing this I discovered a couple more cracks. The big on the left side is carried all the way through to the front pillar block.
Another crack found.jpeg

I'm going to cut this down and do a fiber glass inlay then make the front pillar support with High Density Filler (404) with the west System Epoxy. This is what I used for the horz impact surface. This will cover the inlay up and it will never bee seen. At the same time I will do the rear and down the side to give it full support. I will tint the epoxy so it will blend in with the blue receiver and wood.

Since this crack is extending forward I'm going to add some fiber glass bands in the forearm too for reinforcement. May be over kill but this being a truck gun it gets banged around.

I cheated a little cutting the front horz support, I used my end mill. Made it easy to clean up afterwards.
IMG_3473.jpeg

GunnyUSMC if know of a better way that will work I'm open for suggestions.
 

Attachments

  • IMG_3483.jpeg
    IMG_3483.jpeg
    128.3 KB · Views: 3
Status
Not open for further replies.
Back
Top