Aged Leather

Status
Not open for further replies.

CraigC

Sixgun Nut
Joined
Jan 27, 2006
Messages
23,833
Location
West Tennessee
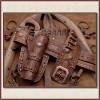
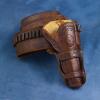
About three or four years ago, I decided to start experimenting with aging my leather. I wanted to do a wide money belt and several holsters for various guns to match. I did both .45 pistol and .38-55 rifle cartridge loops and even aged a set of dummy cartridges for photography, though I never took a picture of the belt before today. Later on I did a pair of Single Six holsters to go with the belt but the color was a good bit lighter, as I had transitioned to dip-dyeing.

003b_6.jpg

001b_3.jpg
 
What do you do to age them? Antique, maybe sand paper? You dip dye, do you also darken some areas with a dauber or anything?

@CraigC , I'm sorry for the questions, but I'm a huge fan leatherworkers in general, and I'm very sure you're aware that every artist has their own methodology on how to get their wanted results.

Keep up the great work, definitely keep posting it. Actually, seeing your work pushed me to make my first Slim Jim, so I look forward to seeing what else you inspire me to make .
 
index.php


Close but not quite. The scratches and cuts on the leather is what gives it character. This belt & holster is over 100 years old.
 
I have soft spot for aged brown leather. Not black, saddle brown. Beautiful work my friend.
 
What do you do to age them? Antique, maybe sand paper? You dip dye, do you also darken some areas with a dauber or anything?

@CraigC , I'm sorry for the questions, but I'm a huge fan leatherworkers in general, and I'm very sure you're aware that every artist has their own methodology on how to get their wanted results.

Keep up the great work, definitely keep posting it. Actually, seeing your work pushed me to make my first Slim Jim, so I look forward to seeing what else you inspire me to make .
Thanks for the kind words! For starters, I don't oil until it's all over with. I want the leather dry. The alcohol based dyes help with that but then I usually dry it further with acetone. Then I start doing the inhuman act of folding it in several places, in both directions to get cracks and wrinkles. Then I put the gun back in it and start taking it off the high spots. Steel wool works best but leaves a lot of nasty dust. I also use Scotchbrite pads and sanding sponges. When I'm satisfied with it, I'll slather it in extra virgin olive oil and let it sit. Then I'll start the sealing/finishing process with gum trag. With it still damp, I'll start buffing. Sometimes I stop there, the two Single Six holsters above only have gum trag. Or I'll go a step further and finish with another product like Bag Cote or Tandy's professional water-based finish, which is actually really good. Don't think they make it any more either. I'll let that completely dry and buff it again. Buffing after aging is what creates the burnished look, like lighter and darker colors in the high and low spots.

Or I will completely finish the holster and 'then' start roughing it up. Then it just looks worn and somewhat neglected.

002b_1.jpg
 
That belt looks incredible. How did you dye it? What are the advantages of dip dying?
Thanks! That belt was done the old way, with a rag and undiluted dye. Same for the top holster and the one above this in post #7. That's why they're so dark.

I used to dye and finish the inside, then put one coat on the outside, then assemble the holster. Then I would dye it once or twice more when it was assembled. Then I'd have to let it dry and then wet it with water to wet form it, then let it dry again overnight. Not only does dip dyeing result in a much more consistent application of color, it also saves me a lot of time. I can not only dye the assembled holster all at once, with a single application but I also wet form it while it's wet with the dye. I dilute the dye 4:1 with denatured alcohol, so the dye goes a lot further. Because it's alcohol based, it dries in just a couple hours. Then I can proceed with the finish work. Now the only overnight drying is after I tool the leather, because I can't stitch it while it's the least bit damp.
 
Well, Craig, my first impression is: "Why in the world would anyone WANT a brand new holster/belt that looks old?"

Me, I want my belt, boots, and holsters to look brand new when new. Same thing as for the current practice of "ageing" new revolvers. I want the wear to be the wear that I put on there myself. A case of to each his own, I reckon.

This holster is one I made over forty years ago and has seen considerable wear:

img4096.jpg_zpsnjsga703.jpg

100_0010_zpsc6b79a2b.jpg

These photos made over forty years apart.
 
That's easy, Bob. People love old stuff. Old cars, old guns, old buildings, old homes, old furniture, old watches, old tools, you name it. People love old stuff and they love the rich, natural patina that only comes with age and honest use. However, it's a double edged sword. That old stuff is old. It's expensive, collectible and often fragile. You can suck it up and pay thousands for a rare collectible. A decent blackpowder Colt may cost you $5000. I don't even know where you'd go to find an original F.E. Meanea gun rig but they don't grow on trees. You'll be taking your chances with literally thousands of dollars worth of rare collectibles that could fail at any moment. Or you could just concede that you'll have to get a new gun and a new rig and let them age naturally, which if you want it to look like a blackpowder relic and you don't live on a horse every day, will never happen in your lifetime. Or you can contact someone like the late Chuck Burrows and have him make you an aged rig that looks the part, is made exactly how you want it, fits you and your gun and costs a fraction of an original.

I like my new leather but it just doesn't scratch the same itch. Because these days everything is slathered in resolene, it is also not going to age like the old stuff did. This El Paso rig will never look like the WRTC rigs below. My oldest EPS rig is over 20yrs old and looks more like this.....

005b_2.jpg

...than this. The EPS rig above also came off a store rack with a bunch just like it. The WRTC work below is all one of a kind. Without the aging, the appeal would be totally different.

IMG_0046b.jpg

Gunrig%201880s%2008-1%20image%202%20of%203_1.jpg

Same for guns. These $500 Uberti's have 99% of the appeal of an original Colt relic at a 10th the cost and none of the internal wear or risk of ruining a 150yr old historical artifact.

IMG_0312b.jpg
 
Thanks for the kind words! For starters, I don't oil until it's all over with. I want the leather dry. The alcohol based dyes help with that but then I usually dry it further with acetone. Then I start doing the inhuman act of folding it in several places, in both directions to get cracks and wrinkles. Then I put the gun back in it and start taking it off the high spots. Steel wool works best but leaves a lot of nasty dust. I also use Scotchbrite pads and sanding sponges. When I'm satisfied with it, I'll slather it in extra virgin olive oil and let it sit. Then I'll start the sealing/finishing process with gum trag. With it still damp, I'll start buffing. Sometimes I stop there, the two Single Six holsters above only have gum trag. Or I'll go a step further and finish with another product like Bag Cote or Tandy's professional water-based finish, which is actually really good. Don't think they make it any more either. I'll let that completely dry and buff it again. Buffing after aging is what creates the burnished look, like lighter and darker colors in the high and low spots.

Or I will completely finish the holster and 'then' start roughing it up. Then it just looks worn and somewhat neglected.

View attachment 1054231


Nice work!
Just curious Why do you use olive oil rather than the many other oils for leather?
 
Awesome work. And a great conversation.

My work isn't nearly as good. I have problems getting the edges to burnish good. What I've tried is wetting it with water and rubbing with a cloth, or a stick, or another piece of leather. I get a good burnish on some parts, and a whiskered / porous edge in other harder to reach spots. Any tips there?
 
That's easy, Bob. People love old stuff. Old cars, old guns, old buildings, old homes, old furniture, old watches, old tools, you name it. People love old stuff and they love the rich, natural patina that only comes with age and honest use. However, it's a double edged sword. That old stuff is old. It's expensive, collectible and often fragile. You can suck it up and pay thousands for a rare collectible. A decent blackpowder Colt may cost you $5000. I don't even know where you'd go to find an original F.E. Meanea gun rig but they don't grow on trees. You'll be taking your chances with literally thousands of dollars worth of rare collectibles that could fail at any moment. Or you could just concede that you'll have to get a new gun and a new rig and let them age naturally, which if you want it to look like a blackpowder relic and you don't live on a horse every day, will never happen in your lifetime. Or you can contact someone like the late Chuck Burrows and have him make you an aged rig that looks the part, is made exactly how you want it, fits you and your gun and costs a fraction of an original.

I like my new leather but it just doesn't scratch the same itch. Because these days everything is slathered in resolene, it is also not going to age like the old stuff did. This El Paso rig will never look like the WRTC rigs below. My oldest EPS rig is over 20yrs old and looks more like this.....

View attachment 1054266

...than this. The EPS rig above also came off a store rack with a bunch just like it. The WRTC work below is all one of a kind. Without the aging, the appeal would be totally different.

View attachment 1054267

View attachment 1054268

Same for guns. These $500 Uberti's have 99% of the appeal of an original Colt relic at a 10th the cost and none of the internal wear or risk of ruining a 150yr old historical artifact.

View attachment 1054269


Craig, after seeing your work and attention to detail, I would love to have you make a holster for my Ruger Redhawk, I know it's not a single action...but
Hopefully one of these days soon I'll be able to, unfortunately for now the funds are tight. Someday... IMG_20220123_164922488.jpg
 
Nice work if aged is what floats your boat. I side with Bob. I really don't want my stuff to look worn. That is why I keep my boots polished and sole dressed and my hats have rain covers on them on my hat rack to keep dust off of them.
 
Awesome work. And a great conversation.

My work isn't nearly as good. I have problems getting the edges to burnish good. What I've tried is wetting it with water and rubbing with a cloth, or a stick, or another piece of leather. I get a good burnish on some parts, and a whiskered / porous edge in other harder to reach spots. Any tips there?
I've had to change the way I do edges as I've changed the way I do everything else. If I'm going to burnish any edges before dyeing, I have to use water. Anything else and the edges won't take color. Otherwise, I wait until after and use gun trag with the wooden slicker from Tandy. On the mainseam, I glue it, even it up on the belt sander, bevel it again, dip dye and then start slicking when I do the finish work.

https://tandyleather.com/products/8121-00-multi-size-wood-slicker
 
Awesome work. And a great conversation.

My work isn't nearly as good. I have problems getting the edges to burnish good. What I've tried is wetting it with water and rubbing with a cloth, or a stick, or another piece of leather. I get a good burnish on some parts, and a whiskered / porous edge in other harder to reach spots. Any tips there?

I'm not amazing by any means, but I've found a couple things that help me.

Burnish in small lengths, like 4" at a time.

Tight corners, use the pointed end of the slicker that @CraigC recommended.

If you can't move it back and forth, use a twisting motion. It'll take longer, but it'll definitely burnish.

Last one, be patient. If you have to keep wetting an edge to get it perfect, move one to another edge. Chances are you're wetting it too much at that point.

But most importantly, don't get discouraged. Keep it up.
 
I made a wooden "wheel" that I can put in my drill press. It is actually more of a cylinder in shape and has a wide groove at the top and a narrow groove at the bottom. I've been using it for years. The middle portion is just flat. I usually just wet the edge to be burnished and run it along my little wooden cylinder until I get the finish I'm happy with.
 
CraigC

Well one thing's for sure; you've got this aging leather process down pat!

Outstanding craftsmanship...as usual!
 
Status
Not open for further replies.
Back
Top