What gunsmithing or repairs have you done today

Musing on stock bolt fasteners, buttstocks, standard AR-handgrips and gunsmith tools to get it done safely and efficiently.

Working on wood stocked long arms I have observed there is quite a variation of stock bolt fastener sizes and styles (slotted, hex, etc.) usually down in a deep dark hole. I fabricated a flexible LED light to illuminate the mystery for some situations in advance of unnecessary gunsmithing misery. The old adage “some men will do in the dark what they would never do with the lights on” seems apropos regarding buttstock fastener engagements with tools.

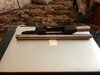
I fabricated a series of long reach tools for slotted fasteners with various sized collars to keep the tool shaft centered in the bored hole to avoid slipping off (or never having been engaged to begin with) a slotted driver exiting thru the surface skin of an expensive stock.

The shafts of the drivers have various diameter cylinder columns with hex screw securement to maintain the driver in the center of the stock boring. The tips of some of the long drivers have been transformed into hollow ground profiles, heat hardened and temper drawn for strength.

Sometimes readily available “drag link” socket style tools are handy.

I found you can purchase a life time supply of standard stainless 18-8 narrow style Fillister ¼-28 fasteners for a tad more than a sawbuck!

More recently I extended this concept to the simple installation of AR style grip screws, usually slotted Fillister head stainless ¼-28 fasteners; a Delrin self-retaining (marine grade electrical shrink tubing that actually holds the head) fastener lathe turned down to standard internal size grip diameter. No more trying to align that fastener down in a hole to prevent cross-threading installations.


[/ATTACH] DSCN0303a copy 2.jpg DSCN0305a copy 2.jpg DSCN0310a copy 2.jpg DSCN0610 12-3-2013 copy.JPG DSCN0611 12-3-2013 copy.JPG Gunsmith AR Grip Screw IMG_2000 Tap Removal Installation Tools ANNOTATED 02.07.22. copy.jpg Gunsmith AR Grip Screw IMG_2005Installation Centering DELRIN Tool MJD 02.07.22 copy.jpg Gunsmith AR Grip Screw IMG_2006Installation Centering DELRIN Tool MJD 02.07.22 copy.jpg DSCN0301a copy 3.jpg View attachment 1084554 IMG_2883 copy.jpg
 
Last edited:
Got parts in Sunday so I fit the new EGW Thick Flange barrel bushing, Wilson Hardcore spring guide rod, and swapped the arched MSH for a Wilson. MidWay came through again, Brownells is about to get the cold shoulder again as I ordered Wednesday and it still shows “In Progress” meaning not shipped. Frustrating when they’re 3 hours away.

Last bad experience I had with them was about 3 years ago when it took them around 2 weeks to get my stripped upper receiver to me. Honestly don’t know what’s going on with their shipping.


I opted for the carry bevel then dehorned the angular edges.
5D7294F1-9AD9-4D55-8E1C-1FE0359C53B2.jpeg

Working on clean up around the edges. I opted for minimum interference in case the old man does want to spend some time with it, though it still requires hammering out with the barrel for removal.
D3743C4C-00FC-43A3-B32A-C66C0A1DCDC2.jpeg

Looks like some oxidation to clean up on the MSH. Also took a minute to dehorn frame edges around the magwell.
3BE264FE-BDB9-4D9F-A634-84C9D11EF8C4.jpeg
 
Cleaned up my .22TCM 1911 after range time yesterday. If not kept really clean, it can fail to extract once in a while so I decided to take a look at the extractor. I also ordered an extra today, so I will have a new factory part to compare to.
The extractor channel was moderately dirty so I brushed that out. The extractor hook looks good, and the geometry of the tip looks fine. I never have fail to feed issues. I chose to clean up the hook a little with a needle file to make sure the hook is sharp with no rounding, just for good measure. Extractor tension is good. I’ll post again when the new extractor arrives and include some pics. It’s possible I’m missing something that will become apparent when compared to a new part.
 
I wouldn't call this gunsmithing, but I was still playing around a little with this un-shot Hammerli Tac2 .22LR.

Went and ordered some stuff and bought a couple of pieces at a local gun shop.

Sights I ordered off Amazon. They were the only ones I could find which had fiber optic in a price range that was in line with the MSRP of the rifle. Solid alloy bodies. Positive detents which hold them in place up or folded. Rear sight with a large and small diopter. The smaller one having the fiber optic dots.

wGMwdd1.jpg

zjz8TS2.jpg

Sights folded (in this pic you can also see the quick release sling swivel I put in the pre-existing ball bearing mount for a single point sling) a nice touch by Hammerli:

FUD0les.jpg

Front sight:

TpfUknz.jpg

After I put the sights in place, I mounted a red dot I had on hand. Plan is to take it to the range tomorrow and get everything dialed in.

kEOj3qk.jpg
 
I wouldn't call this gunsmithing, but I was still playing around a little with this un-shot Hammerli Tac2 .22LR.

Went and ordered some stuff and bought a couple of pieces at a local gun shop.

Sights I ordered off Amazon. They were the only ones I could find which had fiber optic in a price range that was in line with the MSRP of the rifle. Solid alloy bodies. Positive detents which hold them in place up or folded. Rear sight with a large and small diopter. The smaller one having the fiber optic dots.

View attachment 1086164

View attachment 1086165

Sights folded (in this pic you can also see the quick release sling swivel I put in the pre-existing ball bearing mount for a single point sling) a nice touch by Hammerli:

View attachment 1086166

Front sight:

View attachment 1086167

After I put the sights in place, I mounted a red dot I had on hand. Plan is to take it to the range tomorrow and get everything dialed in.

View attachment 1086168
I have the same looking ones on my carbine, but not fiber optic. They work fine.
 
I did a lot of research, some of it here on THR, on micro dot sights before I bought. The 2 endorsements I weighed the most were my Dad saying "Holosuns are junk!" which I know is not the case, and John Lovell's recent review of it on WPS.
My Dad probably bought the 407, which isn't that great, then replaced it with a SIG Zero. The counter guy was telling me while we were waiting for the proceed on the gun that he'd had a Zero, and didn't like it, but had 3 507K X2's, and his rifle dot sights were Holosun also.
I was "dry drawing" to get used to the sight last night, it's definitely a different method, but so far all good!
 
FF II.jpg 6`7 W C-More Topazed.jpg I put a new Burris Fast Fire II on my S&W 617 today using a EGW Mount. I took off my C-More with 12 MOA diode and put on the FFII with a 3 MOA diode. I want to see if smaller is better for accuracy.

I also added some Power Custom cylinder washers. I'm not getting a lot of failure because the action is so light but with the washers it will even be more reliable.
 
Last edited:
With the new 7 prc coming out sometime this year I'd like to build one on a mauser, spec is 65k which is a little high being the round is fat, 270 win is 65k and many were don't but again small case. A commercial fn action would work out nice, maybe if the 98 was rehardend it would be fine just worry with out set back of I use the 09 Argentine I like using. But I still have to finish my 9.3x62 first.
 
IMG_0446.jpg I'm making my own small ring Mauser receiver face truing mandrel.

I'm editing this post to include how I"m accomplishing this task in tool making. So this doesn't become lost information.

Since I am a cheap skate and rarely buy tools unless I really have to or don't want to which is usually the case for me and I all ready have everything that I need to make my own to include a few brain cells left to accomplish it. Why the hell not? Besides it gives me a lot of self satisfaction especially when the build I'm currently working on the tools aren't readily available anymore.

Here is what you need:
1) An old shot out barrel to cut the chamber off of being careful not to damage the threads and don't throw away anything yet.
2) The old barrel to turn down to the diameter of a bolt subtract approximately .002" to allow the end play necessary to pull the mandrel in and out of the receiver freely without binding and preventing the risk of cross threading. The length of the mandrel will be solely up to you and the limit of your lathe bed.

Now cut the barrel to your barrel to the desired length 12 to 15 inches will work.

True up all faces. This can be done with a simple file if you like or with the machines if thats your flavor.

Mill or file flats on the chamber where the business end would be. This is done to remove the mandrel from the receiver with a wrench.

Weld or have the barrel welded to the bolt face side of your threaded chamber piece ensuring they are centered and balanced.

Now use the hell out of your tool that you just made.
 

Attachments

  • IMG_0447.jpg
    IMG_0447.jpg
    79.8 KB · Views: 3
Last edited:
Cleaned up my .22TCM 1911 after range time yesterday. If not kept really clean, it can fail to extract once in a while so I decided to take a look at the extractor. I also ordered an extra today, so I will have a new factory part to compare to.
The extractor channel was moderately dirty so I brushed that out. The extractor hook looks good, and the geometry of the tip looks fine. I never have fail to feed issues. I chose to clean up the hook a little with a needle file to make sure the hook is sharp with no rounding, just for good measure. Extractor tension is good. I’ll post again when the new extractor arrives and include some pics. It’s possible I’m missing something that will become apparent when compared to a new part.
Update... new extractor arrived and I spent a little time doing initial fitting. You can see that the replacement is quite different from the original that came with the pistol.
Original - note the size of the hook
2977D8E7-C824-4489-8088-324BBF28F9A8_1_201_a.jpeg AE0A3D59-8092-4384-A34B-36ED98169564_4_5005_c.jpeg 57A83372-FC51-426D-9AEE-FABDAC28247E_1_201_a.jpeg
 
Here's the new one... quite a difference!
01829DFD-7CBF-456C-A483-7359BFDFB4EB_1_201_a.jpeg 8FBE0639-00C2-4C6F-A0BB-3AB7BC19C8F8_4_5005_c.jpeg 013A9670-D781-408E-9157-EE05BF33A884_4_5005_c.jpeg
In addition, the new extractor had almost no tension on installation. I worked on it a bit and slightly bent the extractor in toward the breechface to get it to have good enough tension to hold a round securely. Next will come a little polishing on the engagement surfaces so the cartridge will slide up under the hook with no resistance (at least very little). I'm not sure why the original part had such a tiny hook. This new extractor will likely solve the random fail to eject issues I've had, regardless of how clean the chamber is.
 
Did some re-imagining of a seldom used upper. Swapped in a WC 350 Legend barrel to get a friend’s deer rifle project kicked into gear. Props to PSA for not cranking down the barrel nut and using grease during assembly. Came off after a 2 hour sit in the deep freeze. Not overly smithy but smifesque.


A little cold, a BevBlock, and one swift whack from a 4 lb mini sledge is all she wrote.
76040306-3694-4221-B14C-621449AE152B.jpeg

Still had factory applied aero shell.
3D229413-8A9E-42E8-B18A-10D76A5188DD.jpeg

Trued the upper before installation and it was a bit off.
4FD8AF2F-12C2-4FEB-92CB-C7DFE5C5B8C9.jpeg

New 16” Wilson Combat SS barrel squeezed under a slim MLOK handguard.
F26B5FDE-F2ED-43D2-A11E-EB26A514223B.jpeg


27C8FA43-2192-46DA-B469-C9BB28C9DD5D.jpeg
 
Last edited:
Finished fitting the extractor on my .22TCM 1911. Feeding is smooth, as is extraction and ejection. I opted to forego polishing the hook until I take it to the range. The geometry on the new part looks pretty good and the parkerizing should wear in on its own. I can always help it along if needed. :)
 
^^ Your project reminded me of this old situation. I purchased this new in the 90"s and it remains a pristine Sig P226 Blackwater Edition (rendition) that Sig cobbled together , a frame mount for the contemporaneous big optic foot print (optic ready slides were not on the Sig idea board then) that was stationary on the frame, as optics of the day would not survive the mechanical beating of slide mounting. Just don't waste anytime trying to source a proper holster for the collective contraption it is. It predated the HK Mk23 that was the first developed by the Joint Armed Services as single-purpose offensive sidearm.


Screen Shot 2022-07-06 at 6.43.22 PM.png Screen Shot 2022-07-06 at 6.43.09 PM.png
 
Back
Top