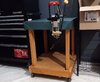
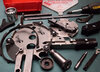
Full step-by-step press disassembly and reassembly - (After fully disassembling and reassembling the press, I realized perhaps reading the instructions could have helped.

So what you have been reading so far and next disassembly/reassembly is typical "Who needs to read the instructions" saga.
)
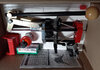
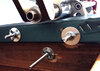
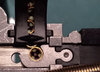
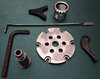
NOTE: Pro 6000 kit came with bushing wrench (Lee calls it "Die wrench") and Allen wrench shown at top left of picture. Only other tool I needed was a small stubby Phillips screwdriver.
NOTE: Likely normal use of press won't require complete disassembly of press but outlined here for future reference.
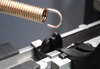
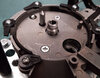
1. Detach case slider spring - Unscrew pan head screw from front hole of slider. Push spring up into the case feed hole to keep it out of the way.
2. Detach primer slider spring - Raise the shellplate carrier up and bend the spring for end hook to clear the hole in the primer slider through the slot
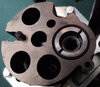
3. Remove shell plate - This is same process as ABLP
- Lower shellplate carrier to bottom
- Remove Station #4 bushing with bushing wrench and pull out index rod
- Lift the case ejector to remove
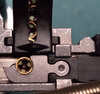
- Insert Allen wrench in the center hole and turn it clockwise to loosen shellplate (BUT I found the shellplate loose ... So I will be repeating my finished round OAL variance test after reassembly)
TIP: Those buying SPP/Pro 6000, do a quick check to see if shellplate is loose before conducting a reloading session
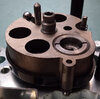
4. Remove top shellplate carrier (Lee calls it "carrier cover")
and drop bottom plastic cover - This process involves separating the top shellplate carrier from the bottom black plastic cover which are held together by two flat head screws accessible from the top and one pan head screw accessible from the bottom.
- Remove red finished round bin
- Raise shellplate carrier up to lift out black plastic bin holder/tool caddy and loosen pan head screw from bottom
- Lower shellplate carrier and loosen two flat head screws with Phillips screwdriver
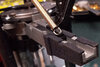
- Carefully lift the top shellplate carrier and tilt the back up so primer attachment could clear the frame supports (Note: Keep track of detent ball on top of spring so you don't loose it)
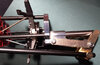
- Raise shellplate carrier body with ram lever to access bottom plastic cover with detent ball/spring, priming rod/spring and index spindle/plastic gear
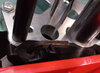
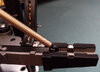
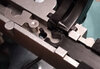
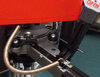
And here's the carrier body factory bolted to ram at Station #1
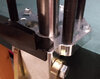
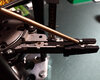
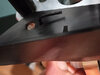
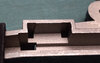
5. Remove primer chute/trough - There are two tabs at the bottom of plastic end that protrude into slots cut in the primer slider channel/trough. It's in there tight and requires some forceful rocking motion to remove. Since plastic tabs will wear with each removal/install, I do not recommend removing the primer chute/trough unless you are replacing the unit.
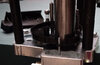
Bottom view of slot cutouts
6. Reassembly - Reassembly is essentially reverse of disassembly steps with following tips:
Reattach top shellplate carrier to bottom plastic cover:
- Raise shellplate carrier body with ram lever
- Install detent spring/ball, priming rod/spring, place index spindle on top of plastic gear inside the bottom cover
- Use the ram lever to lower the shellplate carrier body on top of the bottom cover and ensure detent ball and priming rod/spring are not knocked off
- Tilt the back of carrier top so primer attachment could clear the frame supports
- May need to hold the top/bottom carrier covers with one hand while tightening two flat head screws
- Raise carrier up to tighten the pan head screw from the bottom
Install shellplate:
- Lower shellplate carrier to bottom
- Place shellplate and finger tighten using counter-clockwise rotation
- Use Allen wrench to tighten shellplate
- Install case ejector
- Install index rod and tighten Station #4 bushing with bushing wrench
- Raise shellplate carrier up to install black plastic bin holder/tool caddy and lower carrier back down
- Attach red finished round bin
Attach primer slider spring - Raise the shellplate carrier up and bend the spring for end hook to clear the slot and into the hole in the primer slider
Attach case slider spring - Unscrew pan head screw from front hole of slider and tighten screw through end of spring.
Operate the ram lever several times to ensure all the press components are operating smoothly.