What gunsmithing or repairs have you done today

Came up with a product not on the market... A scout mount picatinny rail / handguard for the Ruger 99/44 Deerfield Carbine. It is essentially a mini-14 type receiver but the gas and recoil system is a bit different. So mini-14 handguards dont fit. Normal scope bases for a mini fit the 99/44 though. But none extended far enough forward for my liking.

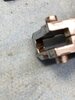
I started with a clearanced $37 AR Stoner AR-15 free float tube. I cut most of it off with the band saw. Then i milled a ruger scope ring down to just a flat block. The handguard bolts to the top of the scope ring block with a pair of 6-32 SHC screws. On the forward end, i used an aftermarket 10/22 barrel band, and will weld the handguard to it. While i have the welder going, ill weld a rod on the under side of the rail near the scope ring block to stiffen that thin end up. Then ill Duracoat the whole handguard black.

This whole thing required zero modification to the gun itself. It does place the RDS just a tad high but it still provides a comfortable cheek weld. If i could find cheap 34mm ultra low rings that would do thw trick. The factory barrel band is still in place too since it is slightly shorter/smaller than the 10/22 unit.

20221120_182553.jpg

20221120_182610.jpg

20221120_182602.jpg
 
It wasn’t my most triumphant day in gunsmithing.

First, I thought I’d remove some surface rust from the blackstrap of my S&W 19-5. The naval jelly took the bluing off immediately, but barely touched the rust. I guess there’s no harm now in some aggressive wire brushing to get the rust off. Then I’ll decide whether to try to touch up the bluing or just wax the bare steel to keep it from rusting.

0C89C3E9-9071-4E1F-B80C-2C155DAB483F.jpeg B0001760-8EE0-4F48-8A8E-5FC4022608E4.jpeg
 
The day before, I tried removing a spot of deep rust from the frame of my SP-101. It really zapped the surface rust, and showed me how deeply it was pitted.

Then, to put me in my place, that rust seemed to seep into the frame a bit around the spot of rust. Damn.

When I rinsed off the naval jelly, I got some in the lens of the laser grip. Now the laser is a rather dim dot. Damn-damn. Instead of fixing the rust, I ruined a $300 laser grip and made the rusty spot uglier.

I got a set of batteries for my bore light. I managed to get them installed and now it works. No drama in this, at least.
ABB39BC1-B6D3-4C49-A640-0BC1DD667C69.jpeg
^ This is the Before pic.

EFA7DFE2-6C13-457D-A306-2C5066CF64D1.jpeg
^ After
 
Last edited:
Not to be easily dissuaded, I decided to try to replace the black ramp right on my SP-101 with an XS tritium one.

I had done a similar job on my LCR a couple weeks ago and it wasn’t bad.

This one required me to drill through the sight, but that all came out OK:

A1CC7337-042C-44C9-AA65-442D4B5DE3CC.jpeg B9EB6D46-907C-4754-B583-07C94CEC262E.jpeg 8A0ADB15-A302-40AA-84DF-AB9421452B5F.jpeg
8A3ADD15-C187-48C6-A97B-60BC372BB171.jpeg

That came out well and is at least some compensation for screwing up the laser.

By the way, I made that ball peen hammer in my junior year of high school in machine shop. I won second place, which was a $50 US savings bond, which matures soon.
 
Made a little progress this afternoon on making a insert to fix the ejection on the Glenfield Mod 75.

Worn off ejection impact stub.
Ejection contact point.jpeg

Pre-fitting my new striker insert.
Pre fitting new Strike Plate.jpeg

It's close, I did not press it all the way in since I had to remove it. Will Loctite the insert in tomorrow if I get some time. Then set it back up in my end mill to face some surfaces and add clearance for feeding a new round. If all goes well I should finish this up if I get some time.
Test fit of strike plate.jpeg
 
Tore down my Model 31-1 last night and scrubbed and re-oiled it and put it all back together.

Tonight I took the ejector off my 1911 and replaced it with a GI spec one. I originally had a Spring Field Armory replacement on it, but it was gappy and didn't look right. The 8 dollar GI part looks great.
 
Not to be easily dissuaded, I decided to try to replace the black ramp right on my SP-101 with an XS tritium one.

I had done a similar job on my LCR a couple weeks ago and it wasn’t bad.

This one required me to drill through the sight, but that all came out OK:

View attachment 1116456 View attachment 1116457 View attachment 1116458
View attachment 1116459

That came out well and is at least some compensation for screwing up the laser.

By the way, I made that ball peen hammer in my junior year of high school in machine shop. I won second place, which was a $50 US savings bond, which matures soon.

I cashed my '88-'90 savings bonds in a couple years ago. Some had matured a number of years prior. I got a good deal over face value.

Not sure if yours is under a monetary limit or not, but i had to pay income taxes on mine.

Bummer about the laser. Get some mothers aluminum polish on a small polishing bob for a dremel and try to polish the etch out of it.
 
Not really gunsmithing, but I spent a couple hours bore sighting 3 rifles . All 3 at about 50 yds, even though it was dark out the business's building acrossed the street is well lit and has a silver exhaust vent that made a perfect sight. The only strange part is that the adjustments moved in the opposite direction that they were marked as moving. Was strange but it worked.
 
Last edited:
Finished up on the Glenfield Mod 75 repairs.

Repairs done:
1. Bullet feed channel , SS inserts made and fitted.
2. Brass ejection block/nub, SS insert block made and fitted.
3. Repaired/adjusted bullet lifter, added epoxy to arm to lower lift.

Ejection Striker Plate Outside.jpeg

Ejection Striker Plate inside.jpeg

Where the lifting arm was beating up on the zinc. It does not look like much but it was equivalent to almost 1/8" on the end of the arm. Adding material to arm prevent it from lifting the bullet to high, now allows you to operate the bolt and feeds without jamming, and shaving the bullet. Prior to this it would over lift the bullet and jam it above the chamber. You had to let the bolt fly full speed or it would jam, ridding the bolt caused jams. With the arm not going as high it now works at any speed. Failed to take a picture of the lifting arm, added about 1/32-1/16" to the top of the arm to restrict lift.

The beat up zinc is the bottom of the recessed area shown, about 1/8" wide in the center.
Bullet lifter contact.jpeg

This one is done and now ready to return back to my neighbor.
 

Attachments

  • Bullet lifter contact.jpeg
    Bullet lifter contact.jpeg
    114.5 KB · Views: 2
I’m not sure if this counts as gunsmithing, but maybe it is the most basic type: gun cleaning!

I took my wife and daughter to the range yesterday and I’m just finishing the cleaning.

The S&W M&P 22 Compact has the threaded barrel. The thread adapter kept coming unscrewed while shooting. I fixed that at the suggestion of using an O-ring from a fellow member. Now, to keep the thread protector from coming off, I’m going to (blue) thread-lock it on.

Then, I’ll finish cleaning my trusty Hi Power. (The original Hi Cap double stack handgun, I think!)

FC3402B6-8D24-49D9-BEBB-BDB53BD57EA6.jpeg
 
Another ‘smith brought me a “pistol in a bag” that he didn’t want to take the time on. It was a Jimenez 9mm, total POS. I had never worked on one before nor did I have the advantage of having taken it apart. Took a few iterations but finally got it right. No, I didn’t test fire it. Life’s too short! Enjoyed the challenge.
 
My trusty SP-101 was getting to be not so trusty any more; the trigger would sometimes not return all the way.

I had modded the gun years ago with a 13 lb. Hammer spring and a lighter return spring. Maybe it was time to go back to the factory return spring? Or maybe it was just time for a detail clean.

Whatever the case, I needed to take ‘er down. I got old Iowegan’s Book of Knowledge for the SP-101 and got down to work. I hadn’t been inside of this gun for ten years, when I tuned it up.

There were some parts that were pretty dirty; I cleaned them. I decided to change the trigger return spring back to stock and go from a 13 lb. hammer spring to 12 lbs.

I got ‘er back together and she’s as smooth as anything now.

1B7745EC-9B2B-4A71-ACCA-7931B1CEA638.jpeg

You might remember that I thought I screwed up my expensive CTC laser grips for this gun with naval jelly trying to remove the rust spot. The Customer Service guy I spoke to at CTC advised me to clean the laser’s (glass) lens. I did that and it’s as good as new now! I’m really happy about that. I really like this grip, even independent of the laser. It’s perfectly shaped and accommodates the pinky. It doesn’t squelch recoil quite as well as the factory groups though:
ABAF0341-39DE-4122-8DF2-FE6E935575FF.jpeg
 
Last edited:
Not really smithing, but repairs... To an RC airplane for my uncle. Made a couple prop nuts to replace the aluminum one. Its a 7/8" hex nut with a 7.0x1.0MM thread. I made them from 4140.

But the main reason for posting is;
Pretty sure the motor on my grizzly mill is pretty much dead. I normally run at 530 rpms. It barely spins. Touch metal, and it just stops. I was able to slowly do the hex on 250 RPMs with a really slow feed. This is already a replacement motor when the factory one broke its shaft during breakin. I wonder if i can get a better motor somewhere other than Grizzly.
Search your motor specs on the internet. Options should pop up!
 
I had to replace the front sling stud on my Weatherby Vanguard chambered in .270 Winchester stock this morning, put low scope mounts on it and gave it a well deserved cleaning. When I removed the action from the stock the hole was stripped out so I place the new sling stud in that requires a nut problem solved. I also discovered it is a butler creek stock.
 
Built our house,pretty much by myself with help from dad,35 years ago. Put a nursery off the MB. Boys all grown,with youngins of their own. I took over the nursery prolly 25? years ago as a dedicated handloading room. It's a little small but no real complaints.

A cpl years ago,I finished an upstairs bigarse suite for wifeypoo. Have spoiled her ROTTEN!! Anyway,she's like.... you should turn our old master BR into something? Well,considering it IS next to the loading room..... how about more shop space,bwahaha.

This cherry, antique dresser was destined for the dump when it got orphaned here..... took literally only 2 days to go from zero to hero. It's a large part of what our shop is geared towards,so no big deal....

Scopes,and most things that go along with them is $$$. They've been living in our machine shop,sorta halfa$$ because of the general conditions. Trying to get gunsmith sheet outta the loading room.... so,add this all up and you get the idea. I also put a modest drafting machine in here. Doing some scope swapping in the new digs this a.m. Got a Bushnell 6500 elite,4.5-30 coming to go on the 260 cast target rig. So took the target 6-18 Redfield off it,and put on the 7-08 "carbon express" cast only rig. Was using a 4-12 Redfield....and pretty durn happy.

Bushnell bore sighter made quick work of getting the 18X dialed in to where the 12x was. Last pic is on the porch.... first shot was "X" for elevation,was 8 clicks right though. Dialed the 18's target turrets and then slammed a nice <1/2" 3 shot group.
Pics forthcoming
 
Along with the,Mo Power scooe....

Ordered a Timney hit trigger for the 260. These are the types of "light" gunsmith chores I want to move into the new digs...

Tools can sorta go back N forth from the Smith room and loading room.
 
Along with the,Mo Power scooe....

Ordered a Timney hit trigger for the 260. These are the types of "light" gunsmith chores I want to move into the new digs...

Tools can sorta go back N forth from the Smith room and loading room.
Eruooptics had 20% off all timney triggers.
 
  • Like
Reactions: BWS
I’m a little prouder of todays project than the last one I reported on. Had a first gen Colt SAA in that had lost the half cock notch. Looks like Bubba and a Dremel happened to it. No replacements available that we felt were reasonably priced so I put a good blob of weld metal on the hammer and started filing and grinding. I got a little carried away and lost the first notch so had to weld up that area too. The revolver now has all the notches and all the clicks are right.
No pictures, my welds are fugly but strong.
 
Back
Top