What clever little things have you "invented or discovered" that you can share?

Welcome FP - Just make yourself at home.

Howdy Focal Point,
Welcome to The High Road!

Your RCBS LSLT sounds neat but I ain't all that bright. :eek:

Reckon you could post a picture for me and any one else
that might be, aah, luminously challenged?

ST
 
Here's my po-boy powder trickler:
PowderTrickler.jpg

It's a clear BIC pen tube that can drop single pieces of even small powder like AA2230. I fill it with a powder funnel and it sits in the small medicine bottle. I use the large medicine bottle to hold a small amount of powder for the dipper, and also use it to top off the BIC pen.

Also, here's my ghetto pick for getting tumbler media out of flash holes:
100_5946.jpg

Be careful with that though, as you can gouge the primer pocket if you get too rough.

Sorry about the big pics; Photobucket combined with Google Chrome doesn't like to do thumbnails.
 
Alox Tumble Lube drying tray

I had been using the waxed paper method and I was not happy with the uneven streaks of alox on the side that touched the paper, and I was really not happy with the job of standing them up even though they looked better (this is only a cosmetic issue, they both shoot OK). Then I read about using coarse screen and I had to do it (screen idea from RU shooter on CastBoolits, the tray is my idea ;)).

I used 1/4" hardware cloth on a scrap of egg crate fluorescent light diffuser (for support and air circulation) over a piece of waxed paper on a plywood tray. It works great. Dump 'em out and shake to spread. Fast drying time, no puddles, even coating, and I can also use it to funnel the finished boolits into a plastic storage container. The pic with the standing boolits compares the waxed paper puddle boolit on the right (w/cornstarch) to the screen-dried boolit on the left.

I coat them with corn starch (not my idea, saw it in a post by Galil5.56), and I really like the results. It doesn't take much corn starch, and it eliminates boolit seating die gum-up problems.
 

Attachments

  • Boolit Tray sideways.jpg
    Boolit Tray sideways.jpg
    159.9 KB · Views: 277
  • Boolits pouring.jpg
    Boolits pouring.jpg
    180.4 KB · Views: 266
  • Boolits spread.jpg
    Boolits spread.jpg
    141.4 KB · Views: 361
  • Boolits closeup.jpg
    Boolits closeup.jpg
    195.8 KB · Views: 254
  • Boolit compare.jpg
    Boolit compare.jpg
    131.9 KB · Views: 279
Custom top made for simultaneous impact coating and brass cleaning.

I took a piece of 1/2" thick Sintra (expanded PVC), routed a channel on the back to fit exactly over the rim of a tumbler, cut two holes the exact size of the lower 1/3rd of two plastic jars and cut a center hole for the shaft and wing-nut. (no comments, Will)
Slide the jars in till they're tight, add the .177 steel balls and impact coat. You can even leave the media in the bowl if you want to clean brass at the same time.
This setup keeps the center of gravity low and the shaking is much harder and sharper without the cushion of small jars floating in the media.

Tumbler003.jpg

Tumbler001.jpg

Tumbler2001.jpg

Tumbler with jars removed. The media is inside so we can do brass at the same time as impact coating.

Tumbler2002.jpg


zfk55
 
For those of us who use lee equipment; the the PVC works as a sleeve, so it allows the press arm to move and not lose any spent primers. It's amazing what you can do with some scrap PVC, a peanut can, and a few curtain rod holders:D
 

Attachments

  • primer catcher.jpg
    primer catcher.jpg
    49.9 KB · Views: 1,076
Last edited:
When I got my 625-2 in the late 80's I used a piece of 1/2" copper tube, cut the end down 1/4' most of the way around. I've given many of these away over the years though I should have marketed them. Brownells and others now sell them for $10 to $15, all you need is 6" of tube and a hack saw to make the same thing for free
Anyone who has a model 625 or any other Revolver set up for 45 ACP should try using 45 Auto Rim instead of 45 Auto that require moon clips. Reloads for both cases are interchangeable. The big benefit is that you will never again need moon clips.
 
This works really well...

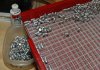
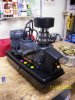
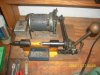
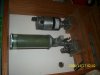
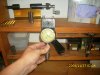
There's actually 2 things here. One is pretty obvious - I used to use my small bench top model drill press to uniform primer pockets and also chamfer the inside and outside of rifle brass. I found a better way to do it was to just pull the power head off the press and flip it upside down on my bench. It makes it easier to see what you're doing, it's a more comfortable motion for doing a lot of brass, and it's really easy to do (just two little set screws hold the tool on the press). I also put 4 little rubber feet on the top of the press's lid so it stays in place. It's really quiet, powerful, etc.

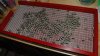
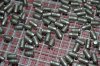
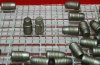
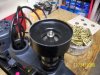
The second thing that works really well, is a brass trap I made for this setup. Using the drill press for any of the brass processing usually made a mess with little brass shavings all over the place. I made this little "trap" out of an empty 1# powder bottle. I cut both the very top and the very bottom off the bottle and taped them together with the top inverted. Then I drilled a hole in the center of the bottom for the cutting tool to go through. When I chuck the tool up in the drill, the plastic is trapped between the cutting tool and the chuck, and so it spins. When I do any kind of operation, the brass falls down into the trap, and the spinning action throws it to the outside walls of the container. It does a great job of catching all little brass shavings and any carbon residue that gets removed.
 

Attachments

  • 100_0496.JPG
    100_0496.JPG
    190.7 KB · Views: 638
  • 100_0497.JPG
    100_0497.JPG
    193.4 KB · Views: 636
I get coffee cans and paint them with bargain basement spray paint to cover up the brands. Then uses the resulting items to sort and store brass casings.
 
Dunno if it's clever...

I'm working up loads for my AR-15, and wanted to have the information a little more organized than I usually do, so I photo-chopped and scanned a bit this morning, and here's what I came up with. Just putting it up here in case anyone else needs such a thing.

th_223datasheet.jpg

All apologies to Mr. Lee, I lifted his .223 illustration from his excellent dies.

Here's what it looked like in practice today.

th_223-Varget-24gr-datasheet.jpg

And here's the final check I run with OnTarget software (available here).

th_223-Varget-24gr-OT.jpg
 
+1 Powder scale on eye level shelf.

Added a simple home made box to put it in. The whole side of the box hinges up so you have complete access, don't need to move it, keeps it clean and ready to go.
 
I had a microwave fry, so i wired a relay onto the internals left over and now have a handy 120v timer for my tumbler. great for moly, moly polishing, general brass polishing.. i can set up to 99:99 which is just over an hour and a half..

Cement mixer with fins for high quantity tumbling..

Home-made electric trimmer and debur/chamfer tools..

i can't afford much. i make everything..
 
I don't know why i didn't scream this to begin with:

The Quickie Primer Tube Filler.

my dad invented this back in the 70's.. some of you old timers may remember it... or still have a couple.

It was alot like the franksford arsenal vibra-prime.

Still have the patent..
 
I don't know why i didn't scream this to begin with:

The Quickie Primer Tube Filler.

my dad invented this back in the 70's.. some of you old timers may remember it... or still have a couple.

It was alot like the franksford arsenal vibra-prime.

Still have the patent..

some pictures. got the cable about an hour ago from walmart.


Picture 1 : Motor Driven (low rpm) carbide debur/chamfer tool
Picture 2 : Motor Driven (low rpm) modified forster trimming tool
Picture 3 : Original Quickie primer tube fillers :)
Picture 4 : Die storage
Picture 5 : RL550B Toolhead storage
Picture 6 : RL550B quick change toolhead storage for "loaded toolheads" with powder measure/trimmer etc
Picture 7 : RCBS Shellholder storage
Picture 8 : Ultra-Tumbler concrete mixer in action.
Picture 9 : Microwave timer... Hasn't been used in a long time.
Picture 10: I don't remember *** we made this for.. maybe a progressive case length check (to make sure they are trimmed within tolerances?)
 

Attachments

  • DSCI0337.JPG
    DSCI0337.JPG
    56.1 KB · Views: 495
  • DSCI0338.JPG
    DSCI0338.JPG
    83.2 KB · Views: 479
  • DSCI0342.JPG
    DSCI0342.JPG
    65.1 KB · Views: 585
  • DSCI0344.JPG
    DSCI0344.JPG
    66 KB · Views: 416
  • DSCI0345.JPG
    DSCI0345.JPG
    60.6 KB · Views: 375
  • DSCI0346.JPG
    DSCI0346.JPG
    54.8 KB · Views: 330
  • DSCI0347.JPG
    DSCI0347.JPG
    58.1 KB · Views: 337
  • DSCI0349.JPG
    DSCI0349.JPG
    84.8 KB · Views: 492
  • DSCI0351.JPG
    DSCI0351.JPG
    62.6 KB · Views: 462
  • DSCI0354.JPG
    DSCI0354.JPG
    63.8 KB · Views: 503
Last edited:
My Midway tumbler has a plastic nut to keep the cover on, requires about 15 turns to fit snug. Turned it over and it now takes 3 turns. Felt like Homer Simpson when I realized that.
 
Tommyintex, that's quite a professional set up! Were you in the business of ammo reloading? And what low rpm motors do you use for the case deburrer and case trimmer?
 
Last edited:
Scrap aluminum angle + rubber band + free HarborFreight flashlight = win

SU1HMDAyODQtMjAwOTEyMjEtMTczMS5qcGc.jpg

Made two for the turret, not sure which one I like better... might keep both running. :D

SU1HMDAyODYtMjAwOTEyMjEtMTgxOS5qcGc.jpg

Not the non-90 degree angles bent in the aluminum to allow the flashlight to not be pointed directly at the support pole.
 
I plan on upgrading this to a peanut butter jar with the lid screwed to the bottom of the table, with a hole for the primers to fall through. That way the jar can just be unscrewed, dumped out, and then screwed back into the afixed lid.

For now, Mickey will do. :rolleyes:

SU1HMDAyNTktMjAwOTEyMTYtMjIxOS5qcGc.jpg
 
Kinetic bullet puller/generic gunsmithing tip:


My tip for very inexpensive no-mar surfaces when tapping out pins/general gunsmithing/gasket hole punching/etc. tasks?

Go to the nearest megamart/sportinggoodsmart and buy a couple black rubber hockey pucks. Usually the cheapest no-brand ones are under a couple bucks.

They work great and also make a nice strike surface for a kinetic bullet puller hammer.
 
Back
Top