Acceptable DIY way to shorten my rifle barrel?

Status
Not open for further replies.

GJgo

Member
Joined
Feb 12, 2007
Messages
966
Location
Western Colorado
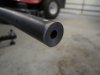
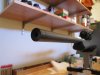
I have a Savage 10FP in 308 w/ a 24" tube that has a blemish just about a 1/2" before the muzzle. It looks like the button got pulled out cockeyed or something & scalloped a deep spot in the lands & grooves. I'm having some accuracy issues with this barrel so I thought I'd just cut that last inch off, recrown it & see if it fixes it up.

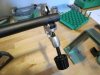
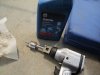
A friend of mine has an 11° crowning tool with a 30 cal pilot that he's let me borrow. He used it when he chopped his Nagant barrel, hacksaw + crowning tool in a hand drill = good enough.

Ultimately barrels are consumable so while I don't want to spend a lot of cash to do this, I don't want to screw it up either.
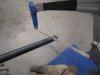
-For cutting I have a hack saw as well as a chop box. Would either be acceptable? I know the chop box would put a lot of heat into the cut surface so I didn't want to risk warping anything..?
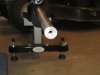
-For crowning I could use a hand drill or figure something out with my drill press, not sure what though as it's not tall enough.
-For finishing the lands to crown edge I've heard you can just put a brass finishing screw in a drill & run it on the surface.

Thoughts or ideas? I tried searching but didn't come up with much. Thanks!
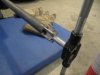
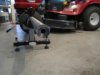
 
do you do your own fillings amd extractions at home also?. ...some things are just worth paying a professional to do
 
Learn yourself on the subject, do it and if it doesn't work out then have another 1/2" removed by a professional. ~Wingnut13
 
shorten barrel

you can do it with a hacksaw, but you'll need a 90 degree to use 1st then the 11 degree and the hand drill. use plenty of lube on the insert and on the cutter. when cutting the barrel keep the hacksaw blade lubed abd use a new one
 
Do it yourself with a new fine tooth hacksaw blade. You should at least make up a jig of some sort to keep the cut square with the bore. Worst case you take it to a pro to fix it in the event of an oops so I dont see a downside.
Let us know how it works out best of luck.
T
 
Thanks guys, that's what I was thinking. I'm not tied to a barrel length so if it comes out poor I know a guy I can call.
 
The crowning tool will square up the face (assuming that you take the crown close to to the OD of the barrel tip and that the pilot fits well), so a hacksaw cut will be 'good enough'. It's not as elegant and specific as using a lathe, but I've done the hacksaw route before and it worked well for me.

I did use a pipe cutter to scribe a good circumference first, and then dressed the face at the end to get an even ring around the 11d crown..
 
Because I'm a problem-solving, DIY kind of guy! The main reason I bought this Savage was because I wanted to do my own tinkering / smithing, and I don't own a lathe...
 
I'll see if I can find the video, but a long range precision shooting school (read sniper) did a very interesting experiment. They trimmed a rifle barrel down 1" at a time using a Sawzall, to test accuracy. They didn't crown it, square it, etc. They just shot it. If I remember correctly it was a Rem 700 and actually shot better the shorter it got (down to 16"). So worse case use a Sawzall and go shoot it.

-Jenrick
 
uuugh. Well, I've seen pretty good results from an abrasive chop saw (common metal shop item) - wet saw keeps the barrel cool. You can also make a muzzle diameter hardwood block to keep a hacksaw relatively square to the cut, then mill bastard it down, finish ream with a reloading inside reamer. A step up would be if one of your friends has an old southbend, you can get 'smith quality with that setup.
 
Jenrick, I read that article a couple years ago & it gave me some confidence in DIY. Anyway, I did the deed today. I think it came out pretty well. :) First I decided that I wanted to take off 1" to clear the blemish. I measured & marked. I then took a pipe cutter to scribe a perfect circumference, and it did, but be forwarned it destroyed the blade on the cutter in the process.

attachment.php
 

Attachments

  • IMG_1322.jpg
    IMG_1322.jpg
    80.2 KB · Views: 384
Next I made the cut with a hacksaw using a new metal blade. Oops, skipped it a couple times in the beginning! In hindsight, considering how deep the 11° crowning tool cuts it in I would have no problem (heat concerns) using my chop box. Heck, it probably would have come out straighter- even with the scribe the hack saw blade walked a couple MM at the bottom.

attachment.php
 

Attachments

  • IMG_1326.jpg
    IMG_1326.jpg
    68.8 KB · Views: 376
JM, Lighting the bore I could see both ends, and the only blemish was at the muzzle. If I did screw it up I'd just buy a new barrel & screw it on. Plus, I'd really rather not ship my rifle all about the country if I don't have to. Plus plus, they'd probably tell me it was within spec & not fix it.
 
Last edited:
Hacking done, left with a rough surface. Not quite square but that'll be fixed. I thought the sawing may have tore up the lands at the end, but actually they looked fine when I cleaned it up.

attachment.php
 

Attachments

  • IMG_1328.jpg
    IMG_1328.jpg
    43.5 KB · Views: 376
Started cutting the crown with the PTG 11° crowning tool w/ the 30 cal pilot. Used a hand tap-handle. Progress is slow.

attachment.php


attachment.php
 

Attachments

  • IMG_1330.jpg
    IMG_1330.jpg
    59.6 KB · Views: 370
  • IMG_1331.jpg
    IMG_1331.jpg
    57.7 KB · Views: 374
Thinking that I might pass out a month or so before I could cut as far as I needed to with the T handle, I enlisted the help of my air tools. The tap end was conveniently 3/8", & I used my universal brake piston tool as a F-F coupler to hook my 3/8" impact up to the cutting tool. I used plenty of ATF as cutting fluid & cut away.

attachment.php


Some time later we have a nice crown! I finished the outside edge with a brass whiz-wheel hooked up to my air drill, worked great. I forgot to take a pic of it but I finished the lands by taking a brass finishing screw, chucking it up in my air drill, and using more cutting fluid running it both directions at the end of the bore. The screw was the perfect size for the job. The end result is that the edges all look great.

attachment.php
 

Attachments

  • IMG_1333.jpg
    IMG_1333.jpg
    82 KB · Views: 370
  • IMG_1335.jpg
    IMG_1335.jpg
    43.5 KB · Views: 366
Once all the cutting was done I used carb cleaner to clean & degrease everything well. I ran a jag & a patch up to the end of the bore to push out any shavings, and to keep the carb cleaner from running down the inside of the barrel. Once clean I dried everything to finish the prep for bluing. I used some liquid blue I picked up for 4 bucks. This photo is after the first application- I've been applying / drying / prepping / applying & I'm up to the 4th coat now, trying to get it dark to match the original finish.

attachment.php
 

Attachments

  • IMG_1336.jpg
    IMG_1336.jpg
    62.1 KB · Views: 360
Don't use a pipe cutter!

It swages a choke on the end of the barrel, regardless of how carefully you use it.
Because thats how a pipe cutter works.
By displacing metal to another place.

And that place is on both sides and under the cut, inside the bore.

Use masking tape, or any tape, to wrap the barrel so you have a straight line to follow with a fine tooth hacksaw.
It removes the metal, not displaces it.

Then square the cut with a machinists square and a fine cut file.

After that, cut the crown any way your credit card will allow.

A dollar two ninety eight roundhead brass screw in a drill & valve grinding compound works as well as anything else.

rc
 
So here's the end result, looks good to me. :) I loaded some rounds today & went to the range- 35 degrees, Brr! It's definitely grouping more consistent since removing the blemish. No unexplained flyers like before. I also tried a load that gave me inexplicable / horrible results previously & it shot acceptably today- big improvement.

attachment.php
 

Attachments

  • IMG_1339.jpg
    IMG_1339.jpg
    59.6 KB · Views: 289
I would send it to Savage before I would do that to it if it were me. ( but that does like a fun project and good learning experience if you trust yourself ) but also I think that voids your warranty from the factory if something else is to go wrong ( not sure though so don't quote me)
 
Status
Not open for further replies.
Back
Top