BCRider
Member
This refers to the addition of a button on the nose of the cylinder and barrel mount arbor on the Colt open top style revolvers. As some or most of you may know a few of the brands seem to take pride in missing the boat on how the arbor is supposed to fit on these guns. And that leaves it up to us to correct this oversight to make it easier to reliably and accurately strip the guns and re-assemble them.
I've done a few before for myself and just muddled through since it seemed like I would not be doing this on a regular basis. But in a weak moment I offered to do a couple of Uberti 1871 conversions for a fellow cowboy shooter. And today was the day I did the work.
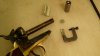
I was looking at doing a couple of them and figured that since I'd done a few already and likely would do a few more over the coming years that it was time to get properly set up for this sort of job. So a couple of hours later I'd come up with the goodies in the first picture.
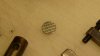
What you're seeing is a special small C clamp that uses an 8-32 screw to clamp the buttons in place for soldering. The taller cylinder has a stepped hole in the top to hold the buttons for the size of the arbor on this gun. This is used to seat the buttons and hold them while filing down the nose to adjust the barrel gap. I'll see how well this works for future sizes. I might have to do up something a trifle more adjustable or just make them up and label the sizes. the bit of angle holds the button in alignment while I clamp it. The coin like thing with the cross hatching is the button about to be soldered to the nose of the arbor in the picture. The cross hatching was filed in shallowly with a triangle file to aid in getting the solder to flow more readily. This is shown in a close up of the back side of the button in the second picture. The button stock is turned in the lathe and sized to match the arbor then the nose shaped and the back side parted off.
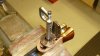
The next picture shows how the angle and clamp are used. And the last one is setup and just about to reach for the propane torch.
The solder used is a soft basic old 60-40 electronics solder. But I use a really good separate flux that I know works well with steel and does a bang up job with copper.....unlike most of the useless stuff sold in the plumbing sections at the hardware stores these days I might add.
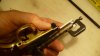
The button is shaped with a flat point truncated cone shape where the flat nose is about 1/8" diameter and the angle of the cone is a little sharper than the point of a twist drill. So the contact point of the button is the circumference of the flat nose. The button is cut off a touch long and the flat point filed further down and bigger in diameter until the "dry fit" of the button in the gun results in the cylinder gap being correct. The wedge is deliberately driven in slightly harder than normal to ensure that the button is in contact and it's not simply sprung. You can pretty clearly see this shape in the third picture with the clamping screw sitting against the flat nose of this button.
When the button fit is correct I solder it on as seen in the pictures. Afterwards any solder is dressed off with a dull file. Why dull you ask? That's because the arbor is heat treated and I don't want to ruin yet ANOTHER file finding out just HOW hard it is. And we're only cutting off any blobs of solder after all.
In the case of both of these guns the wedges proved to be a few thou too wide after the button work. So those were lightly ground off and re-blued to seat to the correct depth. The final gap being set close to .006. One came in at a "tight" .006 and the other a perfect .005.
Hope this helps someone out.
When the guns are set up so the wedge is a locking device and not a gap setting adjustment device the guns are a lot easier to work with. And I can't help but think that they'll last longer too by removing the spring inherent in the improper fit.
I've done a few before for myself and just muddled through since it seemed like I would not be doing this on a regular basis. But in a weak moment I offered to do a couple of Uberti 1871 conversions for a fellow cowboy shooter. And today was the day I did the work.
I was looking at doing a couple of them and figured that since I'd done a few already and likely would do a few more over the coming years that it was time to get properly set up for this sort of job. So a couple of hours later I'd come up with the goodies in the first picture.
What you're seeing is a special small C clamp that uses an 8-32 screw to clamp the buttons in place for soldering. The taller cylinder has a stepped hole in the top to hold the buttons for the size of the arbor on this gun. This is used to seat the buttons and hold them while filing down the nose to adjust the barrel gap. I'll see how well this works for future sizes. I might have to do up something a trifle more adjustable or just make them up and label the sizes. the bit of angle holds the button in alignment while I clamp it. The coin like thing with the cross hatching is the button about to be soldered to the nose of the arbor in the picture. The cross hatching was filed in shallowly with a triangle file to aid in getting the solder to flow more readily. This is shown in a close up of the back side of the button in the second picture. The button stock is turned in the lathe and sized to match the arbor then the nose shaped and the back side parted off.
The next picture shows how the angle and clamp are used. And the last one is setup and just about to reach for the propane torch.
The solder used is a soft basic old 60-40 electronics solder. But I use a really good separate flux that I know works well with steel and does a bang up job with copper.....unlike most of the useless stuff sold in the plumbing sections at the hardware stores these days I might add.
The button is shaped with a flat point truncated cone shape where the flat nose is about 1/8" diameter and the angle of the cone is a little sharper than the point of a twist drill. So the contact point of the button is the circumference of the flat nose. The button is cut off a touch long and the flat point filed further down and bigger in diameter until the "dry fit" of the button in the gun results in the cylinder gap being correct. The wedge is deliberately driven in slightly harder than normal to ensure that the button is in contact and it's not simply sprung. You can pretty clearly see this shape in the third picture with the clamping screw sitting against the flat nose of this button.
When the button fit is correct I solder it on as seen in the pictures. Afterwards any solder is dressed off with a dull file. Why dull you ask? That's because the arbor is heat treated and I don't want to ruin yet ANOTHER file finding out just HOW hard it is. And we're only cutting off any blobs of solder after all.
In the case of both of these guns the wedges proved to be a few thou too wide after the button work. So those were lightly ground off and re-blued to seat to the correct depth. The final gap being set close to .006. One came in at a "tight" .006 and the other a perfect .005.
Hope this helps someone out.
When the guns are set up so the wedge is a locking device and not a gap setting adjustment device the guns are a lot easier to work with. And I can't help but think that they'll last longer too by removing the spring inherent in the improper fit.