
You are using an out of date browser. It may not display this or other websites correctly.
You should upgrade or use an alternative browser.
You should upgrade or use an alternative browser.
Help w/ primers I give up!!!!
- Thread starter Joe&40
- Start date
- Status
-
Not open for further replies.
CMV
Member
My old lee hand priming tool broke and I bought the new model.....well all I can say is the new one sucks.......go with the RCBS, my brother has one and it works great.
Interesting - I thought the new one was better?
That's what I've been using - the Lee Autoprime XR. I've only done about 400 .223 on it so far, but have no complaints. I've gone over some military crimps and while it felt like it was binding or tight, it still seated them. Otherwise the primers just squeeze in without a lot of force from my hands. I can do 100 at once and my hands aren't hurting or cramped up from it.
What's different/better about the RCBS one? They look very similar. My only gripe about the Lee one was needing to buy special shell holders for it. I thought it was dumb to have to buy a shellholder for the press, one for the Lee trimmer, and one for the hand priming tool so I need 3 shell holders for the same caliber that aren't interchangeable. But even buying the full set of shellholders, the overall cost was less than the RCBS tool.
I don't have anything to compare it to. Since it does what I thought it would do and works as advertised, I have to say it's a good tool. But since it's the only thing I've ever used to seat a primer, I might be using one of the worst options & not know it. Ignorance is bliss if that's the case because it performs well for me.
Damon555
Member
Well, the main problem I have with it is the angle of the handle. I have average sized hands and it's pretty tough to get a good grip on the new one. The old model had a slightly shallower angle and a shorter handle. The newer model really cramps my hand up when I can get a grip on it.
I also don't like the fact that the primer waiting to be seated next is sitting out in the open just waiting to fall out or get turned around if it gets bumped.
One good thing about it is the square tray. At least you can dump a box of primers into it without loosing any.
I also don't like the fact that the primer waiting to be seated next is sitting out in the open just waiting to fall out or get turned around if it gets bumped.
One good thing about it is the square tray. At least you can dump a box of primers into it without loosing any.
LiveLife
Member
Joe, sorry for the late reply. I had to give this some thought and retake some closeup pictures I took earlier because initially I too was assuming that it was burr/gouges on the feed ramp surface.Joe&40 said:It's jamming right in front of the seating pin. The ones that turn sideways are the biggest problem. I have cleaned it from powder and washed the whole assembly in heavy detergent and with laundry sheets and used some graphite. I ran 100 rounds tonight through it and had about ten jams.
Joe&40 said:Kingmt. I didn't notice any burs in it I will look closer
Please do post pics.
Since I do not have the press right in front of me to observe the operation, I will offer following suggestions that you could use to investigate your primer feed problem further and provide feedback. I am assuming that your are using the proper Large/Small primer push rods for the Large/Small attachments and your shell plate timing is set to zero.
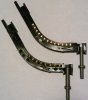
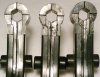
This is how the primers are fed (small attachment on top)
Here's a close up (small attachment on top)
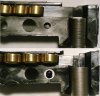
First, check to make sure the primer push rod is going all the way down so the top of the rod surface is even with the feed attachment surface. If there is any debri in the primer push rod tube (like powder particles), the rod may not drop down all the way and stick up a bit.
The top surface of the rob should be even with the primer feed attachment surface like this picture.
Continued on next post.
Attachments
LiveLife
Member
If the push rod is not flat and sticking up above the primer feed attachment surface, you will need to remove the attachment and clean out the tube.

Clear any thing that may have fallen inside the tube and clean the primer push rod.

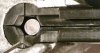
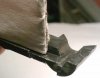
If your primer attachment surface is gouged or has burrs like the picture below, then you can try to smooth out/polish the surface or replace the attachment. New small attachment on the left with gouged attachment in need of repair/burnishing on on the center/right.


Continued on next post.
Clear any thing that may have fallen inside the tube and clean the primer push rod.
If your primer attachment surface is gouged or has burrs like the picture below, then you can try to smooth out/polish the surface or replace the attachment. New small attachment on the left with gouged attachment in need of repair/burnishing on on the center/right.
Continued on next post.
Attachments
LiveLife
Member
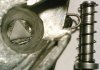
I smoothed out this older small primer attachment with a small precision flat screwdriver and burnished the surface with folded surfaces of 8x11 plain copy paper.
White arrows show the surfaces to be burnished.

Folded 8x11 plain copy paper used to burnish surface (apply firm finger pressure and quickly rub back and forth).

Before and after pictures compared to new attachment vs burnished/repaired attachment on the right. Although you can still see some deeper gouges, the surface is smooth and polished for the primer cups to slide on.

I will be posting a new thread titled "Solutions for Pro 1000 primer attachment" with more comprehensive/detailed pictures from initial "proper" setup to repairs for more reliable operations.
Keep us posted if this helped.
White arrows show the surfaces to be burnished.
Folded 8x11 plain copy paper used to burnish surface (apply firm finger pressure and quickly rub back and forth).
Before and after pictures compared to new attachment vs burnished/repaired attachment on the right. Although you can still see some deeper gouges, the surface is smooth and polished for the primer cups to slide on.
I will be posting a new thread titled "Solutions for Pro 1000 primer attachment" with more comprehensive/detailed pictures from initial "proper" setup to repairs for more reliable operations.
Keep us posted if this helped.
Attachments

LiveLife
Member
kingmt, it may still be debri under the primer rod as OP has not commented back yet. Yes, feel free to use the pictures.
For the new thread, I will actually use the burnished primer feed attachment above along with new and other damaged attachments to see how they feed different brands of primers along with other solutions/mods.bds said:I will be posting a new thread titled "Solutions for Pro 1000 primer attachment" with more comprehensive/detailed pictures from initial "proper" setup to repairs for more reliable operations.
Joe&40
Member
bds, i will try this. Thank you!! Joe&40
Thank you all!
Thank you all!
- Status
-
Not open for further replies.
Similar threads
- Replies
- 25
- Views
- 1K
- Replies
- 3
- Views
- 386
- Replies
- 12
- Views
- 993