homemade holsters

Status
Not open for further replies.
First off there is an easy fix for protecting your little fingers when hand stitching. They are called bandaids. ;)

I first got into leather work back in the early '60's as I wanted a hand tooled western belt and and I wasn't going to pay for the quality of work I saw available. I bought a basic set of tools from a guy that had tried and given up on it, read an Al Stolhman book about how to do it, and was on my way. My first effort turned out pretty well as I was assured by others. This led to a second job making hand tooled western name belts which was the rage back then which caused my tool collection to grow a lot. I have no idea how many belts I hammered out before a better paying job that took up more of my time caused me to lay my tools aside except for the now and then gift belt, wallet, purse, etc. Fast forward quite a few years and I started making my own fancy holsters. Then I put the tools away for a time. I recently got them back out as I have 14th birthday coming up for a GG girl and she is into the western look. I recently purchased a belt strip for her belt, 3 more for other belts as she has a sister and cousin and Grandpa decided he wanted a new one too, and grabbed a piece of Herman's Oak big enough to make at least two holsters as my newest SS 44 has nothing to contain it on my hip.
 
They're super easy to make, would actually be a really good first leather project.

Basically you would just need to measure the length you want from near the butt to where you want it to end near your grip, this will be your length.

Next measure with a soft tape measure (think the kind tailors use, a tool shop tape measure made of a steel band wouldn't follow contours very well) and measure around the back part of your stock near the butt and around near the grip at the spots where you took your length measurements and note those down.

Now with your measurements select a piece of leather, I used 4-5oz but something a little heavier could work too. The measurement of the circumference at the butt will be on the bottom and the measurement around near the grip will be the top. On the back of the leather draw a straight line that is the butt measurement. Find the center of this line and draw another line perpendicular to that line the length that you measured in the first step. When you get that done find what the center of your grip side circumference was and draw a line that centers that vertical line. (edit: the final post is taking spaces out of my attempt to illustrate and doesn't come out right, basically it will look like an isosceles trapezoid)


Next you just need to connect the ends of the two lines from the short to the long, you now have a trapezoidal shape. This will be cut out from your larger piece of leather. You can save leather by orienting this to minimize the leather that has to be cut off (or drop, might be a familiar term if you're a craftsman).

With that piece you then wrap your piece around your cuff and take a look. For me here i'm looking to see how the ends come together. Since butt stocks are rarely flat there will be some spots where maybe the ends of the leather have a bit of overlap. Keeping the leather in as close to the final position you'll want check to see if you need to trim back some more leather (usually near the grip side) and make note and markings with a soft pencil (art supply stores sell shading pencil sets for not much and are a great tool in the leather shop, soft pencils in the 2b or 4b range usually erase easily and don't leave noticeable indents if you're gentle) and cut back as needed.

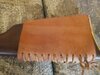
When you've done all your final cuts you can then cut the very tips of the corners to remove the sharp points, just a little bit off is needed, maybe 3mm at most. This will get rounded out by the edgework you'll do later.

Bevel all the edges on the front and back side of your leather and do a preliminary rounding of the edges, you'll have to do more later for the final touches but its good to do this once before moulding.

Next would be wet moulding. Technically you could not do this part but I like a custom fit to my stocks so I like it, plus it helps to start to add some age and character to your leather, especially with plain veg tan.
Wrap your stock with some plastic wrap to keep it dry, try to keep it flat on the butt and not leave any big bulges except maybe around the bottom of the cuff where the stitching will be, and wet your leather piece in a bowl of water. A good full soak is what I prefer, it makes it easier to work with. With veg tan leather when the bubbles of air stop coming out of the leather you know your good. Pull it out and just set it down for maybe 2-3 minutes. The leather will be very soft and pliable now.

Wrap the wet leather around your stock in the position you want it to be and form the leather to any contours you want it to follow. If it starts to slide around be sure to correct it back to the position you want it in. Keep holding it there and working the top side of the leather as it starts to dry, you'll have to hold it for probably 10-15 minutes at least depending on the humidity of where you live. Eventually the leather will start to dry enough that when you remove it from the cuff it keeps it's shape. Keep working it until it starts to get pretty dry and stays in place on the stock on it's own. Leave it around the stock and let that sit for a while to dry, check it after an hour or so and flip it over if you laid your stock on one side so the other side can dry too. After another few hours you can take off the stock and sit it vertically on the butt side and let it dry overnight.

For the rest of the cuff body it's really just going back over the edging to smooth it out after the wet mouling and tapping your lace holes. For the lace holes you will just need to pick a hole punch big enough for your lace (I use 1/4" latigo leather lace on mine) and mark with an awl (or pencil) where you need to tap.

I tapped mine about 3/8" back from the edge of the cuff. Pro (amateur) tip: If you have sling studs on the bottom of your butt be sure to place a stitch hole inline with where the stud is, that way when you go to cross stitch with your lace it will cross in front of and behind the stud.
Using the hole inline with the stud as a starting point measure out in equal as possible distances. I do about 6 stitch holes but you might have more or less depending on your overall length. You may need to get creative with the spacing to keep things even looking but the #1 thing here is make sure you do your markings and taps as identical as you can to both edges of your cuff, that way it doesn't end up crooked when you got to stitch it together.

For the ammo carrier loops you'll want to cut a long piece of leather of the appropriate weight for the size and quantity of rounds you want to be able to carry.
For example, my 357 Mag has 10 loops for rounds, for that I used 2-3oz leather (with the back plain) since there were so many and would be close together. On the 45-70 I used 2-3oz leather but for that I used a scrap piece from another project that was two 2-3oz with the skiv side contact cemented together, effectively making it actually 4-6oz leather. Larger calibers need more loop and can use a heavier leather while smaller calibers generally a lighter leather, especially if you need to cram a lot in a small space.

So anyway, when you decide what cartridge and how man you want to fit on your cuff you'll select a weight of leather to use and cut your strip. A little bit of math can help make sure you're not too short or overly long. Take a soft tape measure and wrap it around one of your cartridges, you can do this with the round flat on a table. See approximately what the circumference is from about the 5 & 7 o'clock positions (wedged right in between the round and the table) take that measurement and multiply it by however many rounds you'll be making loops for and then add 2" on either side for good measure.

When you've cut out your piece do your edgework as needed and then it will be time for more wet moulding. If you have an even number of rounds (10 for example) start with 2 rounds for your moulding, if you have an odd number of rounds just 1 will do.
Wet your leather the same way we did above with the cuff and and then take it to your rounds to form the loops. With two rounds put the center of the piece between the rounds and then roll them together, letting the centerline of the leather fold down between them, to start to form loops. With a single round situation (odd total of rounds) center the middle of your piece around the round and tuck the leather down around the round where it meets the table, starting to form a loop.

For either even or odd round counts the next part is the same, grab more rounds and add them to either side and repeat the action while keeping everything together, forming loops while the leather starts to dry. Here's an example of what it looked like when I did loops for 12GA


You want to be sure that you keep enough slack in the leather "dimples" between the rounds so that they keep contact with your flat surface, if they start to pull away when the leather dries (and shrinks a bit) then your loops will end up too small and it will be hard to put rounds in and take them out. After you've formed loops for all the rounds you want keep them together with your hands and keep forming as the leather dries enough that you can eventually let it be. With my 357 Mag example with the 10 rounds it can be a handful to keep it all together, don't get discouraged if the rounds all pop out of position and you have to finagle them back into the loops you're forming, it happened to me a few times on that one.

Side note: Wet forming its self is a bit of a skill you'll get the hang of if you do it enough. Knowing when you can set a piece down for a few minutes, come back and form some more, repress certain spots as the drying process happens, etc. comes with practice and experience. Keep at it though, its very rewarding being able to make custom moulded leatherwork.

Once that is totally dry you can cut the extra (if any) off the ends and re-edge, next will be tapping stitching holes to attach your loop carrier to the cuff. I won't lie, this part is not super fun, especially with many rounds. Probably start off with a project that has fewer round loops until you get the hang of tapping and saddler's stitching.
The basic idea here is lay your cuff flat and position your loops on the side you want them to be on. A little Elmer's glue can help keep one side in position when you start out but won't really be needed after that. The idea here is to put stitching lines across the width of your loop strap at the very edges past the loops and inbetween each round loop. Start from one side and work your way to the other, making your taps, doing your stitching, making your next taps, doing your stitching, etc. This is the part that is a pain, haha, but well worth it in the end.
When you're tapping the holes in the actual loop part it helps to put a round in the loop so you can get your stitching chisel down tight in the pocket between the round and the cuff (that 5 or 7 o'clock area again). When you're doing this be sure to go slow and keep your alignment, making sure each new stitch tap is parallel to the last and you're not drifting overall, once your tap your chisel in the leather there's no going back. Eventually you'll get through them all and will have ammo carrier loops on your cuff.

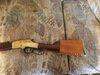
The strap you see on my pieces above that goes behind the actual butt and meets your shoulder might not be strictly necessary but I decided to go with it for extra insurance. I didn't use any suede in my cuff to keep it from sliding around and I wanted to be sure. These are just a strip of leather that's been cut to length, edged, shaped and stitched with wax thread. The stitching hole tapping and stitching here can get a little tricky. One side is easy since you can lay your butt cuff flat, but once you have one side done you start working in a 3D world. With the one side stitched you'll want to put your cuff on your stock and wrap the loose end around your butt end, keeping the cuff from sliding around, and make note if you need to do any more final trimming to keep it even on both sides. If cuts are needed do so and then refinish your edges, you wont have another chance when you do the next part. With the cuff back on your stock wrap the loose end around the butt and a little bit of Elmer's glue can be used to hold the loose end in place until you can stitch it down. Hold on the glued piece until it's dry enough to stay on it's own and gently slide the cuff off your stock.

Let that totally dry (maybe an hour) and then comes the tricky tapping and stitching. Using a table or bench corner position your cuff in such a way that you can put that glued strap end flat on your tapping surface (usually a cutting board) and make your taps for stitching. Once you have your taps in you don't have to worry so much about the glue coming undone but it does help to keep that intact. Make the stitches with a normal saddler's stitch, the angle can be a little weird now that you have a piece of leather folded toward its self but once you have them in that part is done.

With all that done you'll be able to slap your butt cuff on your stock and grab some leather lace and stitch it on like a shoelace, starting from the grip side working your way out to the butt side. Any other stuff like stamping caliber, names, date etc. can also be added when you have it on your stock.


This ended up being way longer than I expected, haha, but I hope it's not too daunting and you actually give leather crafting a try. Pretty much all of the basic technique I know I learned from watching Weaver Leather's youtube page, check them out to get the basics down. Good luck!


I picked up a piece good leather. Can get 3, maybe 4, possibly 5 out of it. At is thick, heavy. No idea what the weight is. Guy uses it for knife sheaths.


Do I need to grommet the lacing holes?

May take trimmings and do lever wraps.
 
I picked up a piece good leather. Can get 3, maybe 4, possibly 5 out of it. At is thick, heavy. No idea what the weight is. Guy uses it for knife sheaths.


Do I need to grommet the lacing holes?

May take trimmings and do lever wraps.

I haven't really found grommets necessary, you could if you wanted a more commercial look but so long as you give around 3/8" between your hole center and the edge of the cuff you should be good.

If you do leather wraps be sure that the leather isn't so thick that when you try to close the action it can't lock closed all the way.
 
I picked up a piece good leather. Can get 3, maybe 4, possibly 5 out of it. At is thick, heavy. No idea what the weight is. Guy uses it for knife sheaths.


Do I need to grommet the lacing holes?

May take trimmings and do lever wraps.
So..yes start at the beginning.

What style of holster do you want to make? Can you show us an example?
 
3.5 -4" lever half wrap, to not interfere with closing.
A simple butt cuffs wrap, to go with CAS. Nothing fancy. More of a cowboy custom, plain and simple.

Prefer no grommets, lacing should not be pulling too hard against the leather.

Getting a cardstock pattern cut to fit, should be hardest part.

No sewing, no pieces, no grommets. One piece of leather and lacing.
 
Started cutting and taping cardstock. Ended up with a good pattern for Browning BL-92.
Put the pattern on Marlin 336. Much adjustement needed, but overall, fairly simple.
Moved pattern to the Henry. Holey Moley, to look so alike, everyone is different.
Break out the shotties. Get a Rossi and then Baikhal pattern made.

Laid out the leather and 4 pieces are easy. Rearrange a bit and I can get+ 5. Make note of how the patterns are placed and start moving them around. I ended up with 6 pieces cut out.

Still need 2 more to have all covered, but I am stoked.


Next, water soaking and forming.

Need to research edge finishing.

Punching holes for lacing will be fairly straight forward.

So far, so good and pretty easy. Just go slow and pay attention.
If you want to do edge burnishing, you can go a few ways.

I started with a piece from my old jeans. Just wet the leather edge a tiny bit and rub.

You can use special tools, like a burnisher, but you can use the wood handle on other tools. For example,when I started that I used the wood on my mallet.

If you want a little help, you can use Gum Tragacanth, or Tokonole. Their sole purpose is to help burnish. Apparently, Tokonole is miles better, but I can't speak on that as I've only ever used Gum Tragacanth and water.

You can use an edge Beveller to get a rounded, more professional edge. I personally use a #2 for almost everything.

For dying the edges, the sky's the limit. I experimented till I found what I liked, which is an InkJot brand Black Permanent Marker. It was a really wide tip, making it really easy to dye the edges black.
 
I feel so inadequate, seeing the awesome holsters and sheaths.

But, I trudged on. Since this will be for Cowboy Action, I decided not to burnish edge and see how it works out.
Got the holes for the lacing. Water soaked, dried and formed to the butt stock.
Lacing was a bit more hassle than I had figured. I am thinking, maybe too many holes.

But, they first about completed. Final tie off the lacing will take a few approaches. Try out different looks.
 

Attachments

  • 0511221831.jpg
    0511221831.jpg
    174.7 KB · Views: 27
  • 0511221831a.jpg
    0511221831a.jpg
    80.4 KB · Views: 26
I feel so inadequate, seeing the awesome holsters and sheaths.

But, I trudged on. Since this will be for Cowboy Action, I decided not to burnish edge and see how it works out.
Got the holes for the lacing. Water soaked, dried and formed to the butt stock.
Lacing was a bit more hassle than I had figured. I am thinking, maybe too many holes.

But, they first about completed. Final tie off the lacing will take a few approaches. Try out different looks.
You did fantastic for your first project! Good job!
 
I feel so inadequate, seeing the awesome holsters and sheaths.

Nonsense. Everyone starts just like you with simple things. With some experience and after poking a few holes in your hands and fingers you will be amazed at the stuff you can make with basic leather working tools. Study photos of bridles, holsters, scabbards, belts and knife sheathes used by our old time vaqueros and cowboys and you will note that the designs are extremely simple and functional.
 
I feel so inadequate, seeing the awesome holsters and sheaths.

But, I trudged on. Since this will be for Cowboy Action, I decided not to burnish edge and see how it works out.
Got the holes for the lacing. Water soaked, dried and formed to the butt stock.
Lacing was a bit more hassle than I had figured. I am thinking, maybe too many holes.

But, they first about completed. Final tie off the lacing will take a few approaches. Try out different looks.


Nice first attempt! I would back off on the number of lacing holes personally but it's your own style.
 
I'm often in a quandary about how to comment on holsters made by newbies to the craft.

I'm a very experienced leather worker,,,
I've been to two schools to learn the skills.

Two week, one-on-one saddle making class,,,
It was run by Dusty Johnson of Loveland, Colorado.

Two year Associate Degree in "Shoe, Boot, and Saddle making",,,
I got that from Oklahoma State University - Okmulgee,,,
Three years managing a Tandy Leather store

I'm not trying to brag so much as I am trying to establish my credentials as a professional,,,
I never tried to make a complete living with my holsters and gunbelts,,,
But over the 25-30 years I have made and sold well over 200 rigs.

So here's my dilemma,,,
I look at every homemade holster posted by a forum member.

A lot of the times it's good work and I do make positive comments on it,,,
But more often than not it looks like something a Boy Scout made at a jamboree.

Uneven cuts on the leather, poorly executed carving, uneven stitching, rough/uneven edges,,,
These are all indicative of a a person's first efforts and shouldn't be denigrated,,,
I still have some of the first leather items I made when I started out,,,
I was definitely not an Al Stohlman prodigy right out of the gate,,,
It took years and a lot of dead cows to learn my craft.

But back to my original point,,,
I recently saw a holster made by a member of a forum,,,
It really was not a very good job and I wanted to comment on how to improve.

I did attempt to measure my words and not appear insulting,,,
Every comment I made was also accompanied by a method/technique for improvement.

I got slammed by the original poster/maker,,,
Several other forum members,,,
And a forum moderator.

So now I only comment on a holster if it really is a nice piece of work,,,
That's sad for me because all I really want to do is help a new leather worker learn/perfect the craft.

All I'm saying is that if I do make a comment that could be considered negative,,,
My intent was not to be snarky or snide,,,
It was to promote better techniques.

Am I being too snobbish?

Aarond

.
As for me personally once I get started I would hold criticism from other members as high value and to be taken well for the sake of improvement. That’s the great part about THR no trolls only mentors mostly. The negative mean stuff gets removed and a ban issued eventually.
 
I'm often in a quandary about how to comment on holsters made by newbies to the craft.

I'm a very experienced leather worker,,,
I've been to two schools to learn the skills.

Two week, one-on-one saddle making class,,,
It was run by Dusty Johnson of Loveland, Colorado.

Two year Associate Degree in "Shoe, Boot, and Saddle making",,,
I got that from Oklahoma State University - Okmulgee,,,
Three years managing a Tandy Leather store

I'm not trying to brag so much as I am trying to establish my credentials as a professional,,,
I never tried to make a complete living with my holsters and gunbelts,,,
But over the 25-30 years I have made and sold well over 200 rigs.

So here's my dilemma,,,
I look at every homemade holster posted by a forum member.

A lot of the times it's good work and I do make positive comments on it,,,
But more often than not it looks like something a Boy Scout made at a jamboree.

Uneven cuts on the leather, poorly executed carving, uneven stitching, rough/uneven edges,,,
These are all indicative of a a person's first efforts and shouldn't be denigrated,,,
I still have some of the first leather items I made when I started out,,,
I was definitely not an Al Stohlman prodigy right out of the gate,,,
It took years and a lot of dead cows to learn my craft.

But back to my original point,,,
I recently saw a holster made by a member of a forum,,,
It really was not a very good job and I wanted to comment on how to improve.

I did attempt to measure my words and not appear insulting,,,
Every comment I made was also accompanied by a method/technique for improvement.

I got slammed by the original poster/maker,,,
Several other forum members,,,
And a forum moderator.

So now I only comment on a holster if it really is a nice piece of work,,,
That's sad for me because all I really want to do is help a new leather worker learn/perfect the craft.

All I'm saying is that if I do make a comment that could be considered negative,,,
My intent was not to be snarky or snide,,,
It was to promote better techniques.

Am I being too snobbish?

Aarond

.

You far more qualified than me as a leather worker, but I've been around the block quite a few times. I always live by this rule....."if you can't say something nice, just keep quiet"...which I do quite well these days. :)
 
I'm often in a quandary about how to comment on holsters made by newbies to the craft.

I'm a very experienced leather worker,,,
I've been to two schools to learn the skills.

Two week, one-on-one saddle making class,,,
It was run by Dusty Johnson of Loveland, Colorado.

Two year Associate Degree in "Shoe, Boot, and Saddle making",,,
I got that from Oklahoma State University - Okmulgee,,,
Three years managing a Tandy Leather store

I'm not trying to brag so much as I am trying to establish my credentials as a professional,,,
I never tried to make a complete living with my holsters and gunbelts,,,
But over the 25-30 years I have made and sold well over 200 rigs.

So here's my dilemma,,,
I look at every homemade holster posted by a forum member.

A lot of the times it's good work and I do make positive comments on it,,,
But more often than not it looks like something a Boy Scout made at a jamboree.

Uneven cuts on the leather, poorly executed carving, uneven stitching, rough/uneven edges,,,
These are all indicative of a a person's first efforts and shouldn't be denigrated,,,
I still have some of the first leather items I made when I started out,,,
I was definitely not an Al Stohlman prodigy right out of the gate,,,
It took years and a lot of dead cows to learn my craft.

But back to my original point,,,
I recently saw a holster made by a member of a forum,,,
It really was not a very good job and I wanted to comment on how to improve.

I did attempt to measure my words and not appear insulting,,,
Every comment I made was also accompanied by a method/technique for improvement.

I got slammed by the original poster/maker,,,
Several other forum members,,,
And a forum moderator.

So now I only comment on a holster if it really is a nice piece of work,,,
That's sad for me because all I really want to do is help a new leather worker learn/perfect the craft.

All I'm saying is that if I do make a comment that could be considered negative,,,
My intent was not to be snarky or snide,,,
It was to promote better techniques.

Am I being too snobbish?

Aarond

.
I think it's down to what they asked for. For example, when I'm showing my work, i always end with " Questions ,Comments and concerns, of the positive and negative variety , are welcome and encouraged", or something that effect.

I like knowing that people like my work. I'm not great, but my stuff works for the most part.

The way I see it, how am I to get better when nobody tells me what I did wrong? I encourage it , but I understand why others don't.
 
I'm with you....there's a place and time for learning in my opinion. I have a small group of excellent leather workers that usually get to see my work. I'll take their advice and criticism any time and also give it. Most internet posting are from people I do not know. Usually when I have tried to be constructive I end up getting lambasted for it. So I no longer offer that form of help unless I know them. Life is just too short for that kind of BS. If they are happy.....I'm happy.....:)
 
I'm with you....there's a place and time for learning in my opinion. I have a small group of excellent leather workers that usually get to see my work. I'll take their advice and criticism any time and also give it. Most internet posting are from people I do not know. Usually when I have tried to be constructive I end up getting lambasted for it. So I no longer offer that form of help unless I know them. Life is just too short for that kind of BS. If they are happy.....I'm happy.....:)
All I ask is to simply under that I'm new. I'm not good, I consider myself barely okay.
 
All I ask is to simply under that I'm new. I'm not good, I consider myself barely okay.

I like western history and western gear so I read a lot about it. Among the books I have is one of my favorites called "Packing Iron" where a nice selection of photos of leather holsters and knife sheathes from various eras of the American West are displayed. If you study these items you'll notice that except for saddles, holster & sheathe designs are simple and very functional so these items are not complicated or hard to make. I pick out the ones I like best and I say to myself "I can make something like that".
My advice to you or anyone that wants to give it try is to think positively because it isn't rocket science. The stuff I make is strictly for my personal use and from the viewpoint of a good professional leather worker there's probably a lot of room for improvement but something doesn't need to be perfect to be functional or give you the satisfaction of using something you made yourself.
To be a professional leather worker you need to invest a lot of time and in tools than the average hobbyist can't afford or is unwilling to buy. For guys like you and me there's no pressure, it's all about having fun trying your best, learning from your mistakes and making it better the next time. Someone may come out and say what you made is this or that but the only person that needs to be happy with what you made is you and if you're not satisfied with your work all you have to do is try again.
So in a nutshell, never mind what anyone thinks and if you enjoy leather working keep trying.
 
Status
Not open for further replies.
Back
Top