GW Staar
Member
- Joined
- Feb 26, 2009
- Messages
- 3,691
You can watch it work in a video near the end.
With pre-filled CCI strips the APS primer system is the fastest, safest primer system going. But if you have an gigantic stash of Winchester or Federal primers, what do you do? RCBS chose to furnish a just adequate strip loader that for me is a weak link that can be a bit annoying in an otherwise fast and convenient priming system.
There are four annoyances:
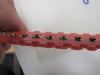
1. The first and worst, is that primer anvils and/or cup edges that are supposed to be at least flush with the edge of the APS primer strips, are sometimes not when they come out of the loader. When they stick up even a little they can jam up a primer machine. Not a serious jam mind you, and easily unjammed by pushing the errant primer down a little, but irritating none the less. It’s a ritual for APS users who use the loader to use a flat something to slide or roll across several strips at once, after loading, to make sure the primers are all down. I have used a small wallpaper roller.
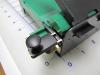
The picture below illustrates the problem. I exaggerated the middle primer for effect, but the left one will catch an edge just as sure.

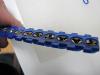
The same strip through the the improved loader …. the strips have plenty of depth to handle recessing.

2. Second annoyance: the black lever that has to be pushed just so, not too much or too little, so the the strips can slide in and out. Pros get fairly good at guessing where the sweet spot is, but it’s a less than “precisioneered” feature, and it annoys me....too easy to make it better than that.
3. Third annoyance: Sometimes the plastic bar above the strip doesn’t open wide enough for all the primers to go back and drop in the strip holes. That’s a a design weakness….partially the result of RCBS’s little raised circles in the bottom of the bar (their attempt at recessing primers that doesn’t work), and partly because some primer anvils are just higher than others…even in the same batch. RCBS didn’t allow for those, so one needs to modify the bar a little.

Picture below is the same piece with the nubs filed off, and additional filing to reduce the depth a little…I may have to reduce it a tad more if I have any more hang up like the last few in the video.

4. The last annoyance is that the tool is too light. It needs a wood base to make it feel substantial…more ergo if you will. I like to load strips in my easy chair while I’m watching sit-coms or movies. A base has made it easier.
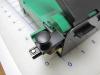
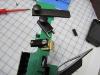
Anyway, I’ve made four mods to remove those annoyances to me. The one (filing the bar) I already showed in the pictures above. I filed, then sanded to 600 grit, and rounded the leading edge. I think I will polish it further. The other three mods are visible in the picture below:

To the left, my primer recessing mod. All primer strips exit though it. On the right side is a slide bolt mod that when pushed in gives the lever a stopping place AT THE SWEET SPOT where strips slide. Finally the Oak base!
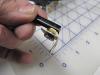
I made a picture essay to demonstrate how I built these mods. I threw out my rule of not permanently altering the original product, but this tool is fairly cheap, and 5 holes had to be drilled. Two were drilled in the front plastic legs and one in the metal back to hold the base. Then, (picture below), one had to be countersunk in the strip channel and the screw head going in had to be ground and polished flush. This side shows the initial step in making the "primer recesser". This is really high tech with a marble from a craft store, and 3/4" aluminum bar from ACE Hardware.

Screwed to this countersunk hole, is the bottom 1/8”x3/4”x1 3/4” aluminum bar. 3 holes were drilled: center is drilled with a #36 bit and tapped for the 6-32 flat head machine bolt. The two end holes are drilled 1-1/8” apart (9/16” each side of center) with a 9/64” bit. (the counter sunk hole in the green channel is also 9/64”)

Next the 1/16” thick center bar is fastened over the strip channel to the bottom bar with 2 - 1.5” 6-32 bolts and nuts, but not tight enough to deform the center bar. (blue loctite used here) Center bar has a 1/2” hole drilled in the center, then the two 9/64” holes same as the top bar. While the bar shape is arbitrary, the 1/16” thickness is mandatory for the marble to protude below it deep enough.

Anyone who has had to replace the innards of a Delta faucet recognizes the spring. If you don’t have one lying around, you can get one from Ace hardware in their spring display ….. pennies. The other high tech part is a glass marble from a craft shop …. the type people pour into vases with their fake flowers …. no, you can’t just buy a single one, but they’re still cheap.

Finally the top bar is carefully placed over the spring and fastened lightly with the 2 brass 6-32 thumb nuts (ACE again). It should be tightened only enough to keep the spring. Screwed on too tight and it’s hard to advance the strips. The top bar is the same size as the bottom bar only the center hole is different. It’s a drilled depression 13/32 diameter. Drill it only deep enough to keep the spring. IOW's straight sides of only 1/32” depth will do a great job. BTW Aluminum and glass was used to prevent sparks.
Next picture is some measurements, then a picture of all the parts for these mods.


The next two pictures show how I anchored the tool to the simple oak base … self-explanatory.


With pre-filled CCI strips the APS primer system is the fastest, safest primer system going. But if you have an gigantic stash of Winchester or Federal primers, what do you do? RCBS chose to furnish a just adequate strip loader that for me is a weak link that can be a bit annoying in an otherwise fast and convenient priming system.
There are four annoyances:
1. The first and worst, is that primer anvils and/or cup edges that are supposed to be at least flush with the edge of the APS primer strips, are sometimes not when they come out of the loader. When they stick up even a little they can jam up a primer machine. Not a serious jam mind you, and easily unjammed by pushing the errant primer down a little, but irritating none the less. It’s a ritual for APS users who use the loader to use a flat something to slide or roll across several strips at once, after loading, to make sure the primers are all down. I have used a small wallpaper roller.
The picture below illustrates the problem. I exaggerated the middle primer for effect, but the left one will catch an edge just as sure.
The same strip through the the improved loader …. the strips have plenty of depth to handle recessing.
2. Second annoyance: the black lever that has to be pushed just so, not too much or too little, so the the strips can slide in and out. Pros get fairly good at guessing where the sweet spot is, but it’s a less than “precisioneered” feature, and it annoys me....too easy to make it better than that.
3. Third annoyance: Sometimes the plastic bar above the strip doesn’t open wide enough for all the primers to go back and drop in the strip holes. That’s a a design weakness….partially the result of RCBS’s little raised circles in the bottom of the bar (their attempt at recessing primers that doesn’t work), and partly because some primer anvils are just higher than others…even in the same batch. RCBS didn’t allow for those, so one needs to modify the bar a little.
Picture below is the same piece with the nubs filed off, and additional filing to reduce the depth a little…I may have to reduce it a tad more if I have any more hang up like the last few in the video.
4. The last annoyance is that the tool is too light. It needs a wood base to make it feel substantial…more ergo if you will. I like to load strips in my easy chair while I’m watching sit-coms or movies. A base has made it easier.
Anyway, I’ve made four mods to remove those annoyances to me. The one (filing the bar) I already showed in the pictures above. I filed, then sanded to 600 grit, and rounded the leading edge. I think I will polish it further. The other three mods are visible in the picture below:
To the left, my primer recessing mod. All primer strips exit though it. On the right side is a slide bolt mod that when pushed in gives the lever a stopping place AT THE SWEET SPOT where strips slide. Finally the Oak base!
I made a picture essay to demonstrate how I built these mods. I threw out my rule of not permanently altering the original product, but this tool is fairly cheap, and 5 holes had to be drilled. Two were drilled in the front plastic legs and one in the metal back to hold the base. Then, (picture below), one had to be countersunk in the strip channel and the screw head going in had to be ground and polished flush. This side shows the initial step in making the "primer recesser". This is really high tech with a marble from a craft store, and 3/4" aluminum bar from ACE Hardware.
Screwed to this countersunk hole, is the bottom 1/8”x3/4”x1 3/4” aluminum bar. 3 holes were drilled: center is drilled with a #36 bit and tapped for the 6-32 flat head machine bolt. The two end holes are drilled 1-1/8” apart (9/16” each side of center) with a 9/64” bit. (the counter sunk hole in the green channel is also 9/64”)
Next the 1/16” thick center bar is fastened over the strip channel to the bottom bar with 2 - 1.5” 6-32 bolts and nuts, but not tight enough to deform the center bar. (blue loctite used here) Center bar has a 1/2” hole drilled in the center, then the two 9/64” holes same as the top bar. While the bar shape is arbitrary, the 1/16” thickness is mandatory for the marble to protude below it deep enough.
Anyone who has had to replace the innards of a Delta faucet recognizes the spring. If you don’t have one lying around, you can get one from Ace hardware in their spring display ….. pennies. The other high tech part is a glass marble from a craft shop …. the type people pour into vases with their fake flowers …. no, you can’t just buy a single one, but they’re still cheap.
Finally the top bar is carefully placed over the spring and fastened lightly with the 2 brass 6-32 thumb nuts (ACE again). It should be tightened only enough to keep the spring. Screwed on too tight and it’s hard to advance the strips. The top bar is the same size as the bottom bar only the center hole is different. It’s a drilled depression 13/32 diameter. Drill it only deep enough to keep the spring. IOW's straight sides of only 1/32” depth will do a great job. BTW Aluminum and glass was used to prevent sparks.
Next picture is some measurements, then a picture of all the parts for these mods.
The next two pictures show how I anchored the tool to the simple oak base … self-explanatory.
Last edited: