
I made this thread quite a while ago and edited pictures due to my fears that the mask I was wearing may give some people a bad impression. I don't like posting my face online and I don't mind a good joke every now and then which is why I wore the mask. I will now repost this with pictures.
You are using an out of date browser. It may not display this or other websites correctly.
You should upgrade or use an alternative browser.
You should upgrade or use an alternative browser.
Install New Model Blackhawk .357 XRN-3RED grip frame on Ruger Old Army Zombie Thread by request
- Thread starter grter
- Start date
- Status
-
Not open for further replies.
I am reposting the following from the Ruger Old Army Club portion of the Black Powder forums since it did not seem to garner any interest there and maybe this is the more appropiate place to share the information.
Ok am I missing somthing here or not. I just fitted a New Model Blackhawk grip frame (a 55 dollar aluminum ebay special) to a Ruger Old Army.
I left the newer version trigger spring mounted and put the old trigger return spring and plunger on top of it.
When all is assembled it's just held in place behind the trigger but a little higher resulting in a lighter trigger and the new version cylinder return spring prevents the trigger from being pulled too far back after the hammer is released.
It's a lighter crisp release with less overtravel great.
The newer grip frame has more area milled out that allows that trigger plunger and spring to fit in with the spring pin behind it
I removed the old style cylinder latch spring and used the modern spring and plunger that mounts in the grip frame for the newer model cylinder latch. It's a fit and it works fine on the Old Army.
Putting it together was different but not too difficult. It's easy for the cylinder latch spring and plunger to miss it's seat (hole) and bend over to the side and of course the trigger spring and plunger has to be positioned also.
Everything seems to hold in place after assembly.
Some lessons I learned I also ordered a trigger and cylinder latch for the new model to see if I can match it or modify it easily but no the holes for the pins in the trigger and cylinder latch of the New Model Blackhawks are of different diameter and drilled in different places.
Retrofitting those are either almost undoable or too much work to be worth it. I was hoping to be able to just hack saw some parts of the new trigger off and adjust the cylinder latch with a little bit of filing but they are very different.
The good news is that the cylinder hands (pawl) of the New Model Black Hawk are good enough to work with. If the other catch in the hand is filed flat you now have a hand that will fit the Old Army alll you have to do is some standard hand fitting.
How do I know because I did it and it works fine in fact the new hand is thicker and rugged.
The Old Army is now 100% coil springs except for the new trigger return spring but that is not used it just acts as a trigger overtravel stop.
Don't fret if you can't find an XR3RED grip frame for your Old Army it seems the new one can be made to fit. If this does not work out (I think it will though) I can forsee moding the grip frame to take the old style trigger sping and plunger would not prove difficult.
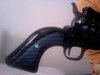
The grips I had on the XR3RED fit fine also.
UPDATE UPDATE UPDATE !!!!
Although I did not experience any problems with the above I could not rest with the idea that the trigger return spring and plunger was unsupported in that small space so I removed the new model trigger wire spring that was acting as a trigger overtravel stop completely
I used it's retaining pin to secure a small piece of brass tubing with a 3/32 inch hole drilled on the very end of it close to the edge (this is important to allow free movement of the hammer strut) inside that extra space in those newer XRN-3RED grip frames.
The new model trigger spring retaining pin through the tube acts as a stop for the old model trigger return spring and secures the tube in place quite well.
The old model trigger return spring and plunger fits nicely into that tube which holds it in place good as well as providing support around the plunger and spring.
Cutting the brass tubing was very easy with a tiny rigid pipe cutter. After a quick minor tiny filedown of a small area of the tube the 3/32 bit drilled through both ends of the tube quickly with my little cordless drill using a bed post for support.
You can keep your old style latch spring or use the newer one mounted on the Newer Grip Frame either will work.
I decided to make my Old Army all coil springs so I used the newer grip frame mounted cylinder latch coil spring and plunger.
Thats it no "extensive modification to grip frame" just simply remove the trigger return spring and drop in a part (a drop in part that is easy to make at that.)
I am currently using a black aluminum one but maybe I will finally get to try out a New Model all steel grip frame used for cheaper without getting ripped and price gouged for an original.
I my opinion this setup is better than the original both aesthetically since the trigger return and plunger are not seen but up and hidden and functionally allowing for a better slightly lighter trigger pull. It is also now centered behind the trigger and not kind of off to the side like the old setup.
I will post pics and instructions if requested by anyone otherwise I will not bother.
========================================================================
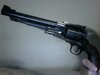
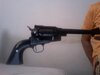
Here it is a fine one with carbon fiber grips and belt mountain cylinder pin. Notice the unsightly plunger that is usually smack in the middle and off to the side behind the trigger is no more. It's up inside the frame
UPDATE OK GUYS I NOW USE THE ORIGINAL LOADING LEVER SETUP. IT LOOKS BETTER.
THE BELT MOUNTAIN PIN IS A GREAT SETUP FOR CARTRIDGE CONVERSIONS BUT I DON'T HAVE NOR EVER HAD A CONVERSION CYLINDER SETUP. I FIND THE LOADING LEVER SETUP IS BETTER FOR CAP AND BALL.
Ok am I missing somthing here or not. I just fitted a New Model Blackhawk grip frame (a 55 dollar aluminum ebay special) to a Ruger Old Army.
I left the newer version trigger spring mounted and put the old trigger return spring and plunger on top of it.
When all is assembled it's just held in place behind the trigger but a little higher resulting in a lighter trigger and the new version cylinder return spring prevents the trigger from being pulled too far back after the hammer is released.
It's a lighter crisp release with less overtravel great.
The newer grip frame has more area milled out that allows that trigger plunger and spring to fit in with the spring pin behind it
I removed the old style cylinder latch spring and used the modern spring and plunger that mounts in the grip frame for the newer model cylinder latch. It's a fit and it works fine on the Old Army.
Putting it together was different but not too difficult. It's easy for the cylinder latch spring and plunger to miss it's seat (hole) and bend over to the side and of course the trigger spring and plunger has to be positioned also.
Everything seems to hold in place after assembly.
Some lessons I learned I also ordered a trigger and cylinder latch for the new model to see if I can match it or modify it easily but no the holes for the pins in the trigger and cylinder latch of the New Model Blackhawks are of different diameter and drilled in different places.
Retrofitting those are either almost undoable or too much work to be worth it. I was hoping to be able to just hack saw some parts of the new trigger off and adjust the cylinder latch with a little bit of filing but they are very different.
The good news is that the cylinder hands (pawl) of the New Model Black Hawk are good enough to work with. If the other catch in the hand is filed flat you now have a hand that will fit the Old Army alll you have to do is some standard hand fitting.
How do I know because I did it and it works fine in fact the new hand is thicker and rugged.
The Old Army is now 100% coil springs except for the new trigger return spring but that is not used it just acts as a trigger overtravel stop.
Don't fret if you can't find an XR3RED grip frame for your Old Army it seems the new one can be made to fit. If this does not work out (I think it will though) I can forsee moding the grip frame to take the old style trigger sping and plunger would not prove difficult.
The grips I had on the XR3RED fit fine also.
UPDATE UPDATE UPDATE !!!!
Although I did not experience any problems with the above I could not rest with the idea that the trigger return spring and plunger was unsupported in that small space so I removed the new model trigger wire spring that was acting as a trigger overtravel stop completely
I used it's retaining pin to secure a small piece of brass tubing with a 3/32 inch hole drilled on the very end of it close to the edge (this is important to allow free movement of the hammer strut) inside that extra space in those newer XRN-3RED grip frames.
The new model trigger spring retaining pin through the tube acts as a stop for the old model trigger return spring and secures the tube in place quite well.
The old model trigger return spring and plunger fits nicely into that tube which holds it in place good as well as providing support around the plunger and spring.
Cutting the brass tubing was very easy with a tiny rigid pipe cutter. After a quick minor tiny filedown of a small area of the tube the 3/32 bit drilled through both ends of the tube quickly with my little cordless drill using a bed post for support.
You can keep your old style latch spring or use the newer one mounted on the Newer Grip Frame either will work.
I decided to make my Old Army all coil springs so I used the newer grip frame mounted cylinder latch coil spring and plunger.
Thats it no "extensive modification to grip frame" just simply remove the trigger return spring and drop in a part (a drop in part that is easy to make at that.)
I am currently using a black aluminum one but maybe I will finally get to try out a New Model all steel grip frame used for cheaper without getting ripped and price gouged for an original.
I my opinion this setup is better than the original both aesthetically since the trigger return and plunger are not seen but up and hidden and functionally allowing for a better slightly lighter trigger pull. It is also now centered behind the trigger and not kind of off to the side like the old setup.
I will post pics and instructions if requested by anyone otherwise I will not bother.
========================================================================
Here it is a fine one with carbon fiber grips and belt mountain cylinder pin. Notice the unsightly plunger that is usually smack in the middle and off to the side behind the trigger is no more. It's up inside the frame
UPDATE OK GUYS I NOW USE THE ORIGINAL LOADING LEVER SETUP. IT LOOKS BETTER.
THE BELT MOUNTAIN PIN IS A GREAT SETUP FOR CARTRIDGE CONVERSIONS BUT I DON'T HAVE NOR EVER HAD A CONVERSION CYLINDER SETUP. I FIND THE LOADING LEVER SETUP IS BETTER FOR CAP AND BALL.
Attachments
Last edited:
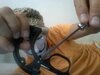
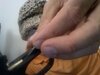
A narrow piece of brass tube that I ordered a long time ago from a knife builders supply and a file to flatten a tiny section for safe drilling.
Remember to drill close the end of that tube if too much sticks out past the pin toward the rear of the pistol it will impede movement of hammer strut.
Remember to drill close the end of that tube if too much sticks out past the pin toward the rear of the pistol it will impede movement of hammer strut.
Attachments


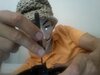
Now you can start reducing to size measure it out to fit (I made the tube as long as the trigger spring and plunger MINUS 1/2 plunger yours may vary just size it right you can always take off a little at a time) and cut with your trusty pipe cutter or hacksaw. Yes I know there is no little holes in end of tube but lets make believe I just finished drilling it.
Leaving tube long for drilling gives you a better grip and more control while drilling. It makes work easier and safer, so unless you have some sort of clamp down setup make cutting it down to size your last step (after drilling.)
Leaving tube long for drilling gives you a better grip and more control while drilling. It makes work easier and safer, so unless you have some sort of clamp down setup make cutting it down to size your last step (after drilling.)
Attachments


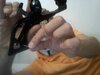
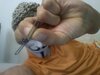
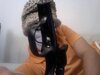
Remove pin that secures new model trigger return spring by using proper sized punch or object of PROPER SIZE and tap out with hammer firm but gently. The first pic on the left is with tube installed but I think you get the picture. Make believe it still has the ghastly new model trigger return spring on it.
Remove that unsightly new model wire trigger return spring
Remove that unsightly new model wire trigger return spring
Attachments

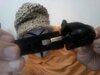
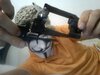
Drop in your newly constructed brass or whatever metal you choose tube and tap pin back in through grip frame and holes you drilled in tube to secure it. Notice you can see pin through tube from rear in second picture. It's not as bright as I would like. I did not want to punch the the pin and take the tube out again for this demo so again lets pretend I just punched the pin back in through the grip frame and through the holes drilled in the tube.
Attachments


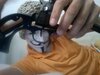
Now it's time to put the new model cylinder latch spring back in the hole in the grip frame if you choose to remove your old cylinder latch spring. The plunger should wind up under the cylinder latch (nice now it's all coil springs from here.)
If you decide to keep the old cylinder latch spring installed then just leave newer coil spring and plunger out when you reassemble. Leaving old cylinder latch spring in makes reassembly easier but I decided to use go with the newer coil spring setup to make this an all coil spring gun. Either way is fine.
If you decide to keep the old cylinder latch spring installed then just leave newer coil spring and plunger out when you reassemble. Leaving old cylinder latch spring in makes reassembly easier but I decided to use go with the newer coil spring setup to make this an all coil spring gun. Either way is fine.
Attachments


Last edited:
Now put it all together making sure all springs and plungers are lined up properly. It can be tricky because the newer cylinder latch spring and plunger can wander easily during assembly and wind up misaligned but when lined up right once everything is put together all is well . Viola. Oops don't forget to put hammer strut and spring in first. Again if you want to avoid the hassle of aligning the newer cylinder latch spring plunger setup you can just leave the old cylinder locking latch spring in.
Attachments
Last edited:
What I do not understand is why you would want an aluminum frame on an Old Army.
I had the al frame on my .41 Mag Blackhawk replace with and Old Army frame and like it that way.
I have pondered this ad nauseam a long time ago and came to the conclusion it's unimportant and only a matter of preference.
As usual there are advantages and disadvantages to both. The aluminum ones are lighter and not prone to rust. Balance is also affected. I don't mind the aluminum grip frames. I was not able to find a blued steel new model Black Hawk grip frame or a less common post 1980s blued steel ROA grip frame. It was either stainless or in the white so I went with the blakck aluminum one which is easy to get and more common. There are complaints that the finish chips on aluminum but my observation is that although a coated finish can certainly chip it is strong for hell, certainly stronger than blueing and does not require attention to keep it from rusting although the rest of the gun does. The aluminum frame is known to be a strong and durable alloy as well. I am not sure I want the old army to be any heavier than it is and it balances just fine for me with an aluminum grip frame.
The original blued Old Army used an aluminum XR-3 Red grip frame but sometime in the 1980's they switched to blued steel for standard production models. Blued steel may be a little (that right just a little) stronger, the blued finish would certainly look much better (my opinion it's a matter of preference,) and the balance would be different. Some say the steel makes it less front heavy, I personally don't find it to be front heavy with the aluminum grip frame but balance can be very important and if one prefers the balance of a steel grip frame that is in my opinion what they should get. Despite that the steel grip frame does add overall weight to the gun. The blued steel grip frames cost more.
I went with what was more commonly available, lower priced, more maintenance free, lighter weight, durable enough, and adequately balanced (for me.) I am glad I did. Aluminum was not a deal breaker for me.
Old XR-3 Red grip frames are still available but not as easy to come by (especially blued steel) while the new Black Hawk grip frames are everywhere and less expensive. I doubt the old XR-3 Red grip frames are going to be easier to get and cheaper as time goes by. The option of using a newer more available grip frame means a lot to anyone who would otherwise not have a functioning gun if they can't locate an original XR-3 Red grip frame.
This also means you don't have to be fleeced by price gougers selling original grip frames or wait forever (maybe really forever?) for tuners or gunsmiths to come up with a fix and/or finish the work.
Maybe more so than should be,the average joe often doesn't have the pull, or money to motivate a good pro so of no fault of his/her own must tackle the task himself/herself. I'll share my experience.
You asked.
Last edited:
- Status
-
Not open for further replies.
Similar threads
- Locked
- Replies
- 15
- Views
- 2K
- Replies
- 28
- Views
- 2K
- Replies
- 83
- Views
- 9K
- Locked
- Replies
- 7
- Views
- 1K