Let's make a custom seating die

Status
Not open for further replies.

Tech Ninja

Member
Joined
Nov 29, 2009
Messages
90
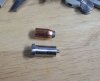
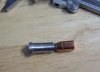
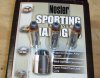
Nosler 158 .357 grain hollow points are reasonably priced good quality bullets. The problem is the soft noses are easily compressed by the shallow curve Lee bullet seating die.

Lee Precision will make you a custom die for a fair price but I reload to save money and that means making a die not buying one. But how are you going to do that without any machine tools? Guns were made for hundreds of years without machine tools and that means we can make a simple seating die without any too. Just a hand drill and bench grinder and some files.

And you know a file in your hand is a machine tool.


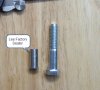
Go to the hardware store and get a suitably sized bolt. I paid .49 cents.

attachment.php


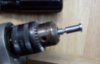
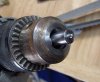
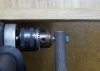
Put the bolt in your drill, clamp the drill down to a bench top. Use a file to reduce the diameter to the same diameter as the seating die. 0.352 in this case.

attachment.php


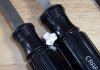
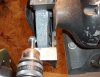
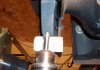
Move to the bench grinder and grind the side of the bolt head. I had the grinder off to make pictures taking easier.

attachment.php


Reduce the bolt head thickness. You can make it thicker than the factory seating die.

attachment.php
 

Attachments

  • 1NewBolt.JPG
    1NewBolt.JPG
    28.1 KB · Views: 228
  • 2FileDiameter.JPG
    2FileDiameter.JPG
    57.8 KB · Views: 227
  • 3GrindSide.JPG
    3GrindSide.JPG
    65.8 KB · Views: 228
  • 4GrindEnd.JPG
    4GrindEnd.JPG
    50.3 KB · Views: 231
Last edited:
It looks like this after grinding.

attachment.php


Move the bolt out further in the chuck so you can cut a groove with a file.

attachment.php


Now file three notches equally spaced around the head.

attachment.php


The notches allow you to put the seating die in the chuck so you can size the post with a file.

attachment.php
 

Attachments

  • 6CutGroove.JPG
    6CutGroove.JPG
    25.4 KB · Views: 226
  • 5AfterGrinding.JPG
    5AfterGrinding.JPG
    19.2 KB · Views: 225
  • 7ThreeNotches.JPG
    7ThreeNotches.JPG
    52 KB · Views: 228
  • 8InChuck.JPG
    8InChuck.JPG
    43.5 KB · Views: 229
Polish it up with some emery cloth.

attachment.php


It fits like this.

attachment.php


And the result is happy hollow points!

attachment.php
 

Attachments

  • 9Finished.JPG
    9Finished.JPG
    34.9 KB · Views: 230
  • 10SeatedBullet.JPG
    10SeatedBullet.JPG
    50.1 KB · Views: 228
  • 11HappyHollow.JPG
    11HappyHollow.JPG
    70.8 KB · Views: 226
I've made so much stuff like that using my drill press, hacksaw, and files it isn't even funny. Everything from trimmer pilots, and seating stems, to trigger guards and other stuff.

Usually when I need something like this it is either out of stock, or would cost more to ship than the item itself cost.

Long live the frugal machinist.
 
Had a similar issue with my Lee seating die for my 270 Weatherby..it was flattening the nose of my 130 grain ballistic tips. I took a 60 degree countersink and drilled a relief in the center. I is now a happy reloader
 
A Quote" post 7

"Why not just get the RCBS die with multiple seating plugs. Your .49 bolt, plus your electricity and time just cost you $30"

------------------------------------------- ------- --
Tech Ninja. In the real world there is critique and criticism, if the criticism is not objective it is just plain-o b*tch$ng.

The diameter of your seater plug should be the same diameter of the bullet. There seems to be something missing, I would suggest the bullet be supported when forming/punching the hollow points, meaning you could use a cylinder to support the bullet and align the bullet punch/seater plug.

More money: I have RCBS and Lyman bullet lube/sizers, finding/making a top punch would allow for bullet support and punching hollow points.

I can not see punching the hollow point and seating the bullet at the same time.

F. Guffey
 
Last edited:
This is great for those that have the tools.

It's just ordinary tools that many people have. Certainly stuff that anyone can afford.

The entertainment and education values are priceless, though.

Yep! Someone once said that you are not wasting your time if you enjoyed what you did.

Your .49 bolt, plus your electricity and time just cost you $30

And I have more time than money. Thirty bucks matters to me.
 
Making something yourself, priceless.

I would suggest the bullet be supported when forming/punching the hollow points, meaning you could use a cylinder to support the bullet and align the bullet punch/seater plug.
They are already JHPs, he is just using that to his advantage with his unique seater plug.
 
"Why not just get the RCBS die with multiple seating plugs. Your .49 bolt, plus your electricity and time just cost you $30"

Why not apply that logic to reloading itself?

Add the costs of loading tools, components, the supposed value of our leisure time and the very real costs of a loading books, bench/room, electicity/heat/cooling, storage shelving, etc, against buying factory and the whole thing is foolish for at least 80% of us.

Maybe you think we could better use our valuable spare time drinking beer and watching TV ??
 
Nicely done. I have found that the very slight deformation I get with both the 158 gr .38 caliber and the 240 gr .44 caliber Noslers when using the standard seating plug makes no difference at all when it comes to accuracy/velocity whether they are shot from revolvers or carbines.
 
I've gone the other way and hollowed out the seating die. But that does tend to reform the lead a bit for spitzers in .357 Maximums.
 
attachment.php


I was taught not to use the side of the grinder wheel. Weakens the wheel.

Turn the drill 90* and grind the corners down. Then support the drill (or the shaft) and turn the drill on and grind with both the grinder and drill running. The part will come out very round. Doesn't seem to matter which way the drill is turning.
 
I have made firing pins for side hammer double shotguns this way. Used socket head machine screws.
 
I was taught not to use the side of the grinder wheel. Weakens the wheel.
+ 1,000!!

I have seen them crack and blow up, badly injuring the grinder person.

They are not designed for side loading, or heat buildup on one side while spinning at 3,600 RPM!!

rc
 
"I was taught not to use the side of the grinder wheel. Weakens the wheel." Yes, we all know the safety rules that are provided with our tools. But we usually find that when following all those rules, we are definitely safer but take the shortcuts that come with familiarity to save on time. The side of the wheel usually gives a longer straighter grind and avoids having to constantly redress the wheel. I'm not saying that not following the safety rules is a good thing. How many times when you need to hit something with a hammer, even one blow, do you run down a pair of safety glasses? How many times have you put on safety glasses to put air in a car or bike tire? By the rules, you should. How many who wear normal prescription glasses in place of safety glasses or even know that they are typically not interchangeable? I try to follow the rules but usually don't. By the way, the two rules to follow with a bench grinder is to not stand directly in front of the wheel and wear safety glasses. I do follow those rules, especially the one not standing in front of the wheel as it sure keeps the debris from getting on your clothes and face, even in the eyes with fully enclosed (perforated sides) eye protectors. As a side note: my Craftman grinder has gone through at least 3 wheel changes due to wearing down and at least 25% of my grinding is on the side of the wheel. In 40+ years I have yet to have one come apart, but I will agree a wheel could come apart and probably will now that I've said this, however that is why they all come with a wheel cover that is designed to catch and prevent the explosive wheel disintegration.

Tech Ninja, very good tutorial and pictures. I find it very satisfying to do-it -yourself little projects like this. Hang, that's why I started reloading in the first place. Even though I have found a small stoneaged little lathe, I still use the battery powered drill and sometimes the drill press with a side angle grinder to get it done faster if exactness is not required.
 
And then there is the other "time" factors:

1. What you made you have....now, not a week from now. Matters when you need/want it now.

2. Some things you build just aren't available any other way.

Good job!
 
Status
Not open for further replies.
Back
Top