
Alllen Bundy
Member
Continuing from: My Journey From Sig P365 to P365X and Modifications Beyond
https://www.thehighroad.org/index.p...nd-modifications-beyond.891955/#post-11996270
P365/X/XL/SAS Grip Module Modifications:
While overall I liked the P365, I didn't like the way the 12 rd magazine shifted around in my hand and the magazine sometimes pinched my hand. So I installed the taller X/XL grip module on my P365. This was unofficially being referred to as the P365X. It only took a couple of minutes to replace P365 grip module. It felt more secure in my hands and the X/XL 12 rd magazine didn't pinch my hand like the P365 12 rd magazine did. FYI, there were so many people installing the X/XL grip module on their P365s that Sig eventually began to sell the P365 with the XL grip module with the flat trigger of the XL and the slide was also milled like the XL to accept a red dot sight. It is now officially called the P365X.
While I thought that installing the taller XL grip module on my P365 was a big improvement and well worth the time, effort, and money, I noticed that the lower rear edge of the XL handgrip dug into my hand and was a little uncomfortable.
So I wet sanded a nice radius onto the edge. I started with 220 grit wet or dry sandpaper and worked down to 600 grit and then hand buffed the sanded areas with a piece of old denim jeans. You can sand with finer grit sandpaper if you want more of a glossy finish.
Sanding blocks are big and bulky. You can make more convenient sanding devices, such as using double sticky tape or glue to hold a sandpaper strip to a tongue depressor, popsicle stick, or whatever works for you. I generally don't recommend power sanding tools. One slip and you could mess up your grip module. It takes a bit longer, but it's more difficult to mess up sanding and buffing by hand.
P365 with unmodified XL Grip Module & unmodified 12 rd Magazine

P365 with Radiused XL grip module and Radiused 12 rd Floorplate

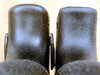
Left: Stock Lower Rear Grip ------------- Right: Raduised Lower Rear Grip

There was a wedge shaped ridge running around the outside of the flare of the magazine well, which also bumped out the rear, that I didn't like. So I also sanded that away. I thinned the outside of the flare as much as I felt comfortable doing.
Left: Stock 12 rd Magazine Floorplate ------ Right: Radiused 12 rd Magazine Floorplate

Rear of the Radiused Grip Module

While I was at it, I sanded the injection mold seams on the trigger guard to make it smoother against my finger.

I also didn't like the 90° front lip of the Sig magazine floor plate, so I sanded a nice radius into the bottom of the floorplate as well.
Now the handgrip fits my hand like a glove. It's like the difference between clothing off of the rack and clothing that is tailor fit for your body. It still looks stock and most people wouldn't notice any difference unless they knew what to look for.

Another advantage of the X/XL handgrip is that the 12 rd XL magazine can lay on it's back. It allows me to fit more magazines into my lockboxes.

You can see that the the 12rd P365 magazine floorplate on the left side is oval shaped
and just flops onto it's side. The the 12rd XL magazine floorplate (On Right side of photo) is flat on the backside and it allows the magazine to stand on it's back,
Continued on next post.
https://www.thehighroad.org/index.p...nd-modifications-beyond.891955/#post-11996270
P365/X/XL/SAS Grip Module Modifications:
While overall I liked the P365, I didn't like the way the 12 rd magazine shifted around in my hand and the magazine sometimes pinched my hand. So I installed the taller X/XL grip module on my P365. This was unofficially being referred to as the P365X. It only took a couple of minutes to replace P365 grip module. It felt more secure in my hands and the X/XL 12 rd magazine didn't pinch my hand like the P365 12 rd magazine did. FYI, there were so many people installing the X/XL grip module on their P365s that Sig eventually began to sell the P365 with the XL grip module with the flat trigger of the XL and the slide was also milled like the XL to accept a red dot sight. It is now officially called the P365X.
While I thought that installing the taller XL grip module on my P365 was a big improvement and well worth the time, effort, and money, I noticed that the lower rear edge of the XL handgrip dug into my hand and was a little uncomfortable.
So I wet sanded a nice radius onto the edge. I started with 220 grit wet or dry sandpaper and worked down to 600 grit and then hand buffed the sanded areas with a piece of old denim jeans. You can sand with finer grit sandpaper if you want more of a glossy finish.
Sanding blocks are big and bulky. You can make more convenient sanding devices, such as using double sticky tape or glue to hold a sandpaper strip to a tongue depressor, popsicle stick, or whatever works for you. I generally don't recommend power sanding tools. One slip and you could mess up your grip module. It takes a bit longer, but it's more difficult to mess up sanding and buffing by hand.
P365 with unmodified XL Grip Module & unmodified 12 rd Magazine
P365 with Radiused XL grip module and Radiused 12 rd Floorplate
Left: Stock Lower Rear Grip ------------- Right: Raduised Lower Rear Grip
There was a wedge shaped ridge running around the outside of the flare of the magazine well, which also bumped out the rear, that I didn't like. So I also sanded that away. I thinned the outside of the flare as much as I felt comfortable doing.
Left: Stock 12 rd Magazine Floorplate ------ Right: Radiused 12 rd Magazine Floorplate
Rear of the Radiused Grip Module
While I was at it, I sanded the injection mold seams on the trigger guard to make it smoother against my finger.
I also didn't like the 90° front lip of the Sig magazine floor plate, so I sanded a nice radius into the bottom of the floorplate as well.
Now the handgrip fits my hand like a glove. It's like the difference between clothing off of the rack and clothing that is tailor fit for your body. It still looks stock and most people wouldn't notice any difference unless they knew what to look for.
Another advantage of the X/XL handgrip is that the 12 rd XL magazine can lay on it's back. It allows me to fit more magazines into my lockboxes.
You can see that the the 12rd P365 magazine floorplate on the left side is oval shaped
and just flops onto it's side. The the 12rd XL magazine floorplate (On Right side of photo) is flat on the backside and it allows the magazine to stand on it's back,
Continued on next post.
Attachments
Last edited:


