Putting a little more power in a $15.00 Daisy

If interested and processing read article if not read below attached note

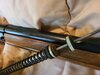
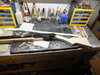
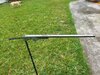
It's looking amazing and I just can't get over how enviously I have no Machinery but people plan on getting me some for my birthday drill press and all that but I have some development and my 499b that I'm converting. It seems like Daisy had to go and make the chamber slightly different than a large chamber as I have gone to the point of deconstructing and reconstructing both the plunger and abutment sides of it with my own macgyvered fashion cuz we all know that I can't stand muzzleloads I'm a repeater guy and I wanted a good seal nonetheless so I got to this point. Also Daisy Infinite Wisdom of triggers couldn't have just stayed with the standard mechanism like all the other wide frames are they had to do a double screw with a slide in and out safety which Beyond me is stupid nothing but a problem the entire time but we're going through and trying to get this right cuz it just seemed to not seal with the previously this was my best option I could think of doing immediately without cutting my own stuff and I have no as I said tools like my kilometers and I can't check sizes past a tape measure or ruler can't wait to see what you got out of that Terry and I tested some oh my guns on a chronograph and I got numbers but I tested a stock Daisy and the thing was saying 250 do they really false advertise at 350 maximum FPS on their boxes and it's only like 250 because then I'll keep my guns down and high 300s if what I'm figuring is correct that my machine's off by 100 ft for some odd reason because I tested two sock red Riders I consecutively found it was within five FPS of 250. I don't know if the corona is right or if my process elimination is right on that cuz if so my model 94 is about 470 FPS average given the fact of the machine I think is $100 off if not it's only at 370 and I'm very depressed about it because it is traveling hot when compared to a standard Daisy I've gone on some of my Vintage Air tubes that I'm using and double ported them as in drilling through the other side evenly and then taking a small file and carefully making sure they're even and that the whole that there goes into is far back on the plunge as I can cuz some of them do not drive with modern plungers they are above the seal and can't have that need as much air possible to be utilized and of course seal as much as possible as Terry and you guys go over. My seals actually a 4-Piece seal from a deconstructed abutment of the 499b but it's fun I feel accomplished when I have to really make stuff from scratch personally Beyond stocks and stuff like that I've made a stock or and like one foregrip which they seem to be a pain to do without a router literally using wood chisels and screwdrivers to have sharpened to do the exact same design as a chisel and yeah I've got my hand a few times over the process price of learning


Edited. It was an epic fail maybe barely travels 5 ft before touching ground it was worse than it was before extremely aggravated with myself is what it is not upset about seal failure upset about trigger mechanism that free floating spring inside of it is a senseless oversight and it's like they designed it to fall apart cuz even the safety Locker pivot point on the front of the trigger mechanism the pen will just slide out if you're too far to the right it was a bad design in general and I'm going to drill out the center marker of an old style trigger to make it work in one of these I will not deal anymore with a double screw trigger design it ain't a safety that aggravates me they should have designed it better
 

Attachments

  • 20221110_110815.jpg
    20221110_110815.jpg
    103.5 KB · Views: 25
  • 20221110_104518.jpg
    20221110_104518.jpg
    103 KB · Views: 25
Last edited:
Wolf
You would be surprised how much I do with hand tools, or with a simple drill press or Dremel. I don't have a router table or even a router so I setup a jig on my drill press and put a router bit in it and hoped I didn't rout my fingers off. As you will soon see this Long John forstock is a long, long, long piece and was very dangerous to do.
I have found that it's not always the tools, it's the person using the tools. I've seen some very beautiful things that you would swear were factory made only to find out they were made by hand with hand tools.
Maybe if you drew a picture of what you trying to do someone here could help you figure it out?
Mark is a treasure trove of information and knows things about these guns I've not thought of yet, so to get a better understanding of your project you may think about the picture ?
Terry
 
So next I cut out the stock set (with my band saw) then set up the drill press to rout the forearm for the barrel and relieve it to fit the reciever.
I decided to work on the forearm first and let the butt stock set until I got this roughed in and working.
I decided to put caps on the forearm, the front is 1/4" brass with 1/8" mahogany and two 1/8" brass pins to hold it in place .
The rear cap is 1/8" brass with 1/8" mahogany, I also added a dress up part that also adds support to the stock at the reciever. The stock sides at the reciever got thin so the brass cap really helped stiffen it.


upload_2022-11-10_17-31-33.jpeg

upload_2022-11-10_17-32-46.jpeg upload_2022-11-10_17-31-33.jpeg upload_2022-11-10_17-32-46.jpeg upload_2022-11-10_17-35-1.jpeg upload_2022-11-10_17-44-20.jpeg upload_2022-11-10_17-54-43.jpeg upload_2022-11-10_17-55-29.jpeg upload_2022-11-10_17-56-13.jpeg upload_2022-11-10_17-56-53.jpeg upload_2022-11-10_17-57-32.jpeg [/ATTACH]

upload_2022-11-10_17-35-1.jpeg

I cut the bottom side to accommodate the ram rod that will be mounted to the bottom with three brass tubes inlet into the groove after it's routed. (yes on my drill press)
upload_2022-11-10_17-44-20.jpeg


Later Terry
 

Attachments

  • upload_2022-11-10_17-30-52.jpeg
    upload_2022-11-10_17-30-52.jpeg
    131.3 KB · Views: 5
Last edited:
You're 100% right cuz even if I had a drill press all my air tubes particularly if I'm doing a 1/8 bore I make sure I do them by hand because I'm making sure I feel all the friction in that bit when I do it but on a side note which is what this post is really for Terry hands down on my Chrono there's a 40 to 70 FPS difference compared to the standard Model 25 Shot 2 without the carbon fiber compared to with it and I'm wondering if my Chrono is right like I said earlier because I'm getting in high 300s and a standard red wire supposed to be 350 FPS well they're shooting 250 continuously on this Chrono which to me if they false advertised I'm pissed off at Daisy don't tell me it's going to go 300 plus if it's not I mean no one likes false advertisement. But yeah it's actually the carbon fiber Barrel hands down I actually got three 4 mm ID 6mm OD on the way I'm curious what you use to hone it out to that point five or you just leave it as before and the six outside deals with the pressure because I got four in five outer millimeter carbon tubes and they split when you push a baby down them I've literally thought about putting two electrical tape as smoothly as I could down the whole thing to keep it from separating on these things I know that sounds hokey but hey I'm a Guyver a lot of things I'm actually back to working on my ob88 I can't decide if I want to make a custom longer chamber with the threaded abutment or if I want to use a buck that I've already chopped up to do it originally with a gravity feed cuz I was going to call the over buck 88 but. But you all know me here enough cuz I complain about regularly I ain't like a muscle feed more than gravity feed gravity feed does not belong in anything in adult is using I can't tell you how many times even point in 45° up the sky where they go right in and I've even flipped the abutment while installing it so it's on the bottom which to me makes more sense you're lifting it up anyway to make sure that there's a BB in a lot of times there's not a baby in it there's nothing worse than you shooting at night and you get that loud dry fire pup on your power builds also side note smaller Chambers are a lot quieter but can have just as much power I really don't find a difference in fps compared to the two Chambers and I walked away from the 499b thing I was doing because I can't do that trigger I was going to smash it I was seriously going to smash that gun the other day I know that I'm jobless right now but I've been a little busy doing a bunch of other stuff so I haven't gone right through all the posts but I have been looking at the pictures quite intently looking good Terry looking real good
 
Wolf thanks for the kind words about the gun build.
I really hate to pop your bubble but I don't think that Daisy has made a RR lately that shoots at 350 fps, I could be wrong you may ask colbalt327 as he has been doing this forever and knows more that I do by far.
Shane Bruce at restomodDaisy would be another to ask.
I try to buy carbon fiber tubing that is the correct I.D. because resizing it is hard to do. It wont cut with a metal cutter, it has to be sanded and then you are left with a porous surface that is not soothe and probably wont work as well? I use diamond tools when I work with carbon fiber.
So trying to change the I.D. may not be a good idea? I spend a lot of time finding BB's that will work in my barrels correctly, I think you are going to have a hard time finding a BB to fit into a 4mm I.D. barrel?
I found the link below on line but I have not ordered any of it so I cant say for sure it will work? But, the add does say 4.5 mm I.D.

https://www.amazon.com/AFexm-Carbon...+carbon+fiber+tube+,industrial,78&sr=1-5&th=1

Hope this helps?
Terry
 
So moving rite along next is the butt stock.
I did a bunch of measuring and marking and finally came up with a paper tape template. I don't know if ya can tell that I slightly reshaped the reciever where it attaches to the stock, just to be a little different.
So next I got the hand tools out and started cutting to relieve the areas needed for the reciever to fit. Very slow going but I got there.
Once I got the stock to slide into the reciever I used a string line to make sure it was seating properly.
I then made some brass inserts to put into the stock for the screws to secure the stock to upload_2022-11-11_14-2-13.jpeg upload_2022-11-11_14-2-36.jpeg upload_2022-11-11_14-3-48.jpeg upload_2022-11-11_14-4-41.jpeg upload_2022-11-11_14-5-8.jpeg upload_2022-11-11_14-6-29.jpeg upload_2022-11-11_14-16-51.jpeg upload_2022-11-11_14-17-55.jpeg the reciever, when all looked good I epoxied them in place.
Next I cut a groove for the cocking lever, being as this has a curve to it I "cut it by hand" and finished it with sand paper wrapped around a piece of flexible tubing.
Later Terry

upload_2022-11-11_14-2-13.jpeg

upload_2022-11-11_14-2-36.jpeg

upload_2022-11-11_14-6-29.jpeg


upload_2022-11-11_14-3-48.jpeg

upload_2022-11-11_14-4-41.jpeg

upload_2022-11-11_14-5-8.jpeg

This would be my first glimpse of what it's going to look like when all done, not sure I like the cocking lever though? Good thing it just a paper cut out.
upload_2022-11-11_14-16-51.jpeg

upload_2022-11-11_14-17-55.jpeg
 
The buttstock and forearm is very nicely done, good proportions and looks great for the type of gun, in my humble opinion. The threaded inserts are something I haven't seen done on a BB gun before, either. This is a fun build to watch, so a big thank-you for that!

Terry, you are 100% correct- the new Red Ryder will not, and never has in stock form, shot anywhere near 350 fps. A 'good' one will maybe do 280, most are nearer to 260-ish fps. This has been verified by a large number of owners who have tested using a chrony.

wolf, 300-310 fps is a marked improvement over a stock 1938B, as you can see when you know what they start out like. You need to go back 70-80 years to find a RR that will approach 350 fps. My own copper band (1940-'41) 111-40 shoots a standard Daisy BB at 330 fps, and it is the hardest hitting unmodified Daisy lever action BB gun I own. It is 100% stock, original seals, spring, air tube/piston ass'y- everything in and on it was as it came from the factory..

Exaggerating the fps of airguns is something nearly every manufacturer does. Speed sells. Daisy often uses "up to 350 fps" but it's still misleading, I agree.
 
We all are thankful for our freedom, and it is in no small part due to the sacrifices made by our Greatest Generation during WW2. Our way of life was truly in peril, and had it not been for the men and women of our armed forces, we would all be living in a quite different world. So thank you, veterans. Regardless of when and where you may have served, we are in your debt.
 
I will try to post these only one time?
So next after the glue was dry on all the brass parts and the mahogany trim was in place it was time to start carving the stocks.
I did this all by hand using razor files, 40grit sand paper and assorted rasp in different shapes. Again going very slow as to not take to much material off.
I have a piece of marble that is pretty flat that I taped sandpaper to and used it as a straight flat sanding block. I came in really handy for getting that long forearm straight.
I then routed the grove for the ram rod, using my drill press as a router.
I then machined three brass guides for the 1/4" ramrod and set them in place to be sure they were going to work, I also drilled the hole for the rod to go into the stock at the reciever end.
Hope I'm not boring you guy's?
Terry

upload_2022-11-12_16-38-54.jpeg

upload_2022-11-12_16-40-14.jpeg

upload_2022-11-12_16-40-43.jpeg

upload_2022-11-12_16-41-20.jpeg

upload_2022-11-12_16-43-15.jpeg

upload_2022-11-12_16-45-7.jpeg upload_2022-11-12_16-48-36.jpeg

upload_2022-11-12_16-49-47.jpeg

upload_2022-11-12_16-50-28.jpeg
 
Needless to say, well thought out an executed! I can't even imagine how much time and effort will go into just the forearm. The figure in the piece of wood you selected is going to be beautiful once finished, I do believe.
 
Thanks Mark, yea I stressed over what part of that board to cut the stocks from, trying not to get the dreaded "Mother -n- law side".
I'll let you guys judge how good my decision was when ya see it all done.?
Terry
 
Here's a couple more pictures of the brass do-dad I made for the forearm where it meets the reciever, it also helps to hold the rear of the forearm in place.
Next are a few pictures of the butt stock, I shaped it the same way I did the forearm (by hand), I also added some mahogany trim around where the reciever meets the stock.
The trim looks a little funky at this point but it will get better when finished.
I made a butt plate out of 1/8" brass and after It was fitted i decided to make and inlay a couple of 1/16" brass do-dad's for the but stock. The one for the top was a real bear to make because of the double curve it has, going around the top and curving down at the rear, the one on the bottom is flat . This is the first time I've done this so don't be to hard on me about the gaps. I think when it has a finish on it they wont be that noticeable?

Terry

upload_2022-11-13_16-16-25.jpeg

upload_2022-11-13_16-16-50.jpeg

upload_2022-11-13_16-17-40.jpeg

upload_2022-11-13_16-18-39.jpeg

upload_2022-11-13_16-19-41.jpeg

upload_2022-11-13_16-20-36.jpeg

upload_2022-11-13_16-21-32.jpeg

upload_2022-11-13_16-22-6.jpeg
 
I posted three videos on YouTube today if you all are interested?
Basically the same as I've posted here only in video form.


Terry
 
Last edited:
Man I really got to keep up with these I've already ordered the 4 mm inner with 6 mm outer diameter carbon tubes I have three of them on the way out of 350 mm length I also I'm about to flare blue a model 111 B for the first time firebluing anything I've been kind of lost my mom that we go sorry for my absence but I'm just not mentally doing well thanks in my life keep going wrong no matter how much I try and I've kind of just isolated for a little bit but a good job interview today so let's hope this goes good and as far as the feet per second I have like to their shooting over 400 then I forget which ones I'm pretty sure it's my 99 my 94 and my 95 that I have but I have to go back and double check I know my 94 is I'll do a Chrono later on and just send you guys numbers for each one the average of 10 shots. I'm good at photography and crap like that but it's hard for me to stop my process and take pictures P.S I need to go back and read through all that I missed a lot in like two days
 

Attachments

  • 16686082167274577467940262073858.jpg
    16686082167274577467940262073858.jpg
    251.2 KB · Views: 9
I'm going to take myself off of here for a little bit I finally becoming an annoyance everywhere no matter what I do when I get something concrete done or findings that are worthwhile I'll let you guys know until then Wolfman outp.s. blue process came out pretty good for a first timer
 
Your not annoying me, don't know about the others ?
Only problem I have is trying to figure out what your talking about sometimes? But I get it figured out eventually.
Hang in there, it will get better. :uhoh:
When ever I'm feeling down I just think about all the people who have it far worse than I do.
Doesn't help them but it makes me feel better.:)
Terry
 
Here's a few more pictures, some of mockup's before I started shaping the stocks, some after I shaped the stocks and some of the stocks with black dye and some with the black sanded back and maybe one or two with the brown dye and Tru-Oil on them?
Terry


upload_2022-11-16_16-16-40.jpeg upload_2022-11-16_16-17-39.jpeg upload_2022-11-16_16-19-32.jpeg upload_2022-11-16_16-20-30.jpeg upload_2022-11-16_16-22-28.jpeg upload_2022-11-16_16-23-25.jpeg upload_2022-11-16_16-24-35.jpeg upload_2022-11-16_16-26-19.jpeg
 
I made a couple of skins for the sides of the reciever out of 1/16" brass.
To do this I soldered two pieces of brass together and cut out the design, after separating them I cut a vinyl design and applied to each of them.
After I was happy with the placement I put them into Radio Shack enchant for about 30 min.
After the etching was done I used a metal blacking liquid to darken the exposed brass. I then removed the vinyl to revile the raised brass design.
I used 0-80 screws to attach the skins to the reciever, very tedious work, one wrong tweak and ya broke the tap.
Terry

upload_2022-11-17_17-15-37.jpeg upload_2022-11-17_17-16-52.jpeg upload_2022-11-17_17-18-41.jpeg upload_2022-11-17_17-20-19.jpeg upload_2022-11-17_17-21-33.jpeg upload_2022-11-17_17-22-33.jpeg upload_2022-11-17_17-23-10.jpeg
 
I made a cocking lever out of 1/4" brass.
I came up with a couple of different designs and decided on the one you see in the picture of the finished lever.
I opened up the hole in the trigger guard a little because standard levers don't seem to have enough room for my fat fingers, I also put a roller tip on it because they work smother if I decide to put a colbalt327 spring in it.
I was trying to make it resemble a long rifle trigger guard but it's not easy because it has to also cock the gun and be strong enough to do so.
The last picture with the lever on the gun is one before I shaped it, it's basically just cut out with all square edges.
I think it turned out OK?
Terry

upload_2022-11-18_16-43-33.jpeg upload_2022-11-18_16-44-6.jpeg upload_2022-11-18_16-45-5.jpeg upload_2022-11-18_16-45-57.jpeg upload_2022-11-18_16-47-15.jpeg
 
I decided after shortly I started this build that I would put a hammer on the left side of the gun (I'm left handed) but then I though it would be lame if it didn't do anything.
Just hanging off the side looking pretty just wasn't going to cut it.
Soooooo I decided to make it work somehow?
Then I thought if I could get the hammer to work it would really be kool if it made noise as I shot the gun, but how to do that?
The real guns use caps that that are put onto a nipple that when struck send fire to the powder through small hole a port that goes through to the breach and ignites the powder.
I'm not using powder but the noise part sounds good, so I needed caps,where to find caps?
Then I remembered that some kids toys had caps that were cup shaped and could be used individually, worth a try? Yes !
So in the following post I will try to explain how I made it work.
First I had to make a hammer, this is made of 1/4" brass and is a loose copy of the first picture.
I mounted the hammer on a 3/16" steel rod that I plan to use for mounting and activation, hopefully the hammer will come back to the fire position when the gun is cocked and release when the trigger is pulled striking the cap with a defining sound ?:eek:

Terry

upload_2022-11-19_10-38-10.jpeg upload_2022-11-19_10-40-10.jpeg upload_2022-11-19_10-41-34.jpeg upload_2022-11-19_10-42-31.jpeg upload_2022-11-19_10-43-15.jpeg upload_2022-11-19_10-45-7.jpeg
 
Back
Top