
You are using an out of date browser. It may not display this or other websites correctly.
You should upgrade or use an alternative browser.
You should upgrade or use an alternative browser.
S&W model 10 disassembly,inspection,select repairs and reassembly - discussion
- Thread starter Sylvan-Forge
- Start date
- Status
-
Not open for further replies.
Sylvan-Forge
Member
Sorry for the late replies, it's been a busy last few months. ..
shootr, thank ya and you're welcome!!
.
Mr. Dale, thank you much and you're welcome!
.
raveneap, I hear ya there and you're welcome.
.
Thanks, Oyeboten. I have'nt seen any cutters like that, .. though like you said, one could probably be made up. Good luck with your 10-6!
.
rhatimi, there is that
.
shootr, thank ya and you're welcome!!
.
Mr. Dale, thank you much and you're welcome!
.
raveneap, I hear ya there and you're welcome.
.
Thanks, Oyeboten. I have'nt seen any cutters like that, .. though like you said, one could probably be made up. Good luck with your 10-6!
.
rhatimi, there is that
.
reduced power springs
Just finished placing in S & W model 642 and 60, reduced power hammer springs 8# and trigger slide springs 13#. Was able to do it fairly easily with the aid of your pictures and discriptions. Used a small phillips screwdriver to ease the trigger slide spring out and back in. Lubed assembly and took them to the range. Ran 100 rounds of +p 38 specials through them. Rapid fire slow fire and not any misfires. What a difference it makes. Smooth and no stacking of pressure on trigger. Wolf springs. Would recommend it to others. Had a woman friend that could not pull the trigger on 642 and now can easily. Loves it.
Just finished placing in S & W model 642 and 60, reduced power hammer springs 8# and trigger slide springs 13#. Was able to do it fairly easily with the aid of your pictures and discriptions. Used a small phillips screwdriver to ease the trigger slide spring out and back in. Lubed assembly and took them to the range. Ran 100 rounds of +p 38 specials through them. Rapid fire slow fire and not any misfires. What a difference it makes. Smooth and no stacking of pressure on trigger. Wolf springs. Would recommend it to others. Had a woman friend that could not pull the trigger on 642 and now can easily. Loves it.
For that slide/rebound spring, I just hold my thumb over the end of the spring/slide to keep it from flying out while I gently pry up underneath the slide with a small screwdriver.
To reassemble, I used a tire valve-stem removal tool and using that, the slide/spring practically falls into place by itself. Seriously.
To reassemble, I used a tire valve-stem removal tool and using that, the slide/spring practically falls into place by itself. Seriously.
charliemopic
Member
Are you Kidding me!!! I thought revolvers were supposed to be simpler than autos?
I have a nickle Rossi model 68 in .38 Special. It's in great shape, shoots good but didn't cost me much so I got into it, disassembled the action and reassmbled it without a problem and without making any modifications. I don't remember all the parts I'm seeing in the Sylva-Forge S&W model 10, but then a Rossi is no Smith.
How similar is a S&W 686 to a model 10?
Many thanks to Sylva, great great post.
Thank You Sir.
-charliemopic-
charliemopic, the model that Sylva-Forge is showing is a modern gun with the internal "lawyer lock" parts. Minus that stuff, the older guns like the model 10 are pretty much the same. I've been inside my S&W model 10's and Rossi model 68's and there's not much difference in the parts layout, except for the coil mainspring in the Rossi versus flat mainspring in the S&W.
It's a common misconception that revolvers are simpler than autos. They are simpler to OPERATE than an auto, but the fitting and craftsmanship of internal parts is (just my opinion here) much more critical in a revolver.
It's a common misconception that revolvers are simpler than autos. They are simpler to OPERATE than an auto, but the fitting and craftsmanship of internal parts is (just my opinion here) much more critical in a revolver.
Hi Sylvan-Forge! Thank'you very much for your job, it's simply fantastic. I'm from Italy(excuse me for my english), i have a question for you: what's the use of the Hammer Block Safety? How i can verify if his assembly is correct? Because I tried to assembly my S&W mod.10 without "Hammer Block Safety" and however it seems working. thank'you in advance!
Enrico
Enrico
Sylvan-Forge
Member
laker1, that's great to hear!
.
christina2009, you're very welcome!
.
swampboy, cool idea!
.
charliemopic,
You're welcome sir and thank you.
As swampboy says, the 686 (L-Frame) is about the same, as are most Smith & Wesson revolvers. The main thing I'd stress is to verify headspace specifications when looking at different calibers and/or different frame sizes.
.
reload68, thank you for all the kind words. Glad to have been of some help!
.
enrico, you're welcome and thank you!
The hammer block safety is an extra safety that helps keep the revolver from firing due to a hard impact, say from a fall onto a hard surface.
The hammer/rebound seat is one safety guarding against such impact, but if the impact overcomes the hammer stud and breaks it, the hammer could possibly cam-over the seat and allow the hammer to fire a cartridge. The hammer block is designed to "block" or intercept the hammer before this can happen.
The revolver will function fine without a hammer block, but chances are greater it will fire if dropped on its hammer from even a low height.
If you wish to re-install your hammer block (I recommend it), please see page 1, post 1, 3rd picture -or- this link, the hammer block is highlighted in red in the 3rd picture.
Reinstallation instructions can be found on page 3 post #62 and #63, or these links : Post 62 and Post 63.
.
.
christina2009, you're very welcome!
.
swampboy, cool idea!
.
charliemopic,
You're welcome sir and thank you.
As swampboy says, the 686 (L-Frame) is about the same, as are most Smith & Wesson revolvers. The main thing I'd stress is to verify headspace specifications when looking at different calibers and/or different frame sizes.
.
reload68, thank you for all the kind words. Glad to have been of some help!
.
enrico, you're welcome and thank you!
The hammer block safety is an extra safety that helps keep the revolver from firing due to a hard impact, say from a fall onto a hard surface.
The hammer/rebound seat is one safety guarding against such impact, but if the impact overcomes the hammer stud and breaks it, the hammer could possibly cam-over the seat and allow the hammer to fire a cartridge. The hammer block is designed to "block" or intercept the hammer before this can happen.
The revolver will function fine without a hammer block, but chances are greater it will fire if dropped on its hammer from even a low height.
If you wish to re-install your hammer block (I recommend it), please see page 1, post 1, 3rd picture -or- this link, the hammer block is highlighted in red in the 3rd picture.
Reinstallation instructions can be found on page 3 post #62 and #63, or these links : Post 62 and Post 63.
.
Last edited:
bluetopper
Member
This post gave me confidence in putting a wide target hammer in my L-framed 686-3 myself.
I had to do a little sanding and fitting but everything turned out great and it works like a charm.
I had to do a little sanding and fitting but everything turned out great and it works like a charm.
Outstanding write up...
I just finished reading/viewing this thread with pleasure and amazement. As a former master gunner from the Army, and retired senior field engineer with a defense firm, I was quite humbled. Here I thought I actually knew a thing or two. I now realize just how much time and skill goes into such work.
I just finished reading/viewing this thread with pleasure and amazement. As a former master gunner from the Army, and retired senior field engineer with a defense firm, I was quite humbled. Here I thought I actually knew a thing or two. I now realize just how much time and skill goes into such work.
Last edited:
gun guy
Member
excellent! while you are obviously well qualified, 99.237% of the time, the, picking up the dremel part is about the end of the gun. the, felt wheel part cant be stated strongly enough, all to often, if a felt wheel on low speed will take off a little metal slowly, a coarse grinding wheel on full speed will take off a whole lot more metal alot faster. you did a great job, heck i got a few revolvers you could tune. well done.
In regards to using the Wolff Power Rib springs in your revolver. I have found that many time even when using the standard power Wolff spring, I will sometimes get light strikes. It is because of the "rib" of the spring causes the strain screw to not put as much tension on the spring as the standard S&W spring. It would be similar to using a shorter strain screw.
An easy fix that I have found is to use the primer from a fired cartridge (removing the small piece of metal from inside the primer of course) in between the screw and the spring. It effectively lengthens the strain screw and you can then apply the correct pressure to prevent light strikes.
An easy fix that I have found is to use the primer from a fired cartridge (removing the small piece of metal from inside the primer of course) in between the screw and the spring. It effectively lengthens the strain screw and you can then apply the correct pressure to prevent light strikes.
Sylvan-Forge
Member
parisite, SaberOne, gun guy, and SWAddict, though I responded in private message some time ago, I just want to say I'm glad to have been of any help and thank you for the kind words. That's a cool fix-it tip, SWAddict, thanks for sharing that.
.
.
Sylvan-Forge
Member
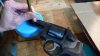
Chief's Special Model 60 (J-Frame)
Here's some stuff that I thought I'd put in this thread a long time ago ...
..meh, getting old ain't what it used to be
Everything is pretty much the same with the small J-frame revolvers with the exception of mainspring being a coil-spring instead of a flat-spring.:

To remove the mainspring as an assembly with the hammer-strut, just cock the hammer, insert a paperclip throught the strut, and remove assembly.:

Minus the hammer-block safety, mainspring assembly, and hammer assembly.:

.
That's all I've got for the J-frames at this time.
.
Here's some stuff that I thought I'd put in this thread a long time ago ...
..meh, getting old ain't what it used to be
Everything is pretty much the same with the small J-frame revolvers with the exception of mainspring being a coil-spring instead of a flat-spring.:
To remove the mainspring as an assembly with the hammer-strut, just cock the hammer, insert a paperclip throught the strut, and remove assembly.:
Minus the hammer-block safety, mainspring assembly, and hammer assembly.:
.
That's all I've got for the J-frames at this time.
.
Attachments
Last edited:
Sylvan-Forge
Member
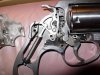
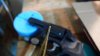
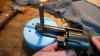
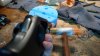
Locking Bolt and related parts
Back to the model 10..
1/16" brass punch to get the pin started.:

1/16" punch gets squeezed a bit.:

1/16" punch moved the pin about as much.:

Time for the .040 short cup tip punch #4.:

.
Back to the model 10..
1/16" brass punch to get the pin started.:
1/16" punch gets squeezed a bit.:
1/16" punch moved the pin about as much.:
Time for the .040 short cup tip punch #4.:
.
Attachments
Sylvan-Forge
Member
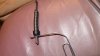
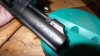
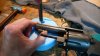
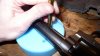
With the cylinder securely closed, use the cup tip punch to drive out the pin the rest of the way.:

The extractor rod keeps the locking bolt assembly from flying out.:

Re-insert the cup tip punch or something suitable to keep the locking bolt and swing open the cylinder.:

Unrestrain thine locking bolt with care.:

.
The extractor rod keeps the locking bolt assembly from flying out.:
Re-insert the cup tip punch or something suitable to keep the locking bolt and swing open the cylinder.:
Unrestrain thine locking bolt with care.:
.
Attachments
Sylvan-Forge
Member
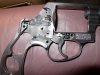
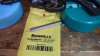
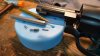
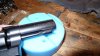
Locking bolt spring, locking bolt, and locking bolt pin.:

Reassembly :
Make sure to orientate the locking bolt pin-recess toward the top (don't forget the spring) and push the locking bolt in a bit (check in the hole to see how much you need), then with your third hand, tap in the pin with a brass hammer.:

Use a brass punch sized larger than the pin to drive it the rest of the way.:

Brass marks should come off of bluing, parkerizing, nickel, and chrome, but may scuff some coatings, so you may want to be a little more careful than I've been.:

.
Reassembly :
Make sure to orientate the locking bolt pin-recess toward the top (don't forget the spring) and push the locking bolt in a bit (check in the hole to see how much you need), then with your third hand, tap in the pin with a brass hammer.:
Use a brass punch sized larger than the pin to drive it the rest of the way.:
Brass marks should come off of bluing, parkerizing, nickel, and chrome, but may scuff some coatings, so you may want to be a little more careful than I've been.:
.
Attachments
Last edited:
Sylvan-Forge
Member
Sylvan-Forge
Member
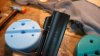
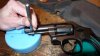
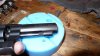
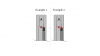
Extractor Rod Amendment
Back in post #49 I made things a bit more uniform but I went too far in beveling as illustrated in "Example 2" which in effect has more resistance when closing the cylinder than if I had just slightly radiused the end of the rod.
A much more appropriate ejector rod end is shown in Example 1. As you can see it has a lot less contact surface which lets the cylinder close easier.:

.
Back in post #49 I made things a bit more uniform but I went too far in beveling as illustrated in "Example 2" which in effect has more resistance when closing the cylinder than if I had just slightly radiused the end of the rod.
A much more appropriate ejector rod end is shown in Example 1. As you can see it has a lot less contact surface which lets the cylinder close easier.:
.
Attachments
Last edited:
Wow. Impressive.
But saw you are still posting here.
You give me confidence in tearing apart an old model 10 (C4XXX).
Just have to figure out that extra screw in front of the trigger
Also, is there a thread that tells how to polish up the internals? This pistol looks to have never been cleaned.
But saw you are still posting here.
You give me confidence in tearing apart an old model 10 (C4XXX).
Just have to figure out that extra screw in front of the trigger
Also, is there a thread that tells how to polish up the internals? This pistol looks to have never been cleaned.
rcmodel
Member in memoriam
That screw holds the true essence of those old S&W's in.Just have to figure out that extra screw in front of the trigger
Kind of like the little "chewing gum" things and colored wires on circuit boards holds the smoke in.
If you take it out, the old S&W essence may escape, just like the smoke in a circuit board!
rc
- Status
-
Not open for further replies.
Similar threads
- Replies
- 2
- Views
- 514
- Replies
- 13
- Views
- 907
- Replies
- 8
- Views
- 1K
- Replies
- 10
- Views
- 817
- Replies
- 10
- Views
- 2K