I am starting a new Saiga 12 project. It has always been interesting to me that the saiga seems to draw out very strong feelings when discussed on this forum and others. For my part I like the saiga but see it as having some serious limitations in its stock form. Read my post in other saiga threads for my thoughts on the platform. I am one that believes many of the limitations of the saiga can be vastly and easily improved upon. This project is unlikely to be anything special but I though some of those less familiar or curious about the platform might find it interesting if I documented the changes I make and offered and evaluation of the enhancement they make.
I should start by saying that I view the saiga as a fighting shotgun. The goal of this project is to render the saiga a more useful fighting gun. This gun will see some casual clay shooting on my own property. I might hunt jack rabbits with it just for fun, and it might see some three gun shooting. It is not being built to be a clay gun, a hunting gun or a dedicated open class competition gun. The goal is to enhance it as a fighting shotgun with simple and relatively low cost modifications, to build the type of gun anyone could with minimal tools and skill.
I have owned/shot other converted saigas. I have also been shooting this particular stock saiga for a while now. These two facts have led me to compile a list of areas I would like to make improvements on.
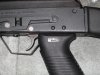
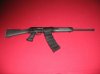
Ergonomics: The ergonomics of the stock gun do not suit me at all. The gun is out of balance and overly front heavy. Another issue is that the grip is so far back the I can not reach the safety without completely removing my trigger hand from the grip. The current style of stock and grip makes supporting the weapon for reloads, or manipulating the bolt, etc more difficult as well.
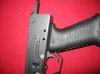
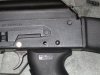
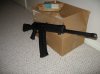
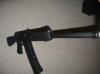
The Plan: Restoring the gun to the configuration it was designed to be address both of these problem. I will move the fire control group (FCG) forward, add a pistol grip and a traditional AK stock. This will greatly improve the balance of the weapon and aide in handling and manipulating the gun. The safety will be less of a stretch but still further away than what I like. To make the safety selector lever more user friendly I will be adding a tab further to the rear of the lever so it can be reached more easily by my trigger hand. Another option would be a left hand side sliding safety. This is an improvement in ergonomics that allows one to use their thumb instead of their trigger finger to manipulate the safety but it requires the removal of the side mount and milling the receiver. It costs much more and requires much more work than tabbing the OME safety lever.
Mushy trigger: The stock trigger uses a funky wishbone linkage that allows the FCG to be further back for use with the sporter stock. This was all done to be able to legally import the saiga into the US . The result of this linkage is a trigger that leaves much to be desired. Although it might present less of an issue on a shotgun than a rifle there is still benefit in a better trigger, one with less creep, and a less mushy feel.
The Plan: When the FCG group is moved I will replace it with a Tapco G2 FCG. Prior to installing this new FCG, I will polish it as well. The result should be a vastly improved trigger, one with a much smoother and cleaner pull and a crisper break.
Phase 1:
I began a basic conversion. The info with picture and video is readily available on the web so I didn't document this too closely or take photos.
I ordered a tapco standard legnth butt stock, a saw PG, and a Tapco G2 fire control groupmodified to fit the S12 with the bolt hold open. I also ordered a S12 specific retainer plate. The retainer plate is my prefered method for instaliing the G2 FCG.
I used the following tools:
Drill press
3/16" carbide drill bit
1/4" carbide drill bit
Dremel with a grinding tip
Needle nose pliers.
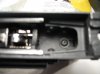
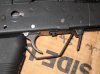
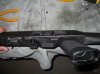
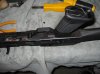
Nothing special. Getting the gun down to the barreled reciever took all of 20-30 minutes if that. I then preped the bottom of the reciever by sanding and degreasing and taped it off and painted the bare metal with engine paint. I plan a full on paint job latter but I have used this engine paint method before and it holds up well. It is not a perfect match but because of the location and the fact that the PG, trigger guard, and magazine are all down there it really is not noticable unless you flip the gun upside down and stare at it. A perfectionist would not like it but from a function standpoint it gets the job done and is cheap and easy. I'll post pics of the painted reciever bottom latter.
I then set about to smooth up the action and trigger. I used my dremel and a polishing stone tip I also used a stone by hand to polish the following areas:
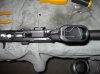
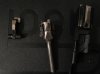
-The bottom of the bolt. This area slides over the hammer when the weapon cycles as well as sliding over the top shell in the magazine. Some people cut the bolt and reshape the thing with their polishing to allow full magazines to be loaded more easily on a closed bolt. I did not do that. In fact I was not very agressivce in my polishing at all. I merely wanted to smooth things up. I may have the bolt reshaped later. Done improperly this can ruin the bolt and they are not easily replaced. Thus I lightly polished it but it made things much smoother. Running my finger over the polished bolt and another stock S12 bolt I have there was a very noticable difference.
-The bottom of the bolt carrier. It hits the same places as the bolt. Again my objective was simply to smooth everything out a bit
-the rails of the bolt carrier. Where the bolt carrier rides on the rails of the reciever I polished everything smooth.
-The rails of the reciever. Where the bolt carry runs back and forth on the rails of the receiver I polished them.
-FCG: I polished the back or the hammer where the bolt and bolt carrier hit it. I also polished the all the parts of the FCG that make contact with each other and where the hammer springs make contact with the trigger. The G2 alone makes a huge difference in the trigger pull. I am excited to see if the polishing makes a notable difference over the unpolished G2. I have an unpolished one I will use for comparision.
The polishing made everything feel much smoother to the touch. Upon reassabmly I will see if it made any percievable difference in the smoothness of the action and or trigger pull. It was very easy work and cost me nothing to do so I gues I am not out much if it doesn't seem to make a difference.
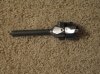
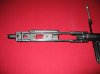
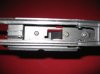
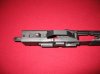
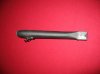
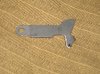
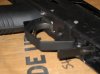
I have attached a picture of some of the polished parts.
In the next phase of this project I will reassamble everything and install a tromix DIY trigger guard. I will post more pictures and discuss why I used that part
I should start by saying that I view the saiga as a fighting shotgun. The goal of this project is to render the saiga a more useful fighting gun. This gun will see some casual clay shooting on my own property. I might hunt jack rabbits with it just for fun, and it might see some three gun shooting. It is not being built to be a clay gun, a hunting gun or a dedicated open class competition gun. The goal is to enhance it as a fighting shotgun with simple and relatively low cost modifications, to build the type of gun anyone could with minimal tools and skill.
I have owned/shot other converted saigas. I have also been shooting this particular stock saiga for a while now. These two facts have led me to compile a list of areas I would like to make improvements on.
Ergonomics: The ergonomics of the stock gun do not suit me at all. The gun is out of balance and overly front heavy. Another issue is that the grip is so far back the I can not reach the safety without completely removing my trigger hand from the grip. The current style of stock and grip makes supporting the weapon for reloads, or manipulating the bolt, etc more difficult as well.
The Plan: Restoring the gun to the configuration it was designed to be address both of these problem. I will move the fire control group (FCG) forward, add a pistol grip and a traditional AK stock. This will greatly improve the balance of the weapon and aide in handling and manipulating the gun. The safety will be less of a stretch but still further away than what I like. To make the safety selector lever more user friendly I will be adding a tab further to the rear of the lever so it can be reached more easily by my trigger hand. Another option would be a left hand side sliding safety. This is an improvement in ergonomics that allows one to use their thumb instead of their trigger finger to manipulate the safety but it requires the removal of the side mount and milling the receiver. It costs much more and requires much more work than tabbing the OME safety lever.
Mushy trigger: The stock trigger uses a funky wishbone linkage that allows the FCG to be further back for use with the sporter stock. This was all done to be able to legally import the saiga into the US . The result of this linkage is a trigger that leaves much to be desired. Although it might present less of an issue on a shotgun than a rifle there is still benefit in a better trigger, one with less creep, and a less mushy feel.
The Plan: When the FCG group is moved I will replace it with a Tapco G2 FCG. Prior to installing this new FCG, I will polish it as well. The result should be a vastly improved trigger, one with a much smoother and cleaner pull and a crisper break.
Phase 1:
I began a basic conversion. The info with picture and video is readily available on the web so I didn't document this too closely or take photos.
I ordered a tapco standard legnth butt stock, a saw PG, and a Tapco G2 fire control groupmodified to fit the S12 with the bolt hold open. I also ordered a S12 specific retainer plate. The retainer plate is my prefered method for instaliing the G2 FCG.
I used the following tools:
Drill press
3/16" carbide drill bit
1/4" carbide drill bit
Dremel with a grinding tip
Needle nose pliers.
Nothing special. Getting the gun down to the barreled reciever took all of 20-30 minutes if that. I then preped the bottom of the reciever by sanding and degreasing and taped it off and painted the bare metal with engine paint. I plan a full on paint job latter but I have used this engine paint method before and it holds up well. It is not a perfect match but because of the location and the fact that the PG, trigger guard, and magazine are all down there it really is not noticable unless you flip the gun upside down and stare at it. A perfectionist would not like it but from a function standpoint it gets the job done and is cheap and easy. I'll post pics of the painted reciever bottom latter.
I then set about to smooth up the action and trigger. I used my dremel and a polishing stone tip I also used a stone by hand to polish the following areas:
-The bottom of the bolt. This area slides over the hammer when the weapon cycles as well as sliding over the top shell in the magazine. Some people cut the bolt and reshape the thing with their polishing to allow full magazines to be loaded more easily on a closed bolt. I did not do that. In fact I was not very agressivce in my polishing at all. I merely wanted to smooth things up. I may have the bolt reshaped later. Done improperly this can ruin the bolt and they are not easily replaced. Thus I lightly polished it but it made things much smoother. Running my finger over the polished bolt and another stock S12 bolt I have there was a very noticable difference.
-The bottom of the bolt carrier. It hits the same places as the bolt. Again my objective was simply to smooth everything out a bit
-the rails of the bolt carrier. Where the bolt carrier rides on the rails of the reciever I polished everything smooth.
-The rails of the reciever. Where the bolt carry runs back and forth on the rails of the receiver I polished them.
-FCG: I polished the back or the hammer where the bolt and bolt carrier hit it. I also polished the all the parts of the FCG that make contact with each other and where the hammer springs make contact with the trigger. The G2 alone makes a huge difference in the trigger pull. I am excited to see if the polishing makes a notable difference over the unpolished G2. I have an unpolished one I will use for comparision.
The polishing made everything feel much smoother to the touch. Upon reassabmly I will see if it made any percievable difference in the smoothness of the action and or trigger pull. It was very easy work and cost me nothing to do so I gues I am not out much if it doesn't seem to make a difference.
I have attached a picture of some of the polished parts.
In the next phase of this project I will reassamble everything and install a tromix DIY trigger guard. I will post more pictures and discuss why I used that part
Attachments
Last edited: