Show us a picture of your reloading bench

I find it ironic all these people who have one little dinky single stage but then so much components their reloading bench is piled high. I'm the exact opposite right now

Which means that while you're at home, staring at your pretty progressive press, the guy with the one "dinky" single stage press is shooting all he wants.
Believe it or not, there are people who load and shoot their entire lives and never have the slightest desire to own a progressive press. I know a couple of older guys that way. They've been loading 30-40 years on the same RCBS Rockchucker press. They could buy a progressive if they wanted to, but don't.
To each his own.
 
dubble... that's cool. Hard to beat a nice heavy 10 for the home shop! I looked high and low for a good one, but either missed them or ended up being pretty worn.
 
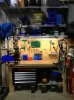
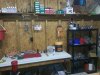
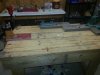
I re-arranged my loading area somewhat. Adding a Dillon 1050 necessitated building a new, lower, bench - as I like to sit when reloading.

The bench is made of 2x4s and 3/4" plywood. Two layers for the work surface (plus a piece of masonite), with a 6" overhang, and a single layer for the lower shelf (which sits on 8" legs, including one in the middle to prevent sagging). The lower shelf was designed to accomodate 50 cal ammo cans underneath it, which then necessitated a slight modification to the Lowes 5-drawer tool chest, which was an after-thought. Nothing a Sawzall couldn't fix.

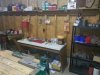
The bench is fastened to the wall, screwed in to the structure behind the metal sheathing. Wire shelving from Lowes provides to the overhead storage, and power strips and LED light bars are mounted to the shelving using industrial, ANSI-rated zip ties.

A custom mount for the Mr. Bulletfeeder was further customized to sit at the correct height for the 1050, and a spare forming die from a parts bender sits on the bullet dropper, to ensure a positive return (so the tension in the feed spring doesn't hold the bulelt dropper open).

SAAMI-approved bullet guides (re-purposed cardboard from a MidwayUSA shipment) ensures that all the completed cartridges find their way into the bin - some were sneaking off behind the press.

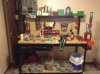
This week's goal is to make the right-hand bench as clean-looking as the left - which is a lofty goal... it looks like a junkyard right about now :D
 

Attachments

  • NewBench1.jpg
    NewBench1.jpg
    136.6 KB · Views: 552
Well, here is a picture of my new loading area, just moved last month and am in the process of setting up so will post an after picture as well. This spot will be much nicer than my last setup, more light and warmer too.
 

Attachments

  • image.jpg
    image.jpg
    103.6 KB · Views: 197
Here is mine. Still collecting equipment. Still need a thumler tumbler kit. A Wilson SS micrometer case trimmer and a manual powder drop. Not sure on which drop to purchase.
 

Attachments

  • reloading bench.jpg
    reloading bench.jpg
    7.7 KB · Views: 305
New Bench

Here's my new bench. Got it together finally last night, after working on it with limited time in the evenings. Made with about $30 of material, mostly scraps.

I mounted the press to a piece of 3/4" finish plywood, and that piece of plywood is attached to the bench with 3 bolts, with T-nuts on the underside of the bench. That way, I can keep the press put away but quickly reinstall. I'll countersink the three holes in the bench, and that way I can install short taper head machine screws to plug the holes, and have a smooth bench surface for other projects. It's a work in progress.
 

Attachments

  • DSC_5603.jpg
    DSC_5603.jpg
    87.7 KB · Views: 401
Last edited:
The one thing that is most important in building a bench, I can speak of this from years of reloading and having 13 presses set up and running, is a SOLID BENCH... NO give at all in any operation. If you can get that done/built you will see a world of difference.

I'm talking rock solid from starting stroke to the finishing of the handle going back to start... Trust me on this one everyone... Make sure or do whatever you have to so that bench don't move, flex anything but stay still!..;)
 
I'm talking rock solid from starting stroke to the finishing of the handle going back to start... Trust me on this one everyone... Make sure or do whatever you have to so that bench don't move, flex anything but stay still!

How very true. You need a solid bench. I had a chance to load 45 ACP on a Dillon 1000 which was mounted to a steel bench. There is nothing like it. You knew when the primer was seated & if you crushed any carbon doing it.
 
I'm with enine- but have bench. All current items fit in said toolkit, except I need to narrow it down to Universal and RL22 for powders. I have a number of other powders, but this is my "bug-out"/Range-kit set. I use the Lee Hand Press exclusively, but have the Breechlock Challenger in the basement if I want to free up a hand for moving shells to-and-from the press.
 

Attachments

  • 1229121146.jpg
    1229121146.jpg
    46.4 KB · Views: 185
Here's an update of mine. Still working on it, but I'm actually to the point where I can reload there now. Need a little organizer with clear drawers for small bits and going to add another shelf. There's a second wall of pegboard that's going up on the left side soon. Plenty of space for my needs (just not for my wants)...
 

Attachments

  • uploadfromtaptalk1385435266803.jpg
    uploadfromtaptalk1385435266803.jpg
    114.9 KB · Views: 257
I'm with enine- but have bench. All current items fit in said toolkit, except I need to narrow it down to Universal and RL22 for powders. I have a number of other powders, but this is my "bug-out"/Range-kit set.

Hey now, I've already laid claim to the name Bug Out Reloading Kit or BORK for short :)
 
An option for those who do not want build their own. I bought this at Costco. It is on wheels, but it is absolutely stable. No movement during reloading. It has locking cabinets, lots of storage, and a nice, thick, oak working surface. Assembly was straight forward, and no parts were missing. usynu7ep.jpg
 
Thats nice, I'd like to have the ability to wheel around. Great that it doesn't sacrifice stability. Ive pondered the idea of putting heavy duty wheels/casters on my reloading stand.
 
Here is my reloading bench, just added the small side where the press is mounted. Now I have some more room to prep the brass and to clean my guns.
 

Attachments

  • WP_20131128_011a.jpg
    WP_20131128_011a.jpg
    127.4 KB · Views: 649
Well, after moving last month, I finally got the bench set back up and running, do here is a picture of its new home.
 

Attachments

  • image.jpg
    image.jpg
    128.3 KB · Views: 493
Been rearranging mine to make room for 2 more presses. This is it for now.
 

Attachments

  • 20131204_190703.jpg
    20131204_190703.jpg
    147.2 KB · Views: 420
  • 20131204_185956.jpg
    20131204_185956.jpg
    149.6 KB · Views: 437
  • 20131204_190410.jpg
    20131204_190410.jpg
    103 KB · Views: 383
  • 20131204_190637.jpg
    20131204_190637.jpg
    139.8 KB · Views: 426
Back
Top