The Remington R51, Explained

Status
Not open for further replies.
it is obvious that some people manage to release the safety under recoil (a mystery to me,

Actually easy to do if you use an isosceles stance with a thumbs forward grip using side to side tension rather than front to back tension to control recoil. Gripping the gun this way, you have to make a conscious effort to keep pressure on the grip safety and under recoil, you will usually release it.
 
I must disagree in general. I've used the grip you describe and had zero issue with the grip safety disengaging. No matter how hard you try, you can't push your hand into a handgun, the grip is eponymous for a reason.
 
"Actually easy to do if you use an isosceles stance with a thumbs forward grip using side to side tension rather than front to back tension to control recoil. Gripping the gun this way, you have to make a conscious effort to keep pressure on the grip safety and under recoil, you will usually release it."

Ah, good thing I'm a Weaver man. :D Weaver for the win! I'm actually working towards a hybrid, these days; I find myself more and more square to the target as I shoot more frequently, but still grip with a push/pull which works really well to keep the safety nailed down. I can see how a person's variable finger lengths can cause their hand to wrap around the back differently (for instance, I don't even make a pretense of getting my strong thumb far enough around the hit the slide catch easily, so the meaty part of my thumb is right over the safety) and this would likely make safety engagement better/worse. Different strokes for different folks.

I also wouldn't doubt that certain guns require a lot less safety reset to tie up the weapon than others ;)

TCB
 
barnbwt,

Thanks for the reply comparing the Glock FCG with the R51. To clarify: How does the material and design durability of the trigger and trigger bar assembly, trigger mechanism housing, connector, and trigger spring of the Glock compare to the R51 parts that perform similar functions. While the parts of the R51 may appear to flimsy, much like the Glock parts appear, could they in fact be durable enough?
 
Sorry, Nom, I really don't know jack about Glocks (just broke one that one time, and I wasn't really looking at the trigger). Sorry as well for the big picture which appears to show a much beefier transfer bar:
glock-trigger-install-2.jpg

"While the parts of the R51 may appear to flimsy, much like the Glock parts appear, could they in fact be durable enough?"
My critique was more in regards to their rigidity than their durability. I don't fear them breaking or wearing out anytime soon, but the transfer stirrup bows outward 1/16" until it hits one or both walls every time I pull the trigger.

TCB
 
Ah, but pivot pins on this gun are just as likely (more likely, in fact) to serve as guides for slotted holes

But if you have only one slot and one guide, what you have is a really wobbly hole...oh wait! :eek:
 
Let's think about this...you'd have the trigger and stirrup a single fixed piece (or rigidly connectect). It would slide/pivot at the front pin, while the tail could still rise/fall with the disconnector. It would be really weird (maybe) to have the trigger rotate infinitesimally as the gun fires, and it might be enough to be felt as "slap," so that could also be the reason they canned it.

TCB
 
"What's funny, is the sear/hammer/stirrup arrangement is almost identical to a 1911's except that the safety sear notch is caught by a hammer block, rather than beating the crap out of the primary sear. BTW, the initial stage of the trigger pull comes from pushing the hammer block out of the way (and it remains in contact with the stirrup throughout disconnection, so you almost don't need a trigger return spring) and the short second stage is pushing off the actual sear. I wonder as well if you could simply 'pin' the transfer bar to the tail of the hammer stop, so it is pushed and pulled by the trigger, and at that point have only the sear spring and positive sear engagement contributing to the trigger pull (the trigger would still be fully returned and block the hammer when the safety is released and the safety block slides upward into the FCG parts, but the first trigger stage would have zero weight). I think it would still function the same; only disengaging when the trigger is pulled, and otherwise blocking the hammer if the trigger and safety are released; just dependent on safety position, more than trigger pressure."

HA! I was right! I had the gold-colored spring figured all wrong; my initial estimation that it reset the sear was correct and its tail also resets the disconnector upward (little tabs catch the tail. The notch in the hammer safety actually straddles the end of the transfer stirrup, so the hammer safety is mechanically engaged/withdrawn by the trigger bar without a separate spring adding pull weight/complexity. The initial trigger pull is thus set only by the pathetically anemic return spring at the trigger pivot (doesn't even return the trigger fully) and combined with the fairly weak disconnector reset spring force, I now see why the reset is imperceptible and the second stage so much stronger than the first (overcoming a positive hammer engagement). There is for sure the potential for this gun to be stoned down to a much lower trigger weight, just like a 1911. It can do it safely, too, since there's no way for the hammer to release without the safety pulled, and no way for the hammer to hit the pin without the trigger being pulled :cool:

I like the way these Remington designers think; they think like me :p

TCB
 
I sold my LC9 after taking it apart to install a new hammer, I just couldn't keep it knowing what it was built like. But this is worse. I originally said , give it a year, but unless they fix those problems I am staying away from this gun, thanks for all your hard work.
 
I sold my LC9 after taking it apart to install a new hammer, I just couldn't keep it knowing what it was built like. But this is worse. I originally said , give it a year, but unless they fix those problems I am staying away from this gun, thanks for all your hard work.
Perhaps there is more than one reason Remington doesn't want end users detail stripping the gun. It's kind of like watching sausage being made. Or congress at work. :eek:
 
Holy crap, you guys; everyone who hasn't sent their R51 back in needs to take it apart now and put it back together. I don't know what metal shavings fell out, what burs broke off, or what misalignments were corrected, but the gun is tons easier to rack now, and the safety is no longer scratchy. As best I can tell, the disconnector pops up and down much more easily, pretty much on par with every other disconnector I've played with. It especially drops down much more easily. My thinking is the spring was possibly double-wound against the disconnector to more assertively drive it upward. But there's two reasons that's stupid and unnecessary; the gun won't fire until that piece returns, so if it arrives upward a millisecond later due to only 1lb of force on it rather than 5 the shooter's reaction time will never know (I'll verify this with testing, of course), and secondly, the more force that is required to drop the disconnector, the more it tilts, pivots, binds, and scrapes on everything in there. It's even possible an extra wind would cause the spring coils to bind, which would definitely explain the spongy yet stiff disconnector I originally had that felt like it was slipping over wet rocks when it was pressed with the slide off.

Anywho, it takes like 10lbs to rack the decocked gun now. And a function check appears to show all systems nominal :cool:. I dunno, maybe I just forgot how much easier this gun was to rack than my other pieces (I don't remember it being like half the Hi Power or 1/3 the CZ52, though :confused:)

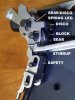
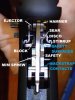
Fun facts: the disconnector can pivot about 5 degrees side to side, and 5 front to back on its loose slotted pin holes (side pivot is limited by the FCG components it binds against :barf:). The safety block can pivot about 30degrees side to side, and almost none front to back (it can actually tilt enough to disengage both safeties but it appears its straddling the hammer strut blocks this motion (and what's a little binding gonna harm? :rolleyes:)

Reassembly notes:
Slave pins are not required, but you'll hate yourself for not having them (I know I do). The stippled sections of the pins are long enough to prevent lining up both sides of the hole before a hammer is needed to seat them; way to go Remington. Go slow on the pins or they'll miss their marks under spring tension and break stuff. The hammer spring cross pin is pretty easy for a pistol, but it will launch the end cap at lethal velocity if you aren't careful; wear eye protection. The magazine catch is a pain to position, since its spring keeps trying to fall off (slave pin would make this loads easier). I had to use steel punches for everything; these pins are bound up tighter than Dick Tracy's hat-band (those "stars" you see are from metal swaging out of the hole around the stippling grooves :eek: --totally awesome from a fatigue-cracking standpoint, I'm sure ;) )

TCB
 
More pictures of the gun, during reassembly. The trigger/mag release are fairly easy to figure out since there's only so many ways to install them wrong (I found all three), but the FCG/safety stuff takes some careful thought.

The first picture is another mockup on the outside of the gun that better shows all the parts and how they work together. You can even barely see the captive spring in the safety block that pushes it upward against the lower pivot pin, and the sear-safety notch that secures the sear from being pressed by the stirrup. More clear is how the stirrup rides on a lip on the disconnector; this is what pushes it up/down off the sear during firing to disable the trigger.

The second picture is mostly a demonstration of why you want slave pins. You can install the pin incrementally adding each part from one side, but it's a lot more difficult (mag release installation was slower, though)

And the last piece is what I should have shown ya'll up front, but I took the gun apart in a different order (the backstrap was last). Honestly, since the backstrap/mainspring can be removed with a bullet and a table top (press the butt of the gun onto the bullet to relieve the tension on the cross-pin and push it out with the other hand), this is a very convenient way to access pretty much everything for inspection and service. Easier than a revolver sideplate, I'd say. I think they are all reachable for oiling through the hammer port and the hole in the magwell you can see the safety through, but you can't see what's moving around very clearly.

TCB
 

Attachments

  • P4230030.jpg
    P4230030.jpg
    92.1 KB · Views: 95
  • P4230031.JPG
    P4230031.JPG
    102.7 KB · Views: 87
  • P4230033.jpg
    P4230033.jpg
    93.9 KB · Views: 93
"I just couldn't keep it knowing what it was built like"

Okay, that's actually really funny :D. I think that's the worst insult that's ever been leveled at any machine, ever. Doubly funny since the LC9 seems to be the common refrain for 'the R51 sux' threads; that and the admittedly well-executed Shield (which almost makes up for the Sigmoid-- I mean, Sigma fiasco :D)

I notice this thread is getting a bit notice on other boards, and it seems like a lot of readers have the wrong impression; this was a critique, not a review. I did my review earlier, which also contained a lot of criticism and a lot of praise that I felt justified, like I prefer from reviewers. This thread was intended to be a deconstruction of the gun so people can firstly understand how it works, and secondly see where some of the common issues may be coming from. It'd be a whole lot longer if I had praised every design element that I actually liked or agreed with (which is nearly all of them except the bad apple parts, and would have a whole section on clever/efficient machining) which is why I spent time on the negatives, since that's what is most important besides a basic understanding of function. Also, since spotting bad stuff in a design is a lot easier than noting every last little thing they did right (thousands), do not take this thread as a condemnation; it is a critique, an identification of possible deficiencies in an otherwise pretty sound and thorough design.

TCB
 
It'd probably be easy? I'd just find a brass tube that fits the pin better, cut it to be the full width of the frame there, polish the ends/interior well, and then drill out the trigger and press the bushing into place.

I'm not quite prepared to straight-up burn the bridge with Remington before they even have a chance to issue a recall + fix, though ;). Call me a coward, if you like. I still don't get it; the MIM parts are among the best quality pieces in the gun, so why is the trigger so terrible?

TCB
 
The warranty is 2 years which is pretty good, but I doubt I'll wait 2 years before trying to improve a few things. I will wait a few months to give Remington a chance to do something.
 
I just figured out the "piece 'a junk gun locks 3/4" out of battery" malfunction; if you rack the gun then release the safety then the slide (or just rack the slide without the safety being pressed) there's a 30% or so chance the slide hangs on something. I'm not entirely sure what it could be, but the only moving parts the slide sees are the disconnecotor and the hammer, so it's one of those. I'll guess the disco for now since it seems to be the root of every other weak point on the gun :D

"I will wait a few months to give Remington a chance to do something."
Exactly. I'll get some other projects done as I continue to shoot this thing as it is for the time being, but I darn sure am not going to let stuff that continually irritates me set un-meddled. I think a replacement trigger (so no modding) with overtravel screw and a better return spring scheme will be the first order of the day. Possibly a sliding trigger if I can convince myself it'd be drop safe.

TCB
 
I'll concur on the disconnector. The slide racks with the least resistance when you rack it with both the safety and the trigger depressed.

I'm OK with a pivoting trigger if the wobble is out. I'm used to my BHP and the R51 is real close. I'm thinking a fluff and buff just to take the rough edges off of the stampings, etc. might do wonders. Maybe turn down the teeth on the pins so the pins will engage the far side of the frame before the teeth set in the near side.
 
Sad part about the stamped parts quality is that they don't have be rubbish. I'm thinking of the HK P7, a complicated design with hardly a machined part to be found, and everything is finely finished and works slick as snot. I suspect the Remington engineers responsible for the project were probably ready to quit when they saw the mess Manufacturing had made of their gun. Hope they get a chance to fix it.
 
Don't know where all the fingers should or could be pointed but manufacturing works off of prints, from engineers, that specify material, tolerances, and sometimes the process. Many times the "drawing" is converted to a DXF file that is directley used to laser cut sheetmetal parts. My problem with the manufacturing part of this gun is the machining from dull tools, very sharp inside edges, and no consistant finishing of parts. The bottom on my R51 breech block looks to have been polished by a pre-school kid. May post a picture later. After 300 or so rounds mine shoots rather good though.
 
These are punch parts, which always suck if you don't use good (sharp/new) tooling. As with the chambers, milling, drilling, and every other operation...the simplest explanation seems to be manufacturers that didn't give a damn, or weren't allowed to give a damn. Laser cut parts would be tons better, but such a machine is a huge investment if they are convinced their clapped out old banger is still good for something.

Oh, I found some small tooling marks that they forgot to buff out on the underside of the beavertail (only flaw I can seem to find on the frame)

Gonna try cleaning up the chamber this weekend, and actually bother to cut a leade. So that should at least help (or not hurt) the few stoppages I've run across with ball ammo, and give the gun much better safety margin for fat/long nose bullets going forward. Picked out another bunch of ammo types to throw through it afterward.

TCB
 
Last edited:
These are punch parts, which always suck if you don't use good (sharp/new) tooling. As with the chambers, milling, drilling, and every other operation...the simplest explanation seems to be manufacturers that didn't give a damn, or weren't allowed to give a damn. Laser cut parts would be tons better, but such a machine is a huge investment if they are convinced their clapped out old banger is still good for something.

Oh, I found some small tooling marks that they forgot to buff out on the underside of the beavertail (only flaw I can seem to find on the frame)

Gonna try cleaning up the chamber this weekend, and actually bother to cut a leade. So that should at least help (or not hurt) the few stoppages I've run across with ball ammo, and give the gun much better safety margin for fat/long nose bullets going forward. Picked out another bunch of ammo types to throw through it afterward.

TCB
It is a new gun. I can see the possibility fo dull tooling in some of the milling operations, like the slide, but why would the dies for the punched parts not be new? Maybe high clearances or no die cushions? It seems like they were focused more on cutting costs than on cutting metal.
 
I work in manufacturing, and believe me, cutting cost is everything now. We can hire marketing and finance folks by the scores but seldom invest in manufacturing equipment.
 
Very nice work.

I do hope you send your critique to Remington, at the top.

I was hoping for something a lot better from them, but what you've shown looks like it came off the Kilgore or Hubley production lines.
 
Status
Not open for further replies.
Back
Top