Traditions muzzleloader kit lock warped?

Status
Not open for further replies.

kayak-man

Member
Joined
Nov 2, 2009
Messages
1,247
Location
PAC-NW
Howdy Ya’ll! I just wanted to consult the brain trust before I did something stupid.

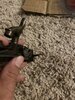
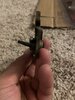
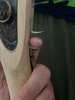
I recently bought one of the traditions black powder DIY kits. While dry fitting, it appears the stud coming off the seat that the trigger engages is angled upwards, and does not come into contact with the trigger.

My plan is to take apply JB Weld to try and give the trigger something to make contact with.

Is there either:
A - some unseen fatal flaw with my plan.
B - another product that would work better for this project?
Thanks,
Chris
 
I sent a Facebook message to frontiergander to come and offer advice.
He builds a lot of Traditions kits.
However, in general, it's not a good idea to use JB Weld on a critical part if there's any possibility that the gun won't work if the epoxy fails.
It may be one or more defective parts or an inletting problem.
If you can identify the parts on a diagram or with photos as suggested that would certainly help.

Traditions warranties every part of the kit so they will replace any defective part, and maybe even build the gun for you if needed.
We don't know the model or have any diagram of it.
Do you have a diagram of it in your instructions that you can post if we can't look it up?

There's also a Facebook Group named "Black Powder Kit Gun Builders" where some folks may be able to help you out.
 
Last edited:
I tried to circle the part in question in the first video so you can see what I’m talking about.

in all the images I’ve found online, what I’m calling “the stud” has a 90* angle to the lock plate, where in this one it’s angled upwards is too far away from the trigger to be actuated.
 

Attachments

  • FB4F4A7F-2A75-4FC2-8724-BF9BEAC92B2F.jpeg
    FB4F4A7F-2A75-4FC2-8724-BF9BEAC92B2F.jpeg
    140.4 KB · Views: 12
  • FC4A23EE-B597-4C41-BC10-E8AF03DC7536.jpeg
    FC4A23EE-B597-4C41-BC10-E8AF03DC7536.jpeg
    172.3 KB · Views: 12
  • A431A057-D8AA-45F2-AA1E-B8A8989CA104.jpeg
    A431A057-D8AA-45F2-AA1E-B8A8989CA104.jpeg
    77.5 KB · Views: 12
the sear is purposely bent upward to make room for the trigger. When you set the trigger, the front trigger flies up and smacks the sear, setting the lock off. Im assuming this is a double set trigger gun like the hawken?
IMG-8333.jpg
 
I am so glad I posted this instead of thinking “that’s a stupid question” and rocking on.

Frontiergander, it is indeed a double set on the St Louis Hawken. The best I can figure out is that the trigger is not making any contact with the sear. If the solution is to inlet the trigger area a little more, I’m game, but I didn’t expect it because the trigger already fits flush in the rear and then also appears flush with the in letting for the trigger guard.
 

Attachments

  • D34A4226-52D2-4B2F-8D50-EF5633869CE0.jpeg
    D34A4226-52D2-4B2F-8D50-EF5633869CE0.jpeg
    76.1 KB · Views: 5
  • EBA401B7-A325-4AE3-BC72-2314D6960EF3.jpeg
    EBA401B7-A325-4AE3-BC72-2314D6960EF3.jpeg
    83 KB · Views: 5
Did you try to set the rear trigger?
Did you cock the hammer to see if the front trigger makes contact with the sear when it's pulled?
The front trigger should work with or without the rear being set.
But I think that the hammer needs to be fully cocked.
 
Last edited:
negative, there is zero indication that at any point in cocking either trigger is coming into contact with the sear, and when fully cocked both triggers are still too far away to do anything. So it sounds like more inletting? I tried messing around with the adjustment screws on the trigger with zero improvement in the situation. Main concern at this point with inletting is just that I’m starting to run out of room for my finger between the stock and the apex of the curve. Which I guess the obvious solution would be to sand down that part of the stock a little more, but I just want to make sure I’m on the right path before I start taking away material I can’t put back.
 

Attachments

  • image.jpg
    image.jpg
    57.7 KB · Views: 25
Here's a factory photo showing how much room there can be under the triggers. --->>> https://www.muzzle-loaders.com/traditions-st-louis-hawken-rifle-kit-krc52408.html

For a trigger comparison, here's an old 1 in 66" Traditions Hawken Woodsman that I used to own.
It was a factory assembled gun.
It's not the St. Louis Hawken but very similar.

index.php
 
negative, there is zero indication that at any point in cocking either trigger is coming into contact with the sear, and when fully cocked both triggers are still too far away to do anything. So it sounds like more inletting? I tried messing around with the adjustment screws on the trigger with zero improvement in the situation. Main concern at this point with inletting is just that I’m starting to run out of room for my finger between the stock and the apex of the curve. Which I guess the obvious solution would be to sand down that part of the stock a little more, but I just want to make sure I’m on the right path before I start taking away material I can’t put back.
I built a kit about 8 yrs ago and the trigger base shouldn't be below the stock, you might have been given the wrong trigger or it's the lock, either way, contact Traditions before doing any major modification, any metal work and they will void the warranty.
 
index.php


To me, when comparing the amount of wood surrounding the ovaled lock mortise area of your unfinished stock, especially under that area where the triggers extend down, and then comparing it to the same area on the factory photo link, you have some wood to remove.
The amount of wood left under the oval area is fairly minuscule in the factory photo.
So it looks like you need to remove some exterior or surface wood.

Just carefully consider whether everything else is lining up properly and perfectly.
The barrel, the drum and nipple with the lock and hammer.
That means that the trigger is the only thing that can be adjusted.
If the wrong trigger was sent then that should be on Traditions.
How far away is the trigger from the sear, more than 1/4" - 1/3"?

It looks like almost 1/2" of wood can be removed from under the lock mortise oval where the triggers are before you would interfere with the shape of that oval.
But I wouldn't interfere with the shape of the oval.
Only the part where you need clearance.
IMO it's precision kit work, IMO.

Keep fitting the trigger guard to make sure that you're confortable with how it's proceeding.
 
Last edited:
Status
Not open for further replies.
Back
Top