I finished bedding my Ruger M77 MkII 6.5X55 this past weekend, and I thought I'd share what I learned. This was my second attempt to bed it, and I learned a lot from the first effort. Basically, the first time I used masking tape that peeled off and didn't tighten the action screws down enough. I ended with epoxy on the stock and the action off center in the barrel channel. After scaping it out (and off the stock), I tried again.
The Brownells bedding kit is a good purchase - it has the resin, hardener, release agent, and epoxy die in the box. It also has one stirring stick and a couple of cups for measuring/mixing, but if you do more than one job, you'll need additional cups and sticks. Dixie cups work okay, and so do popsickle sticks, tongue depressors, or even half of a wooden clothes pin. (You don't actually need mixing cups for small amounts, but it is convenient.)
Avoid masking tape - it peels off at the wrong time and lets epoxy cake on your wooden stock. Use plastic electrical tape instead. I used black, but next time I'll use a lighter color; it would be easier to see the wood/tape join and make it accurately close to the edge. You want no overlap either direction - right square on the edge.
The second time I used release agent under the electrical tape, but next time I won't. The tape sticks okay to the release agent if there isn't a lot of pressure on the tape, but if you try to wipe off the still-liquid epoxy, the tape will slide. I think the tape would stick better if release agent were not there, and I think that would be adequate protection. A better tape stick makes wiping off during hardening a neater cleanup. The tape won't move (I think), and the pressure will force the rag/paper towell down a little deeper into the channel between the barrel and the stock. This means there will be less hardened epoxy at the top of the barrel channel that you have to scrape off the stock, and avoids the accidental rounding of the square edge of the wood getting it off.
Masking the round part of the fore-end tip just under the barrel is a little harder. Some people might settle for just release agent (from the box, or auto wax), and that might work okay, and I may try this next time. I wasn't completely happy with the way I did it. I used a tape "sling" from one side of the barrel channel to the other, then cut a radius (by eye) to remove tape close to the rounded end of the fore-end tip where the barrel exits. The problem with this was that the tape peeled up from the channel, given that there wasn't much sticking to the inside of the channel and that was on top of release agent. Again, I'm not happy with that approach, and will try something else next time.
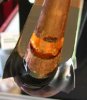
The Ruger tip hump is very narrow, possibly to save weight. With the tape towards the front of it removing some of the surface of the tip hump from the bedding surface, I decided I needed additional surface to the rear of the tip hump. To get this, I built a cofferdam out of children's modeling clay. This allowed the epoxy to fill behind the tip hump for about three quarters of an inch, without it leaking back up the channel. Also, without the cofferdam to contain the epoxy, it wouldn't have supported anything. I coated the clay with several coats of release agents as I did the other parts, barrel, stock, and tape, that I didn't want the epoxy to stick to. That seems to work well, but left little flecks of clay in the channel. Choose your colors to accomplish what you want: I used orange, so I could see the pieices I needed to remove. Gray or brown would work just as well, and wouldn't look out of place.
That's about it. I still haven't shot it, yet, but maybe this next weekend.
Jaywalker
The Brownells bedding kit is a good purchase - it has the resin, hardener, release agent, and epoxy die in the box. It also has one stirring stick and a couple of cups for measuring/mixing, but if you do more than one job, you'll need additional cups and sticks. Dixie cups work okay, and so do popsickle sticks, tongue depressors, or even half of a wooden clothes pin. (You don't actually need mixing cups for small amounts, but it is convenient.)
Avoid masking tape - it peels off at the wrong time and lets epoxy cake on your wooden stock. Use plastic electrical tape instead. I used black, but next time I'll use a lighter color; it would be easier to see the wood/tape join and make it accurately close to the edge. You want no overlap either direction - right square on the edge.
The second time I used release agent under the electrical tape, but next time I won't. The tape sticks okay to the release agent if there isn't a lot of pressure on the tape, but if you try to wipe off the still-liquid epoxy, the tape will slide. I think the tape would stick better if release agent were not there, and I think that would be adequate protection. A better tape stick makes wiping off during hardening a neater cleanup. The tape won't move (I think), and the pressure will force the rag/paper towell down a little deeper into the channel between the barrel and the stock. This means there will be less hardened epoxy at the top of the barrel channel that you have to scrape off the stock, and avoids the accidental rounding of the square edge of the wood getting it off.
Masking the round part of the fore-end tip just under the barrel is a little harder. Some people might settle for just release agent (from the box, or auto wax), and that might work okay, and I may try this next time. I wasn't completely happy with the way I did it. I used a tape "sling" from one side of the barrel channel to the other, then cut a radius (by eye) to remove tape close to the rounded end of the fore-end tip where the barrel exits. The problem with this was that the tape peeled up from the channel, given that there wasn't much sticking to the inside of the channel and that was on top of release agent. Again, I'm not happy with that approach, and will try something else next time.
The Ruger tip hump is very narrow, possibly to save weight. With the tape towards the front of it removing some of the surface of the tip hump from the bedding surface, I decided I needed additional surface to the rear of the tip hump. To get this, I built a cofferdam out of children's modeling clay. This allowed the epoxy to fill behind the tip hump for about three quarters of an inch, without it leaking back up the channel. Also, without the cofferdam to contain the epoxy, it wouldn't have supported anything. I coated the clay with several coats of release agents as I did the other parts, barrel, stock, and tape, that I didn't want the epoxy to stick to. That seems to work well, but left little flecks of clay in the channel. Choose your colors to accomplish what you want: I used orange, so I could see the pieices I needed to remove. Gray or brown would work just as well, and wouldn't look out of place.
That's about it. I still haven't shot it, yet, but maybe this next weekend.
Jaywalker