Duracoat Shake and spray. My hand at it with pics.

Status
Not open for further replies.

zerobarrier

Contributing Member
Joined
Nov 17, 2013
Messages
792
Location
Houston, TX
Hello all,

This will be multiple posts because of pics.:)

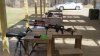
I wanted to share my experience with the Duracoat shake and spray system. The one rifle I did was all black and to me all black can be boring at times. So I have been wanting to add some color to my Rem 700 in 308. My local guy does cerakote, which is a better finish then what I did, but this is just a bench rifle and it is the XLR element chassis I am changing the color. So there shouldn't be much, if any wear and tear.

The reason I decided to try this was my local guy wanted $150 plus 6-8 weeks. So during the nice summer my main rifle would be out of commission.:fire: The duracoat was $35 plus $13 shipping and I took the rifle apart, painted, and put back together in a day. Much better then 2 months.

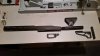
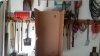
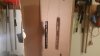
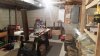
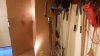
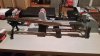
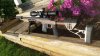
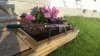
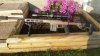
Here are some before pics:
attachment.php

attachment.php


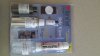
So I will tell you what I did and add pics, now mind you I am no expert. First I got the package, I chose aged bronze for the color:
attachment.php

attachment.php


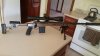
Instructions are pretty simple. Spray down with the supplied degreaser and true strip. Let hang for a few minutes then scrub with the scouring pad that is supplied.
 

Attachments

  • 20150527_154002.jpg
    20150527_154002.jpg
    66.6 KB · Views: 327
  • 20150527_154015.jpg
    20150527_154015.jpg
    56.9 KB · Views: 326
  • 20150522_123010.jpg
    20150522_123010.jpg
    69.6 KB · Views: 332
  • Range (2).jpg
    Range (2).jpg
    157.5 KB · Views: 331
Once I degreased and stripped I scrubbed it real good, making sure to get everything. After that I got my air compressor and air blasted it really well to make sure everything was off. I then let it hang for about 2 hours before painting.

attachment.php


After that I was ready to try and paint for the first time. I have never really even used spray paint...

attachment.php


So I did short fast stroked going down to the left. Kept the sprayer about 6-8" away. I started spraying above the part first in order to get the best spray possible. This is the first 3 parts with 1 coat:

attachment.php


It seemed to go on really well. I did end up with a few runs but that was my fault due to inexperience with spray paint. I ended up doing 7 parts of the XLR element with 4 coats. I let them hang overnight before reassembly:

attachment.php
 

Attachments

  • 20150527_165030.jpg
    20150527_165030.jpg
    70.8 KB · Views: 328
  • 20150527_184850.jpg
    20150527_184850.jpg
    48.4 KB · Views: 325
  • 20150527_214411.jpg
    20150527_214411.jpg
    77.9 KB · Views: 326
  • 20150527_203511.jpg
    20150527_203511.jpg
    57.5 KB · Views: 325
I then put it all together and I like the color.

attachment.php


attachment.php


For my first attempt I think I did an ok job, the runs I left in it aren't to noticeable. If it really gets to me then in winter I can always send it out to be professionally done.
 

Attachments

  • 20150528_070226.jpg
    20150528_070226.jpg
    75.1 KB · Views: 324
  • 20150528_071810.jpg
    20150528_071810.jpg
    72.1 KB · Views: 494
Much interest in this. I have two builds to refinish. One especially had two halves of a receiver welded back together. In the raw, the seam is quite noticable. Much blending of the metal but am wonding if this finish would help hide this but not fill in the markings. How did yours turn out?
 
Here are some before and after shots:

Before:
attachment.php


After:
attachment.php


Before:
attachment.php


After:
attachment.php


Before:
attachment.php


After:
attachment.php


All in all I would try it again. I am not sure how the durability will be, but like I said before I don't think it will be an issue for my use. It was really easy to put on and did not take that long. It probably to me as long to post this with adding and editing pics :banghead:

I did enjoy doing it and like doing things myself. Everything done to this rifle was by me and it shoots <.5" at 100yards with my hand loads. It can do 2.5" at 500yards if I do my part.

Well thanks for looking.
 

Attachments

  • 20150528_071417.jpg
    20150528_071417.jpg
    121.3 KB · Views: 450
  • 20150528_071438.jpg
    20150528_071438.jpg
    129 KB · Views: 314
  • 20150528_071453.jpg
    20150528_071453.jpg
    127.6 KB · Views: 444
ID-Shooting,
Duracoat also makes a product to use with their paint system called Durafill--designed to eliminate minor imperfections by filling small voids, pitting, etc.. Combining the two might work. Some epoxies can also be painted over after sanding. Either might help hide that along with using a flat paint in a dark or pattern type paint job.

Avoid glossy or semi-gloss finishes as it will accentuate the flaws below.
 
It appears that the DC holds up if the metal prep was done correctly and the parts assembled after a fairly decent cure time. IIRC DC sets up fully in 5 weeks.

I'd leave the parts alone for 2 weeks and then assemble.

Guy did an encore that way, forgot how to put it together. Some snug pins but nothing chipped during my assembly of the rig.

Hell I gave him the DC for the project- went with Gunkote heat cure for a couple of 1100's I did.

Your rifle looks good, should hold up decent if it's cured. Buddy has high $ sniper rifle built by famous dude, DC painted. It's used a fair amount and has chips.

But, being DC.........his metal and stock are all camo'd. No heat used.
 
Status
Not open for further replies.
Back
Top