
bangswitch
Member
I'm putting an original replacement stock on my 12 Gauge Fox B and wanted it to match the original fore end. I got the stock from www.gunstocks.com. Nice piece of walnut, but they are sold requiring final inletting and some shaping to fit. That's all done now.
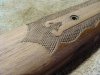
I once had a 20 gauge Fox B identical to this 12 gauge, so I remembered the checker pattern on the pistol grip. It has two fleur-de-lis, which I thought might be a bit of a challenge, since I haven't tried this before, but, in for a penny....
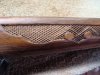
I bought a full set of DemBart checkering tools, with cutters for 16 lpi and 20 lpi, and decided to do 16 lpi on the pistol grip. Now, the fore end checkering is impressed and not cut, but I plan to cut the checkering into the pressed pattern (I'm about 1/3 of the way, and it's working fine). The fore end pattern required the 20 lpi cutters so it will be a bit finer. I'll also sand and re-oil the fore end to match the finish of the stock. I'm using teak oil; it's very similar to tung oil, but thinner and designed to penetrate dense wood like ebony, teak, and mahogany. 5 or 6 coats will usually fill the grain.
I sanded the stock down to 220 grit, and then applied two coats of oil, sanding the wet oiled finish with 600 grit and then wiping it after letting it penetrate an hour. After these coats dried, I traced my pattern onto masking tape applied to the stock pistol grip, and then cut in the outline with an exacto knife, removed the tape and started in. I used a small veining cutter to deepen the outline, then laid my master lines for the checks. After all the cutting and cleaning up of the lines, I've got two more coats of teak oil on. At least two more will go on after that, then a fine rubbing with 4-0 steel wool, and several coats of BriWax. I also have a reproduction pistol grip cap on order to finish it off.
It's tedious work; after several evenings and a long rainy afternoon, here is the result. I have the fore end up to compare the patterns. I can point out many, many.....many small screw ups, but overall I'm happy with the result. It looks almost as good as the factory cut checkering on the 1950 Fox B 20 gauge I have. Any critiques welcome.
I once had a 20 gauge Fox B identical to this 12 gauge, so I remembered the checker pattern on the pistol grip. It has two fleur-de-lis, which I thought might be a bit of a challenge, since I haven't tried this before, but, in for a penny....
I bought a full set of DemBart checkering tools, with cutters for 16 lpi and 20 lpi, and decided to do 16 lpi on the pistol grip. Now, the fore end checkering is impressed and not cut, but I plan to cut the checkering into the pressed pattern (I'm about 1/3 of the way, and it's working fine). The fore end pattern required the 20 lpi cutters so it will be a bit finer. I'll also sand and re-oil the fore end to match the finish of the stock. I'm using teak oil; it's very similar to tung oil, but thinner and designed to penetrate dense wood like ebony, teak, and mahogany. 5 or 6 coats will usually fill the grain.
I sanded the stock down to 220 grit, and then applied two coats of oil, sanding the wet oiled finish with 600 grit and then wiping it after letting it penetrate an hour. After these coats dried, I traced my pattern onto masking tape applied to the stock pistol grip, and then cut in the outline with an exacto knife, removed the tape and started in. I used a small veining cutter to deepen the outline, then laid my master lines for the checks. After all the cutting and cleaning up of the lines, I've got two more coats of teak oil on. At least two more will go on after that, then a fine rubbing with 4-0 steel wool, and several coats of BriWax. I also have a reproduction pistol grip cap on order to finish it off.
It's tedious work; after several evenings and a long rainy afternoon, here is the result. I have the fore end up to compare the patterns. I can point out many, many.....many small screw ups, but overall I'm happy with the result. It looks almost as good as the factory cut checkering on the 1950 Fox B 20 gauge I have. Any critiques welcome.
Last edited:


 Actually, I'm having a lot of fun with this. It sure is tedious, but it keeps me out of the bars and off the streets at night.