Knifemakers: Am I doing it right?

Status
Not open for further replies.

slicksleeve

Member
Joined
Sep 1, 2009
Messages
558
Location
Fort Payne, Alabama
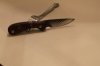
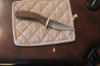
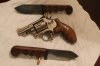
Hello guys. Just thought I would pick your brains about my newfound, (and totally un-needed) hobby. My wife and I have six horses, so when the farrier comes, he usually has a handful of Save Edge rasps for me. I've been putting them in the forge, let them get up to non-magnetic for a while to anneal, then cooling down on their own. Then I draw the shape, and rough them out with a hacksaw, (don't have a band saw yet), and then go stock removal on them. All I have right now is a Porter Cable 4x36" belt sander. Been starting out with 36 grit, then to 60, then 120 grit. 120 grit is as fine as I have seen in local stores. Should mention that I drill most of the holes before starting the bevel. After sanding, I usually go ahead and heat them up again to non-magnetic, then immediately plunge them into the vat of used Delo 400 out of my diesel truck. Then run them over a wire brush wheel to remove the scale, wash them in the kitchen sink, and throw them in the oven. In the oven at 350 degrees until they turn straw color, and out to cool down. Then I pin the rough shaped grips on with 1/8" brazing rods, glued on with Gorilla glue. After it cures out, I blend everything in. Final sand and polishing goes up to 1200 grit by hand. Sooo, does this sound like the proper process? They sharpen up pretty good. I don't have a lot of arm hair left some days after honing them.
 

Attachments

  • IMG_1714.jpg
    IMG_1714.jpg
    74.7 KB · Views: 85
  • IMG_5582.jpg
    IMG_5582.jpg
    73.6 KB · Views: 79
Sounds like you've got the process down, and the knives look good. Just takes practice and some time to figure out what you like now.

I will say that 350 sounds a little low on the tempering temp. I haven't used those rasps, but I would guess you could get closer to 400 deg F. Every oven is different though and the dials aren't necessarily accurate, different alloys take different temps as well. Put those knives to use and see how they hold up. If the edges start chipping, raise you tempering temp by 25 degrees and try again.
 
I'd suggest spending some time on Walter Sorrell's YouTube website.

He is a wealth of information on knife making and demonstrates numerous methods that are geared toward the beginning knife maker. Look through his videos and you will get a lot ideas and information.

Here's a LINK to his website on how to make a knife from a file.

It's a three part series and he makes the knife using no specialized tools and using hand tools and things most people have around their house and workshop.

As an example, he makes a "forge" to heat the file using charcoal briquettes and a hair dryer.

In Part 2, he addresses heat treating and suggests tempering the blade at 400F for 1 hour, letting it cool and repeating the process.
 
Last edited:
Thanks guys. By the way, when I said I draw the shape, I meant that I actually draw on it with a sharpie the outline I want. Didn't mean to sound like I hammer them into those forms if it did.
 
I think you've done a damn fine job, especially grinding on a 4" x 36" grinder. I have one but never ground anything but pistol grips on it, I have a 2" x 42" for what little knife making I do now. Check trugrit.com for belts.

Edit: I just went to Trugrit and they have your belts up to 800 grit. It's where I've bought all my belts for a long time.
 
Your blade shapes look very good, especially for someone just starting out.

Be careful with finger grooves. I have seen exactly two in the hundreds of knives I've handled that were the right size. A single deep choil is frequently useful, but more than that almost always raises blisters and hot spots if you actually work with the knife.

John
 
good stuff

You are doing the basics correctly. A minor difference for me is that I heat the quenching oil to about 150 degrees...
Another qood video about making blades is the piece by Charlie Lewis on you tube. Lewis is a maker of custom straight razors and his explanation of the heat treating process is worth a look. The video is an hour long; the heat treating parts are at about the 22 minute mark. This link is a bit past that:
https://www.youtube.com/watch?v=tvFO3TqhDj0
 
Thanks for the links and feedback fellers. As far as starting out, I've made about 20 now, give or take. My first one looked like something a prisoner would scratch out against a cell wall. I don't show it to people. But I did make this one for my wife, she drew it out on paper. The scales came from an old badly sporterized milsurp stock. When time permits, I will watch those videos. I started out by reading a book about Robert Loveless. Since then I've read a lot online also. Funny thing is, I got started doing this because amateur gunsmithing is expensive and now matter how good a job I can do, they seem to be worth less afterward.
 

Attachments

  • IMG_1660.jpg
    IMG_1660.jpg
    27 KB · Views: 36
slicksleeve

I like the overall design and build quality of your knives but agree with the others who think that the finger grooves might be a little troublesome due to their size and spacing. Other than that I believe you're doing a great job at making knives and keep up the good work!
 
Pete D., I have heard of people who heat the quench oil up before. What does this do as opposed to having it at ambient temperature?
Not to jump in, but warming up quench oil actually improves quenching speed. Cold oil is thick and because it doesn't flow well, the oil immediately against the blade heats up faster and creates a pocket of hot oil around it trapping heat. Warmer oil flows better and will actually transfer heat faster, as odd as it sounds.

Be aware that motor oil has a lower flash point than some of the commercial quenching oils, so you need to be careful of your container size vs. the size of your blade. I also use motor oil, but I have a steel tank made of 4 inch sprinkler pipe so I have several gallons of oil to absorb the heat. I can preheat my oil to 140-150 degrees and quench one large blade (12 inches, 5/16" thick) before I get close to flashing it off. If you try to quench in something like a coffee can for example, you have much less heat capacity in your quench and are more likely to have a fire. Pre-heating your quench oil is a good practice, but it also means you are starting with the oil closer to its ignition temperature so use a little precaution.
 
Good job.

Used oil is cheap, but new is cheap enough that the consistency is worth the cost if you're keeping the oil.

Do heed the advice to heat your oil before quench. It does provide a better quench. Also, don't stir with the blade. Straight in and straight out again. You can heat by dropping a chunk of hot steel into the oil.

Consider doing two draws in the oven.

JShirley is spot on about multiple finger grooves. A single groove then a palm swell fits more hands and won't be likely to produce hot spots.
 
Real nice work!

The wife's knife is fantastic.

Ditto what the more experienced said about finger groves and from experience the 400 degree works better .

Keep at it you got talent.
 
Status
Not open for further replies.
Back
Top