Cesiumsponge
Member
I finally splurged and picked up a Bushmaster A3 16" dissipator carbine from the local gun store on Thursday. I was considering the M4 style Bushmaster in A3 but there weren’t any at the front rack and I didn’t want to grind away at the front sight block to make it a low-profile unit (though I had to end up grinding the dissipator FSB anyhow unbeknownst to me).
I had a bunch of accessories already picked up beforehand so I had to be dedicated to the rifle or I had a pile of useless stuff. The gunsmith at the store already left for the day so I couldn’t get them to loosen up some parts and pound out some others. I couldn’t wait until Friday so I took matters into my own hand.
I took it home, and having never handled an AR15 before, I spent about a half hour learning how to take it apart, did a function test, observed the inner workings, and then spent the next two hours disassembling it and putting on new goodies. The only gun-related tools I had was a punch set and a DPMS AR multi-wrench.
I learned the buffer tube’s detent will fly off if you’re not careful but I did it in a clean room just for such an occasion and swapped out the stock with a Vltor unit and added a ambidextrous sling mount for a one-point sling I had. I forgot to put in the spring and buffer back in for some stupid reason and pulled back on the charging handle and got the bolt carrier stuck to the rear of the gun. I couldn’t figure out why it didn’t spring back until I saw the uninstalled spring and buffer laying on the table. A bit of jiggling and shoving the forward assist and I got the bolt back where it belonged, hinged the upper open, and installed the spring and buffer. Stupid moment.
KNS anti-rotational pins were a cinch to install since they already come with a tapered pin attachment to push out the old ones out. It took me a good 15 minutes to get the stock grip off since I didn’t have any folding allen key sets (I have 8 of those folding key sets and none were big enough argh!) that were long enough and ended up finding a T-handle by chance in the right size in an “assorted tools” box. I ended up replacing it with a Magpul MIAD unit and a Hogue Handall slipon rubber sleeve afterwards. The grip feels perfect for my hand.
I ended up removing the front sight dummy block since I had a rail-mounted YHM BUIS and didn’t need a stationary front sight. The flash hider was a cinch to take off. The DPMS wrench had a stone finish that was a bit too thick (I don’t know why they did that) so I had to scrape a bit of it away before it would fit on the flash hider and not get jammed by the crush washer.
The dummy FSB ended up as the hardest step since the tapered pins were jammed in there solid from the factory. After finding out which side I was supposed to punch them out of, I bent two brass punches and a 3/32 steel punch and dented up my brass hammer; they wouldn’t budge. I ended up squaring up two ends of scrap threaded rod I found, used it as a punch and took a framing hammer to town. It worked!
Then I tapped it off with a wood block and found out that they finished the firearm with the front sight installed and underneath the FSB was bare metal. I later filled the pin holes with JB Weld, took Rustoleum high-temp spray paint to the barrel, and it looks like the original finish. If it works for BBQs and engine blocks, it should work for gun barrels.
I couldn’t figure out how to get the M16-length handguard off (or didn’t take the time to learn) so like an impatient dummy, I pried them until I broke them off at the delta ring, then found out the delta ring can be pulled back against spring power to release it. No harm since I won’t be keeping them. Instead of properly removing the barrel to remove the delta ring (since I had no torque wrench to put it back to spec afterwards) I took a cutoff wheel to the aluminum delta ring and cut that off, removed the snap ring and the stack of springy things behind it, and installed the Samson MRFS-R rail (almost identical to the Troy unit).
I found out the factory shaved gas block was too big for the rail system, doh! I ended up taking a grinding wheel on a drill press and grinded the thing down to a profile that would clear it. After that, I did the aforementioned high temperature paint finish and it looks great. I filled in the fire/safe stampings on the selector with red and white for an H&Kish look.
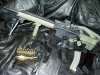
The Tangodown vertical grip fits nicely on the mil-spec rail and has no slop or play in it. It locks up tight and is a PITA to move since there are two spring-retained “bars” that lock on any rail and you have to both pull down on them, and apply lateral force to move it. Doing so is a bit of a high-wire act. The Tangodown panels fit very nice and are hard to slide around until you break them in a bit. It ended up taking almost two panels to cover the length of any given side. As seen on the left side of the rail system, I ended up cutting off a bit on one end and contoured it to fit against another panel and it worked out perfectly.
All in all, it’s just about done save a tactical light for identifying at night (if I load it with frangible and use it as a HD rifle) and maybe a laser for range fun. I need to take it down to the range some time and run some ammo through it to zero the Eotech 552 and the BUIS. Bipod is on there for zeroing...I don't plan to hump a bipod on a carbine on a regular basis. Otherwise it’s the way I want it and I can use it to get familiar with the M16 family since I’m planning to hop into the Army at the end of the year.
All in all, there wasn’t anything intimidating to me. Nothing was terribly hard and I found it very fun and a good experience (when I wasn’t looking for allen keys). I had no professional gunsmithing experience at all and did my own work on a Saiga 12 shotgun which was a bit more difficult since I had to cut holes in the receiver to relocate the trigger group.
Well worth it!
PS: By chance, is there a specific break-in procedure for chrome-lined barrels? I have read contradicting opinions everywhere and it'd be helpful if I get some more contradicting opinions and pick the one with the most votes
I had a bunch of accessories already picked up beforehand so I had to be dedicated to the rifle or I had a pile of useless stuff. The gunsmith at the store already left for the day so I couldn’t get them to loosen up some parts and pound out some others. I couldn’t wait until Friday so I took matters into my own hand.
I took it home, and having never handled an AR15 before, I spent about a half hour learning how to take it apart, did a function test, observed the inner workings, and then spent the next two hours disassembling it and putting on new goodies. The only gun-related tools I had was a punch set and a DPMS AR multi-wrench.
I learned the buffer tube’s detent will fly off if you’re not careful but I did it in a clean room just for such an occasion and swapped out the stock with a Vltor unit and added a ambidextrous sling mount for a one-point sling I had. I forgot to put in the spring and buffer back in for some stupid reason and pulled back on the charging handle and got the bolt carrier stuck to the rear of the gun. I couldn’t figure out why it didn’t spring back until I saw the uninstalled spring and buffer laying on the table. A bit of jiggling and shoving the forward assist and I got the bolt back where it belonged, hinged the upper open, and installed the spring and buffer. Stupid moment.
KNS anti-rotational pins were a cinch to install since they already come with a tapered pin attachment to push out the old ones out. It took me a good 15 minutes to get the stock grip off since I didn’t have any folding allen key sets (I have 8 of those folding key sets and none were big enough argh!) that were long enough and ended up finding a T-handle by chance in the right size in an “assorted tools” box. I ended up replacing it with a Magpul MIAD unit and a Hogue Handall slipon rubber sleeve afterwards. The grip feels perfect for my hand.
I ended up removing the front sight dummy block since I had a rail-mounted YHM BUIS and didn’t need a stationary front sight. The flash hider was a cinch to take off. The DPMS wrench had a stone finish that was a bit too thick (I don’t know why they did that) so I had to scrape a bit of it away before it would fit on the flash hider and not get jammed by the crush washer.
The dummy FSB ended up as the hardest step since the tapered pins were jammed in there solid from the factory. After finding out which side I was supposed to punch them out of, I bent two brass punches and a 3/32 steel punch and dented up my brass hammer; they wouldn’t budge. I ended up squaring up two ends of scrap threaded rod I found, used it as a punch and took a framing hammer to town. It worked!
Then I tapped it off with a wood block and found out that they finished the firearm with the front sight installed and underneath the FSB was bare metal. I later filled the pin holes with JB Weld, took Rustoleum high-temp spray paint to the barrel, and it looks like the original finish. If it works for BBQs and engine blocks, it should work for gun barrels.
I couldn’t figure out how to get the M16-length handguard off (or didn’t take the time to learn) so like an impatient dummy, I pried them until I broke them off at the delta ring, then found out the delta ring can be pulled back against spring power to release it. No harm since I won’t be keeping them. Instead of properly removing the barrel to remove the delta ring (since I had no torque wrench to put it back to spec afterwards) I took a cutoff wheel to the aluminum delta ring and cut that off, removed the snap ring and the stack of springy things behind it, and installed the Samson MRFS-R rail (almost identical to the Troy unit).
I found out the factory shaved gas block was too big for the rail system, doh! I ended up taking a grinding wheel on a drill press and grinded the thing down to a profile that would clear it. After that, I did the aforementioned high temperature paint finish and it looks great. I filled in the fire/safe stampings on the selector with red and white for an H&Kish look.
The Tangodown vertical grip fits nicely on the mil-spec rail and has no slop or play in it. It locks up tight and is a PITA to move since there are two spring-retained “bars” that lock on any rail and you have to both pull down on them, and apply lateral force to move it. Doing so is a bit of a high-wire act. The Tangodown panels fit very nice and are hard to slide around until you break them in a bit. It ended up taking almost two panels to cover the length of any given side. As seen on the left side of the rail system, I ended up cutting off a bit on one end and contoured it to fit against another panel and it worked out perfectly.
All in all, it’s just about done save a tactical light for identifying at night (if I load it with frangible and use it as a HD rifle) and maybe a laser for range fun. I need to take it down to the range some time and run some ammo through it to zero the Eotech 552 and the BUIS. Bipod is on there for zeroing...I don't plan to hump a bipod on a carbine on a regular basis. Otherwise it’s the way I want it and I can use it to get familiar with the M16 family since I’m planning to hop into the Army at the end of the year.
All in all, there wasn’t anything intimidating to me. Nothing was terribly hard and I found it very fun and a good experience (when I wasn’t looking for allen keys). I had no professional gunsmithing experience at all and did my own work on a Saiga 12 shotgun which was a bit more difficult since I had to cut holes in the receiver to relocate the trigger group.
Well worth it!
PS: By chance, is there a specific break-in procedure for chrome-lined barrels? I have read contradicting opinions everywhere and it'd be helpful if I get some more contradicting opinions and pick the one with the most votes