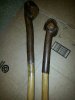
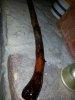
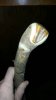
Pictured is an osage orange cane I'm making for myself, next to my refinished lollysmith blackthorn. I'm using the blackthorn as a template in terms of shape and how much bark to remove at the top.
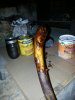
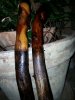
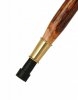
I've got a pretty good work flow set up: mark suitable trees with surveyor tape while wandering about the woods; use a sven saw when appropriate to cut, with about 4" to spare (winter for osage orange/bois d'arc); shellac the ends; let it dry near a woodstove for a few weeks; use a fabric steamer to straighten where necessary; soak and use a hand planer to remove knots and shape the top; dry a while then use steel wool to remove loose bark (the "skin" stays intact); shape and finish the top using progressively finer grits of sandpaper (starting with a sanding sponge then freehand); cure longer if necessary then stain and finish, adding a metal ferrule and rubber cane end last.
Not sure how this one will end up being stained but mature osage takes on a beautiful tiger stripe pattern after loose bark is gently removed.
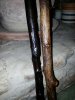
I require any stick be reasonably sturdy since I have an interest in martial applications (paul sharp has great stick fighting drills on his blog - google it!). Beyond that what I really appreciate is bringing out the natural beauty of the wood with as few changes as possible and making a warm, natural looking end product.
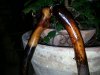
This example has been straightened to its current state more than a few degrees and has had some preliminary shaping done. I will post some updates once it's fully sanded, prior to finishing.
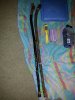
I'm going to try to make a Brazos spike ferrule fit on the end, and probably stick a copper skull bead at the bottom. Pics attached of those as well.
I've got a pretty good work flow set up: mark suitable trees with surveyor tape while wandering about the woods; use a sven saw when appropriate to cut, with about 4" to spare (winter for osage orange/bois d'arc); shellac the ends; let it dry near a woodstove for a few weeks; use a fabric steamer to straighten where necessary; soak and use a hand planer to remove knots and shape the top; dry a while then use steel wool to remove loose bark (the "skin" stays intact); shape and finish the top using progressively finer grits of sandpaper (starting with a sanding sponge then freehand); cure longer if necessary then stain and finish, adding a metal ferrule and rubber cane end last.
Not sure how this one will end up being stained but mature osage takes on a beautiful tiger stripe pattern after loose bark is gently removed.
I require any stick be reasonably sturdy since I have an interest in martial applications (paul sharp has great stick fighting drills on his blog - google it!). Beyond that what I really appreciate is bringing out the natural beauty of the wood with as few changes as possible and making a warm, natural looking end product.
This example has been straightened to its current state more than a few degrees and has had some preliminary shaping done. I will post some updates once it's fully sanded, prior to finishing.
I'm going to try to make a Brazos spike ferrule fit on the end, and probably stick a copper skull bead at the bottom. Pics attached of those as well.


")