Anybody here ever used Duracoat?

Status
Not open for further replies.

jmcraven

Member
Joined
Jul 6, 2006
Messages
37
Anybody here ever refinished a gun with Duracoat. I bought a pair of Star BM's with considerable holster wear, and I was thinking about ordering a kit and doing it myself. If anybody has any experience with it, please let me know what you think. Also if the process is as easy as they make it sound.

Thanks
 
Dura coat

My brother bought me a kit for my birthday it was very easy to use i just fallowed the directions, the only advice i would give you is to make sure you sand blast it with the right stuff they recomened, alum, oxide if i rember right?
any how go for it.
IM003960.jpg
 
About 4 months ago, I had the slide of a 1911 Duracoated black. It's now in need of refinishing, with large areas of bare metal showing. On average, I shot it once a week. This 1911 isn't my carry gun or my night stand gun. It was fired, cleaned and stored. Others may have had good luck with it, but my experience with Duracote was less than satisfactory.

Mike
 
I just finished (literally, about two hours ago) refinishing an AR lower that had the old Colt Grey to match an RRA upper that I had mounted on it. The match between the RRA upper and the duracoat "Black Oxide" is pretty darn good. It was ready to be handled after about 1/2 hour (it helps when your back yard is the same as a 110 degree oven). I hadn't planned on reassembling the AR until tomorrow, but since it looked and felt good, I did so. The thing looks darn nice! I don't plan on lubing up and shooting it until it cools down a bit here, so it will have time to cure in the safe. Lauer's instructions say allow 3-4 weeks for a full cure. I'll have to get back to this thread as for as durability.....
 
Please do; I'll be really interested to hear how it progresses.

Did you find the process as easy as they claim? They make it sound like a 8 year old could do it- which is about my level of sophistication on stuff like this :D
 
It was very easy. I degreased with STP Carb Spray Cleaner, and did not sand blast (it is listed in Duracoat's instructions as optional). Mixing was relatively easy. I used those 10ml medicine syringes that you use to give liquid meds to children and mixed 10ml paint with just under 1ml of hardener (12:1 ratio). It was perfect for the little jar that came with the testor's spray kit I bought at Wally World for $20. Shake it up and spray. If you go duracoat, be sure to buy the reducer (thinner). You will need it to clean the sprayer (unless you're just gonna toss the bottle and the bottle's nozzle) and you may need it to thin your mixture just a bit (I didn't need it at all for that). Cleaning up was the hardest part, but I want to keep all of the sprayer parts, because my daughter and I are getting into model airplanes (back into, for me, I guess). No one in my family could tell the difference between DuraCoat's Black Oxide on the lower and Rock River's original finish on the upper.:)
 
Thanks a ton for the info. That's exactly the kind of stuff I was curious about. I was wondering particularly about the sandblasting since I don't really have the means for that-thanks for that info. Please do keep me up to date as to the overall experience.

I am looking at the basic kit for $50 on the Lauer website- it seems to be a decent deal, and it comes with an instructional DVD.
 
The AR that I just (partially) finished using DuraCoat Black Oxide. The lower is an old Eagle Arms (before they bought the Armalite name) receiver, which had been finished in “Colt Grey.” The upper is a relatively new Rock River Arms. Only the lower, the part of the buffer tube that is showing, and the buttstock have been refinished. I was attempting to match the RRA finish. When I hold it in various light, I can see a difference between the Rock River finish and the DuraCoat. However, it is largely trivial.

By the way, I have since read somewhere that if you are painting something with a blued or stainless finish, then sand blasting is *HIGHLY* recommended. Lebben-B, might that have been the problem with your finish? Just a thought.

e4705d55.jpg
5bc3c5ab.jpg
 
Ive used duracoat and bead-blasting of parts is a must. I would recommend blasting parts as prep for any sprayed on finishes.

5-05001.jpg

above shows an AK kit blasted and ready for degreasing. I also used a dremel with a sanding wheel to knock down sharp edges on the rifle.

Degreasing is highly important.


duracoat009.jpg

Above shows simple hang rack I built for the parts to be sprayed. Important to be able to get all the nooks and crannies.

I allowed the parts to dry 24 hours and reassemble the rifle after that. Duracoat gets harder by the day until after three weeks or so. Simply put the rifle away and leave it alone.

The photos below are of the completed rifle in Colt Grey (and some dremel work on the bolt carrier handle). It is very easy to do and it is very durable as long as the prep is done correctly. Good luck!


Image3.jpg

finished007.gif
 
also if you dont have a bead blaster you can take the parts to a machine shop and have them do it for you. I used a medium grit glass beads in my blaster. I left my bolt carrier in my AK's raw but covered the piston when I blasted it. I also plugged the chamber, muzzle and gas port on the barrel. I would think a machine shop would charge yo 20 bucks to do it. Or you can buy the owner an 18 pack and talk him into letting you do it yourself on his blaster.
 
Duracoat

Like most finishing jobs the key is prep. The Duracoat needs a good surface to mate with. Blasting is the way I go. Also, make sure you have completely degreased.

I've done a couple of my own guns with good luck. I've usually handled my guns shortly after painting but the longer you wait the more durable it becomes. I think James who is a sponsor over at XDTalk tells his Duracoat customers to wait 30 days to holster guns. I've never waited that long but I don't use unlined Kydex holsters either...


Duracoat.gif
 
The most durable and wear-resistant DuraCoat finishes that I've seen were aplied over manganese phosphated steel. Dunno how well it works over blued steel.
 
camo in dura-coat...

Camo is only limited by the imagination. Bow hunters use an array of schemes based on their needs. They do it with common flat enamle though. I've seen many interesting schemes, and I've done my bow in the three basic colors of:

*olive green
*black
*woodland brown

Sometimes I use medium gray instead of brown.

I'm a little scared of dura-coat. I've never used it, and I've seen CRAPPY results which may be the fault of the person who applied it. I was an aircraft structural repairman in the Navy. Aluminum is my gig and I've never seen paint adhere well to aluminum no matter how well it was preped. I've used alodine to etch the aluminum which inhibits corrosion, then used epoxy polimide primer and paint. The results in my book were marginally acceptable. Poly Urathane paint rocks. We used it on the leading edges of the wings, it is TOUGH stuff but the heat thing with a barrel might do it in. I don't have much faith on applied finishes. I did research anodizing...sounds as bad as hot/rust bluing to me so it's out of the question. I do zinc phosphate and manganese phosphate parkerizing. Zinc is easier, and it looks better. I've had very few manganese turn out true even black. It can be done, but it's not easy and parkerizing can only be used on carbon steel. Good luck with the Dura-Coat, I'll check back to see how it went.:D
 
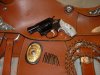
The pattern on the CZ pictured above doesn't require a camo template.

First I disassembled and blasted the gun with 150 grit silicon carbide. After blowing off the loose abrasive with air, I washed the parts with warm water and Dawn dish washing soap to make sure all the abrasive was gone. I then blasted it with air to dry it and sprayed it with the Duracoat degreaser 'TruStrip' to make sure it was dry and free from oil. Note.. at this point the metal is raw and bone dry and will begin to rust almost immediately (at least it will in Houston humidity).

You start with a base coat, in this case matte black. I sprayed the dissassembled gun so as to coat all surfaces.

To speed up the process, I cure the Duracoat at low temp over a relatively short period, 1 hour at 130 degrees. I use a small cabinet powered by the heating element from a toaster oven. Curing like this is not required by it speeds the process allowing you to move on to the next step in just over an hour.

I then reassemble the gun so the lines for the camo pattern that is applied flow over all the parts of the gun (safety, grips, etc)

The pattern is very simple. Using blue painters tape torn into strips so that there is an irregular shape on each side, mask off the areas you want to remain black.

You then spray your second color, in this case a dark gray. Return the gun to the oven to cure with the tape still in place. The 130 degrees is not hot enough to damage the painters tape.

Leaving that first tape mask in place you now add additional tape over the second color leaving only small areas exposed which will recieve the final color, here a light gray.

Return the gun to the oven, after an hour you can remove all the tape. At this point you can apply a clear coat which helps to give an even sheen to the paint.

The Duracoat is applied using a small hobby air brush. I'd never used an air brush prior to using Duracoat. The Duracoat goes on very even and I've never had problems with runs or build up. The Duracoat is not a thick finish. Even when doing 4 coats like in the above example, the dimensions are not increased such that I have difficulty with moving parts rubbing or mating.

The CZ pictured was done in one day.
 
I just did this old Mossberg model 88 the other day. It was my first time using Duracoat and I found it very easy to use.
 

Attachments

  • 88-3.jpg
    88-3.jpg
    85.4 KB · Views: 432
History Prof said:
I'll have to get back to this thread as far as durability.....
jmcraven said:
Please do; I'll be really interested to hear how it progresses.
Well, almost six months later, and over 200 rounds out of the AR, the DuraCoat finish looks almost the same as the day I sprayed it on. I've even inadvertantly ding'd it a few times, and the impacts haven't left any noticable scratches. I'm impressed with this stuff. I may have to refinish a few more next summer, when it is a 110 degree oven in my back yard again.

HOWEVER, the difference between the RRA finish and the duracoat is now VERY obvious. The RRA finish on the upper is flat, the DuraCoat finish on the lower is very glossy. I don't blame DuraCoat for that - I think I just selected the wrong finish for what I wanted to do....
 
Status
Not open for further replies.
Back
Top