Design feedback

Status
Not open for further replies.
A first-timer's attempt at a hamon:

Well, I finally got around to heat treating that top knife. I really wanted to try my hand at clay hardening with this one. I've always seen these pictures of beautiful hamons on 1095 and W2 steels, and I figured, well hell, why not? Worst that could happen is I get an ugly hamon, or no hamon at all.

A generous soul on another forum donated some refractory materials so that I could build a paint can forge, including some satanite cement, and I had a dab left over, so I mixed it up and gave it a whirl.

I globbed some of the satanite on (about 1/8" thick), made a simple wavy pattern, and to the hot paint can forge it went. Heated to orange (at night to see the color well), tested with a magnet, soaked 10 minutes at that temperature, quenched in brine, and then tempered twice at 450 F (one hour for each tempering) until the telltale straw colored oxide formed.

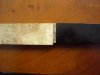
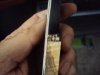
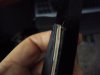
I could see a line as soon as I raked the clay off the blade, but I read that that's not really indicative of a true hamon, as you can get surface decarb on the blade that follows the contour of the clay pattern. So I (reluctantly, and with great apprehension) hit it pretty heavily with some 120 grit, and worked back up to 2000 grit, and then etched in hot apple cider vinegar, and polished with some stainless kitchen sink polish (it was the only liquid abrasive I had handy).
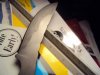
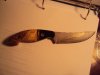
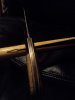
Here's the result:
bullnose3.jpg
bullnose4.jpg
bullnose5.jpg

Not the prettiest hamon I've ever seen (not by a long shot), but I was real pleased just to see one at all. I just knew it would sand right off, so I was happy to see it was actually a true hamon.

So there it is, my first ever attempt at clay hardening. I'd say it's at least a step in the right direction, anyway.


Some things I learned:

Despite what I read on the internet, Radio Shack does not carry ferric chloride. At least not the one near me.

When etching the blade, it helped to get the vinegar hot. I've read a lot about warm vinegar, but the boiling point of acetic acid is pretty low, and you will not get the vinegar hot enough to damage a heat treat, so I got the vinegar up to a full boil on the stove top, cut off the heat, and then etched. After several blotchy failed attempts with wiping the vinegar on with paper towels, trying a soak in warm vinegar, and a messy fiasco involving a lemon and a cut finger, I figured out that a full immersion in near-boiling hot vinegar did the trick.

My propane burner (which is the cheapest Bernz-O-Matic LP burner they make) sucked! It was very positional when used with the paint can forge. I finally got it set up at just the right angle, and it would work, but if you touched the thing, I mean if you even breathed on it, it would immediately snuff out. I'd recommend anyone who builds a similar DIY forge to go with a better burner, and not be a cheapskate like me. I hate that old adage about "buy cheap, buy twice," because sometimes there are really good deals out there, but in this case, the adage is true. I'll have to get a better burner.

Propane worked, but it was slow to get the forge up to temp. I will probably try a MAPP type gas next time.

The satanite worked really well for the clay. I've read of people having issues with other types of clay breaking off in the forge, but I didn't have any issues.

Another thing I learned is that the hamon may or may not follow your clay line. On some areas of the blade, it followed the lines perfectly, and in others, it's like it had a mind of its own. I haven't figured out if it's because of temp variations, clay moisture variations, or what, but that's what I observed. Honestly, the areas where it deviated from the line are the most interesting to look at. I wish I could figure out how to recreate that intentionally.


I will be trying this again. If nothing else, I had a lot of fun doing it.


Now for a handle...


Jason
 

Attachments

  • bullnose 3.jpg
    bullnose 3.jpg
    78.2 KB · Views: 4
  • bullnose 4.jpg
    bullnose 4.jpg
    35.3 KB · Views: 4
  • bullnose 5.jpg
    bullnose 5.jpg
    32.2 KB · Views: 3
Last edited:
Not bad at all! And great ingenuity! :)

I was able to get ferric chloride at a local Radio Shak, so you'll just have to call around.
 
Thanks for the kind words, guys. I want to make another one now, and I don't even have this one finished.

I was able to get ferric chloride at a local Radio Shak, so you'll just have to call around.
Must be a regional or store to store thing. I asked the teenage clerk about it, knowing he wouldn't know what in the world I was talking about (I was right). He went and got his manager. I asked her, and she looked at me like I had grown another head or something. I even made sure to ask for circuit board etchant, but no dice. I could probably just make some next time, although the vinegar worked well after I figured out it needed to be hot.

Jason
 
I agree w/ JS:
Tip the blade tip
up on that first one.

I'd also make the handle
more proportional to the blade.
I want more handle than blade for control.

Good stuff, made better
by asking for feedback. :cool:

Nem
 
I agree w/ JS:
Tip the blade tip
up on that first one.

Yep. Too late on this one, but I have some more 1095 laying around, so I'll probably be posting some more sketches when I get time. This time, I'll wait on the feedback before I grind a blank. :D

I'd also make the handle
more proportional to the blade.
I want more handle than blade for control.

It actually handles pretty well for me, but it's not a bad suggestion. I'll take it under advisement for the next one.


Jason
 
Jason, it occurs to me that I should have said "scales", not handle.

The handle looks fine - at least the tang that the scales will fit onto.
My suggestion was more that I'd like to see the scales stretch up over the choil.

But then, I realized I didn't look closely enough at your drawings. I was focusing on the top one in the image here, thinking the lines on the handle represented scales, and didn't realize that the bottom one is a sketch of the knife with scales in place. Indeed, they stretch forward far enough (red arrow).

So, in other words, never mind, it looks fine. :)

attachment.php
 

Attachments

  • blanks2.jpg
    blanks2.jpg
    27.8 KB · Views: 72
I'm going to have LASIK in the morning, so I won't be able to make the scales for another week or so (still waiting on some buffalo horn to come in anyway), but I am planning on putting the front edge of the scales just far enough back to not be in the way of a stone during resharpening. I think I'm going to go with a combination of box elder burl and buffalo horn.


Jason
 
primitive man once skinned mamoths with flint and sharpend bone, a knife is a knife, if you like it or not, is usually a personal tast, if you have the skill to use it even if it's design is a good one or not you will adapt your skills to make it work, personally i think it's a nice looking design and i prefere hand made knives to production ones, i have an old harp, among other that could tell more stories than i will ever live out in my life time, if it wasn't pitted from use, it would be a 5-7 hundred dollar knife, but because it's been used like it should etc....it's more like 100-250, but i wouldn't take a grand for it because i can't get another one and i love aged stag handles...go for it, when people see it with you they'll know you by your blade
 
Knife 2 - I like wharncliffe fixed blades. I want to see it with less handle and equal usability (not a "3 finger knife" or at least not quite, but I do like the pattern), and a bit less top-to-bottom width.

Basically just cleaned up and sleeker, more minimalist...maybe get rid of the hump halfway between the tip and where the scales will begin.
 
Well, I figure I might as well make this a sort of "work in progress" thread. I have just about finished my scrimshaw job I've been working on, so I started making some scales:

scale1.jpg
scale2.jpg
scale3.jpg

These are box elder burl and buffalo horn. I did a five layer spacer of black and white vulcanized spacer and a layer of copper.


More to come.


Jason
 

Attachments

  • scale 1.jpg
    scale 1.jpg
    31.7 KB · Views: 2
  • scale 2.jpg
    scale 2.jpg
    38.4 KB · Views: 2
  • scale 3.jpg
    scale 3.jpg
    32.9 KB · Views: 2
Dude, nice work.

Keep on ...

Suggestion: pay attention to edges ... . .... . .. ........

PS: yes, I acknowledge "work in progress".
Shaping up nicely ...
 
build them and use them hard. you will find any pinch points or any other problem with them as you go. the point weither up swept or drop is a matter of customer choice. You have to like using them first.
 
build them and use them hard. you will find any pinch points or any other problem with them as you go. the point weither up swept or drop is a matter of customer choice. You have to like using them first.

Definitely. This will be for my personal use. I would love to get to a point to where I could sell a few knives, but I am still far from there. I wouldn't feel comfortable putting my work in a stranger's hands yet, especially when my name and his/her money would be on the line.

Maybe in time, I suppose.

Jason
 
Here are some more pics:

WIP1.jpg

WIP2.jpg

WIP3.jpg


I've only roughed in the shape, so I still have much much more sanding and contouring to do on the scales. The scales won't be quite that thick when I get done.

I'll also be putting some mosaic pins into the areas where the Corby fasteners are, and sanding those flush with the scales.


Jason
 

Attachments

  • WIP 2.jpg
    WIP 2.jpg
    44.5 KB · Views: 0
  • WIP 1.jpg
    WIP 1.jpg
    44.5 KB · Views: 0
  • WIP 3.jpg
    WIP 3.jpg
    49.4 KB · Views: 2
Knife is coming along very nicely. I really like the scales and some mosaic pins will really set it off. One thing I find from alot of knife makers is that thier scales end up to blocky. Put a nice feeling belly and a rounded back on those scales. Some knives just feel right and this one certainly has the potential.

Nice work sir.
 
That's looking pretty good! Congratulations on sticking with it and having patience. That's the only way to get good!
 
Finally got to spend a little time on that knife this weekend. It's pretty much done. I will probably go over the handle with a little steel wool and give it a dip in some epoxy, but it's basically done.

Here's some pics:

WIP7.jpg

WIP6.jpg

WIP5.jpg

WIP4.jpg


Thanks for all the feedback and tips, guys. I'll be revisiting that Wharncliffe-that-wasn't soon, so I'll post another similar thread for it when I get rolling on it.

Jason
 

Attachments

  • WIP 4.jpg
    WIP 4.jpg
    27.7 KB · Views: 0
  • WIP 5.jpg
    WIP 5.jpg
    39.3 KB · Views: 0
  • WIP 7.jpg
    WIP 7.jpg
    21 KB · Views: 0
  • WIP 6.jpg
    WIP 6.jpg
    26.6 KB · Views: 0
I would, but that light colored box elder is wanting to stain from being handled, even after i polished it. I can't imagine what blood would do to it.

Jason
 
Status
Not open for further replies.
Back
Top