FAB-10 Range Report: Two round burst model!!!

Status
Not open for further replies.

El Rojo

Member
Joined
Dec 27, 2002
Messages
2,540
Location
The People's Republik of California
Yes, I finally got my less than manly FAB-10 out to Five Dogs this weekend to develop my test loads. After one shot, I soon discovered that I had a two round burst model! Yes, I would pull the trigger and it would shoot twice! Had I had a few boxes of 55 gr. FMJ there handy, I would have had a heck of a time. Bad news is I only have my v-max test loads. So I ended up treating the gun like a single shot.

What would cause such a thing? My gunsmith did the trigger job for me. He got the trigger a little too light and so when the second sear engaged to hold the hammer down during cycling, I was fine. When I would release the trigger after pulling it, the hammer would release to the 1st sear, but there wasn't enough to hold it back so it would keep going forward. Effectively I had a two round burst gun, unless I held in the trigger indefinitely. Never fear BATFE agents who lurk about, I immediately took the gun after my range session back to my gun smith and it is still in his hands today. He said the RRA parts set I ordered has some pretty soft metal, so he has to rework the parts with harder spring steel to get the parts to keep their edge.

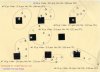
So anyway, other than that little excitement it shot well. For those of you new to the story, I bought a Bushmaster 20" V-match upper and stuck it on a PRK legal FAB-10 lower. I stuck a LEupold VX-1 12 power on it and it shot pretty good. I was getting about 1" for my good groups at 100 yards. I think I am going to go with load #3 for the 50 gr. and either group #8 or #9 (See attachment) for the 55 gr. I liked group 8, but I think those two were shooter induced flyers for group #9. I thiink I might want the higher velocity. What do you guys think?

The gun smith should be calling me sooner or later. Hopefully it will still have a good trigger and he can fix the two round burst action.
 

Attachments

  • 223 50 & 55 v-max 11-30-03.jpg
    223 50 & 55 v-max 11-30-03.jpg
    71.2 KB · Views: 226
The steel isn't "soft" unless you polish past the hardened exterior. Methinks he polished too much...he may get it to work for a while, but my money says that his new "job" may degrade with time. Might have to get another set and send it to John Holliger with $25 for his trigger job.
 
All AR15 trigger parts have a very thin surface hardening - if you are even remotely aggressive on polishing them, you will polish right through the hardening and into the soft steel - causing the doubling problem you just mentioned.

This is pretty common knowledge for people who have even tinkered with ARs. I take it your smith doesn't see a lot of AR-type rifles? The actual fire control parts are plenty hard if you don't break out the dremel on them.

Rather than "rework the parts with harder spring steel", the smart and cheap move is just to buy new AR parts and either not polish them or be very gentle about it. If the trigger is still not satisfactory then, there are any number of aftermarket triggers available for the AR series.

The gun smith should be calling me sooner or later. Hopefully it will still have a good trigger and he can fix the two round burst action.

I'm skeptical. I've never seen a trigger that failed in this manner be salvaged yet; but I haven't seen a lot of things and they are still possible :)
The good news is the parts can be replaced cheaply and installed correctly by monkeys if the trigger can't be salvaged. Make sure you don't spend more than a new trigger would cost (around $28-32 for a new trigger and hammer) trying to save the old parts.

A drop-in match trigger can be had for anywhere from $85-200 as well.
 
Try dropping in a new disconnector (the hook shaped part that rides in the trigger), should only cost $5 or so.

Here's a cheap and easy function check you can do:
With the rifle cocked and on Fire:
1. Pull trigger and hold to the rear
2. Rack charging handle (let it fly home, dont baby it, you might need some snap caps since you cant remove the magazine)
3. Release trigger while listening to the reciever

You will here either a 'clunk' or the sound of the hammer falling on the firing pin. The 'clunk' is the hammer being released by the disconnector and caught by the trigger. 'Clunk' = good.

Kharn
 
Yeah I figured that out pretty quick Kharn, so that makes me feel better that I have decent "figuring it out skills." The gunsmith got the klunk to work, but it was at the expense of a darned heavy trigger. We will see what happens.

I don't know, how bad are the reloads? :confused:
 
Well I've seen on the website that you must hit the takedown lever and split the upper and lower in half and then grab a stripper clip to recharge the magazine. How long does it take? Is it really slow or acceptable?
 
OH!!!! I was thinking you were refering to the reloads as in reloaded ammo. I have used the stripper clip once or twice, but I am not worried about it. I will probably just single feed them in there one at a time. This is more of a varmint gun than a tactical gun. My hope is someday they will get rid of SB23 and let us PRK's free! Yeah I know, not likely, but hey, I gotta hold on to some hope.
 
Well, I'm at a bit of a loss:
(b) Machinegun
The term ''machinegun'' means any weapon which shoots, is
designed to shoot, or can be readily restored to shoot,
automatically more than one shot, without manual reloading, by a
single function of the trigger. The term shall also include the
frame or receiver of any such weapon, any part designed and
intended solely and exclusively, or combination of parts designed
and intended, for use in converting a weapon into a machinegun, and
any combination of parts from which a machinegun can be assembled
if such parts are in the possession or under the control of a
person.

Sounds pretty clear to me. Pull is one function, release is another.
 
Badger Arms:
It is still a very unsafe condition, as there is no way to stop the second shot from occuring besides holding the trigger indefinitely.

El Rojo:
The only time I ever had this problem was with home-made recievers that did not have the holes in the correct places. It seems odd that you would have this problem with a commericial reciever. Did you use it before your gunsmith worked on it, and has your gunsmith worked on AR15s much? A heavy trigger seems an odd result from trying to fix this problem, do you know how he modified the parts?

From my experiences with an AR15, its better to invest in a quality two-stage NM trigger ($80-$120 usually) than to pay a gunsmith to try to improve the stock trigger.

Kharn
 
Thanks Kharn. Too late!!! Oh well. We will see what happens. I am not quite sure the specifics of it all. I have faith in the guy, he does good work. I will keep you guys posted. If I knew it was going to be this much trouble, I might have forked out the extra cash and bought one of the expensive types. Oh well.
 
A guide to AR 15 Trigger Jobs:

http://www.thefiringline.com/forums/showthread.php?s=&threadid=15982

As I mentioned earlier, military-style rifles are not known for their trigger pulls. Usually they are gritty and can benefit by taking the roughness out of the hammer/trigger contact area. Please don't even think
about using sandpaper here. You can ruin your rifle if you use abrasives on the hammer/trigger contact area. Just polish this area with Simichrome and rouge.

With your thumb on the top of the hammer, pull the trigger and ease the hammer to rest against the back of the magazine well. Look down into the lower receiver and observe how the hammer assembly
goes together. Notice that the two arms of the hammer spring ride atop the trigger pivot pin. With your thumb on the hammer push the hammer pivot pin out to one side with a small nail or similar tool and
remove the hammer. Pay attention to how the hammer pivot pin comes out and put it back in the same way.

Wipe the hammer/trigger contact area on the hammer free of oil. Polish the contact area with Simichrome and then rouge. Spend some time here and get the contact edge/corner as polished as possible.
Don't bury the Dremel felt tip into the metal, keep the R.P.M.s up by letting the Dremel do the work. This area should be glass smooth. Then smooth the trigger/hammer contact edge on the trigger
assembly. You should be able to polish this edge with the trigger still in place. Wipe these area free of polish and oil liberally. Reassemble in reverse order of disassembly. Do not use force to seat the pivot
pin. You should be able to do this with finger pressure if everything is aligned properly. Check operation to ensure everything is reassembled properly but do not let the hammer smack into the back of the
magazine well.
 
Kharn:
It is still a very unsafe condition, as there is no way to stop the second shot from occuring besides holding the trigger indefinitely.
I wasn't speaking to the safety of the condition, only the leaglity. This applies to an earlier post that I made that was censored.
 
Status
Not open for further replies.
Back
Top