Here's the build in progress
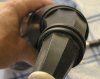
Gizamo; Here's the current state of the project. I have to fool with mixing stains. I want the fir base plug to match the beautiful ivory color of the moose antler spout. In the photo the red fir base plug has been stained "pickled white" but it's too different from the moose spout.
Though based on 18th century styles, it's not a copy of anything, as I took stylistic license of my own. Most paneled necks had eight flat panels. This neck has eight fluted (concave) "panels". The fluting was done with a 6" grind stone, turning at 1100 RMP on a buffing lathe (a regular 3600 rev grinder will burn the horn very quickly). The fluted neck has increased the complexity of the carving process several times over. If I had it to do over again, I probably wouldn't. Getting the flat panels to line up on either side of the strap rings is hard enough. Getting these flute points to line up in 3-D, all free hand, is maddening. A hard foam abrasive wheel was used to clean up the flutes after using the grind stone, and there's still work to be done.
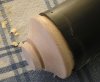
The fir base plug is hollowed slightly to increase powder capacity. You can see in the close-up that it's made of two pieces, laminated. I had a VG 2 x 4, but it wasn't thick enough for this buttoned plug design. It was turned on a metal lathe, with a form cutter plunged straight in to make the button groove for a strap. In keeping with the inward radius theme, the main curve of the plug was done by using an old-fashioned tool post, partially tightened, rotating the whole tool holder with a wrench. Anyone skilled at a wood lathe could do it just as easily by hand, of course.
I do not recommend red fir. The hardness difference between the winter rings and the summer rings is something akin to layers of styrofoam between layers of steel. Not fun to work and finish. If I had it do over I'd use something like pine or willow (hardwood on this already heavy beast would add too much weight for my tastes).
The moose antler was turned cylindrical on a metal lathe between centers using a dog and faceplate, then hand-carved on a small wood lathe. I left waste at one end so I could put it back on the metal lathe for threading the tenon and drilling the center hole. A T-handle violin peg box reamer was used to put a taper in the center hole for the stopper.
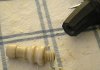
At that point I could have cut an ebony or rosewood fiddle peg to length, shoved it in and had a finished stopper. We are warned not to use hardwoods however, as they're more likely to break the spout if they get wet and swell. The white pine I used is soft enough to give way under pressure. It's also pretty easy to carve and fit to the spout. I hand carved the stopper from a split block of close-grained pine. Splitting your blank gives you grain lines that run parallel to the stopper, making it stronger than if you'd used a saw-cut blank.
Threading the end of the horn is generally not done. Usually if the horn is fitted with a removable spout like this, there is a separate collar that is threaded and then heat-applied to the horn's neck. That's the way to do it. Instead I drilled for the 5/8" threads by hand, and threaded by hand using a tap and T-handle. I drilled the hole incrementally to final diameter, one 64th at a time, so I could make small adjustments in the drilling angle as necessary to give a convincing, natural angle to the spout. That was a treMENdous pain in the neck, and I do not recommend it-- thread a separate collar on the lathe, and thread your spout on the lathe. Better yet, don't make a separate spout. Most original horns were one-piece.
You can see the three scrimshaw radii near the horn base, between each pair of pin holes. For that I used a compass, with a wood sizer plug to give the compass a center point. Draw the lines with graphite and then scribe the lines with an Exacto knife. I suppose an experienced engraver would simply have free-handed the lines after the horn was assembled.
I still have to play around with stains for the base plug, install the base plug and secure it with wooden pins, do clean-up work on the strap ring and neck shoulders, trim down the strap ring a bit, do some engrailing at the base of the neck, and a bunch of scrimshaw work. Most original scrimshawed horns were white with darkened scribe lines. Since this one is mostly black it'll have the lines dyed white. It's a negative.
Otherwise, the techniques used were mostly from Scott Sibley's book, "Recreating the 18th Century Powder Horn" available at Track of the Wolf. If you're interested in making your own horn, get the book for sure.
The finished horn will measure 17 inches along the outside (the "bottom") curve, from spout to button, so it's a biggy. I think it'll hold over a pound of powder when it's done. I guess I'll call it an "expedition horn".