Bobsen
Member
Hi it's me again
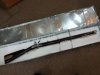
I've been working on the baker rifle for some weeks now it arrived from India in three days posted in India on the 16 march and arrived on 18th (hardly can believe it myself.)
Have to say whenI got it I was a little disappointed as it was not the one I saw in India and I had paid for,having said that as I wished I had my set of parts.
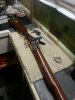
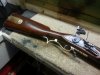
I hope the photos come out ok but this is as arrived?
I stripped the gun and found the parts reasonably well made but in need of a lot of work
I cleaned off the finish and found a piece of teak with a walnut type colour.
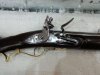
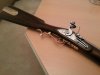
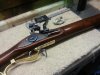
I then worked on the lock it was very heavy and soft so I polished the bridle tumbler and sear the the inside of the lock plate.
I also filed flat the outside of the lock plate and then hardened the parts and reassembled the lock.
I left the parts heat blued as this looked in keeping with the gun
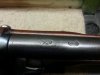
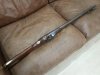
I then filed up the sights and took the high polish off the barrel then put the period proof marks on the breach.
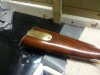
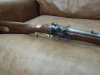
After filing the brass work to fit to the wood I polished it to a bright but not over polished finish.
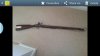
I removed some wood from the wrist area as this was far to chunky and refitted the trigger guard and brass oval I also fitted a small spring to the ramrod channel to hold the thing in place. I did this by soldering a brass clip to the trigger guard front finial and secured a small bent spring by friction into the clip
This when the guard is in place puts the spring in the end of the ramrod channel
and holds the ramrod in place by friction.
I've tried to attach a number of photos but I can only attach one try any more and it knocks the previous one out so I will post them individually hope it works
I'll put some more detail up tomorrow.
Thanks for now
I've been working on the baker rifle for some weeks now it arrived from India in three days posted in India on the 16 march and arrived on 18th (hardly can believe it myself.)
Have to say whenI got it I was a little disappointed as it was not the one I saw in India and I had paid for,having said that as I wished I had my set of parts.
I hope the photos come out ok but this is as arrived?
I stripped the gun and found the parts reasonably well made but in need of a lot of work
I cleaned off the finish and found a piece of teak with a walnut type colour.
I then worked on the lock it was very heavy and soft so I polished the bridle tumbler and sear the the inside of the lock plate.
I also filed flat the outside of the lock plate and then hardened the parts and reassembled the lock.
I left the parts heat blued as this looked in keeping with the gun
I then filed up the sights and took the high polish off the barrel then put the period proof marks on the breach.
After filing the brass work to fit to the wood I polished it to a bright but not over polished finish.
I removed some wood from the wrist area as this was far to chunky and refitted the trigger guard and brass oval I also fitted a small spring to the ramrod channel to hold the thing in place. I did this by soldering a brass clip to the trigger guard front finial and secured a small bent spring by friction into the clip
This when the guard is in place puts the spring in the end of the ramrod channel
and holds the ramrod in place by friction.
I've tried to attach a number of photos but I can only attach one try any more and it knocks the previous one out so I will post them individually hope it works
I'll put some more detail up tomorrow.
Thanks for now