Original Colt Black Powder Finishes

Status
Not open for further replies.
Joined
Nov 14, 2006
Messages
223
Hi, can anyone tell me what the original finishes looked like on the Colt Cap&Ball revolver's, Paterson, Walker, Dragoon, 1851, 1860, & 1861.

I would like to replicate this finish if possible on my Revovlers,
where they charcoal blued, blued or was anything even done at all?

Thank you,
 
I seem to recall it was a charcoal blueing process but don't quote me on that.
Some years back I was discussing that very same thing with a gunsmith at Thompson Center and remember a conversation about charcoal blueing. I have an excellent resource book on Colt's...don't know if it references the metal finishing so will have to get back to you.
 
I do not know what process they used...but it was different than later process, and or, the results were different.


I would experiment with scraps of similar Alloy or Steel or Iron type, in carefully, evenly, maybe holding with Tongs in a small open side Furnace, and then Air cooling, or quenching, depending.


Small items can be wonderfully Blued in a Candle Flame or Spirit Lamp.

Larger things, an even Heating gets more difficult, and rate of heating, so it does not climb past too fast, or climb past at all.


Things can be Blued in a Muffle or Saggar ( enclosed heated space, in essence, excluding Oxygen )...but heat must be brought up slow, and kept to a plateau, or else things would go too far.

This may have been among the methods of the time.
 
This is a copy of an old post from THR.

According to my neighbor who was a manufacturing engineer at Colt in the early 1970's, (snip)The blueing and the case hardening were done in Hartford useing the same equipment that was used on the original firearms. The guns were assembled by a small group of dedicated workers.
The blueing tanks and the case hardening furnace were the originals and produced the beautiful blue and great case colors of the early guns. Colt spent a great deal of time and money in an effort to move this equipment to their new West Hartford plant. The tanks and furnace were in poor condition and literally came apart when workers attempted to dismantle them. Colt again spent a lot of time and money trying to duplicate the finishes they obtained from the old tanks and furnace but were unsuccessful.
 
Hi, can anyone tell me what the original finishes looked like on the Colt Cap&Ball revolver's, Paterson, Walker, Dragoon, 1851, 1860, & 1861.

To answer that simple question could take a book - which I don't have time to write.


Over the years, extending from the middle 1830's until now, Colt used a number of different ways to finish their revolvers, and some of the processes were a closely guarded trade secret.

Regardless of how it was done, the factor that most determined how the finish would look was how highly the metal was polished before it was finished, and on commercial products Colt spared no expense to get the highest polish possible.

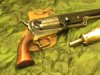
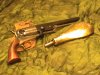
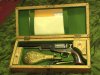
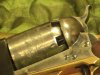
1836 – 1922: Larger blued parts were charcoal blued – a process involving heating the parts in a furnace fired with (we think) pine charcoal. The result was a deep blue tending toward black. Smaller parts – screws, triggers, and such - were niter blued by heating them in a tank filled with liquefied potassium nitrate. For more information go to (www.brownells.com). The result is a highly iridescent blue-blue. Frames, hammers, and some other parts were case hardened in a furnace while packed in a mixture of charcoal and burned bone. This imparted a very hard surface on what amounted to iron parts. When the parts were quenched in a secret liquid (water + unknown) the surface took on an oil-slick-on-water look that was later protected with a thin coat of lacquer.

Side note: With the exception of the genuine Colt products, today’s cap & ball reproductions do not have true bone & charcoal casehardened frames and hammers. They are simply colored to more or less look that way.

Side note #2: Walker and some Patterson revolvers had polished but unfinished "in the white" cylinders, which for the most part were, and are not duplicated in reproductions.

1922 – 1941: Same as above, but the furnaces were gas fired, and the parts were not so highly polished. The result was a more satin blue-blue that was unique to Colt’s during this period.

1941 – Present: Blued parts are tank blued, using salts and equipment provided by the Du-Lite Corp. (www.dulite.com) that services much of the firearms industry. As always, the appearance and color of the finish depends on the amount of polishing. They also continue to color caseharden frames (and sometimes hammers) on Single Action Army revolvers, but the colors tend to be more brownish then cap & ball era parts had had a more blueish bias.

While some firearms restorers have come close to duplicating 19th century finishes, I have yet to see anyone that can duplicate them exactly. Part of the reason is that as mentioned before, the precise way things were done were trade secrets, the details of which have been lost; and the amount of hand polishing makes any such work very expensive if it’s done right.
 
What all of the Methods have in common, is a way to Heat the part, and, not heat it beyond the Color one is after.

The Iron or Steel will go through a range of Colors as it's temperature increases...hence, the rate of increase must not over-reach the intended plateau for the particular 'Blue' possible for any given set of secondary details attending the Heat itself.


Somwhere here I have a pretty interesting Book on Firearms Blueing from the early 1920s, which details hundreds of methods.

If I can find it, I will report back.


Possibly it has insight into methods used in the early to mid 19th Century, even though of course these tended to be proprietary when used by the major Arms Makers.

I have not read it yet, because when I got it, I was reshuffling things here, and it got packed away instantly.
 
While some firearms restorers have come close to duplicating 19th century finishes, I have yet to see anyone that can duplicate them exactly. Part of the reason is that as mentioned before, the precise way things were done were trade secrets, the details of which have been lost; and the amount of hand polishing makes any such work very expensive if it’s done right.

Consider the possibility that a 19th century gun is over a hundred years old. Even a well kept gun has been exposed to light and air for a long time. Maybe we are just seeing a difference in age, not process.
 
Here's what he means by the original charcoal bluing; note the dark blue on this original Walker from 1847

promo002.jpg
 
What is not clear to me, is just what it is people mean by the term 'Charcoal Blue'.


Does it mean a Muffle or Reduction Atmosphere or other Insulatory container holding the items to be Blued, was heated with 'Charcoal'?

Does it mean such a container or insulatory device, to hold the items to be Blued, was filled with Charcoal of some granulation or other, and, then Heated by whatever means?

Does it mean the items to be Blued were held in to a Pile of or other condition of open Air Burning Charcoal?


What does it mean?
 
Oyeboten...if I remember correctly, charcoal blueing was done by burying the parts into a crucible of charcoal and some chemical...the charcoal was about pea-sized...this was then heated to a certain temp and held there. That's all I can recall about it.
 
Well...it should!


I wish to do some Blueing one of these days, and, the more I can learn about it, the better.


One thing we can know about Artisans of the mid to latter 19th Century -

Economy, Thrift, Practicality, Forthrightness, as much and as cleverly as possible...and no BS.


Very different than now, probably unimaginable to just about everyone, and, certainly unimaginable to present day manufacturers.


Things were done 'once, right and fast' ( or as fast as they could, anyway ).

So, whatever the methods were, they were I am sure, even by to-day's "standards", probably pretty effecient, and, likely to have required skill and practice.
 
At Colt the apprenticeship for a polisher was many, many years...that I do remember! Blueing itself, as far as the practical technique, is actually quite easy. I've hot blued many guns because I was fortunate to have a good friend that had the setup and his polishing skill was the best I have ever seen! I can't match what he does in that department.
 
Un-Walker

I tried to replicate The Walker (picture #8 above) in an older Uberti.

:scrutiny:


(I shouldn't have polished the powder flask I know)


But, they're worth more if your replica has paperwork.

Most of all - you gotta have fun with these things.
 

Attachments

  • Cased Walker II 03.jpg
    Cased Walker II 03.jpg
    55.7 KB · Views: 36
  • Cased Walker II 02.jpg
    Cased Walker II 02.jpg
    66.2 KB · Views: 30
  • Cased Walker II.jpg
    Cased Walker II.jpg
    55.6 KB · Views: 27
  • Cased Walker II 12.jpg
    Cased Walker II 12.jpg
    47.1 KB · Views: 28
Last edited:
I personally feel that the original Colt blues from the percussion periods were charcoal blue; however, there is a world of difference between the blues that are called charcoal blue today and what Colt probably used. The blue you see on reproduction Uberti pistols is basically a temper blue; however, if you bring the temperature of the steel parts to a higher range, say about 900 degrees F you will get a much deeper black finish that has the appearance of wet India ink. There are no secret ingredients in the mix, it is simply a finely ground pure charcoal (I use the wood charcoal that Brownells sells) and the parts are packed in the crucible (I use the same one that I do for color case hardening). If there is any secret it is to make sure the parts are clean and than shift them in the pack halfway through the process. Having a good furnace with an accurate temperature reading is very nice when doing this process.

The color case hardening is simply a bone and wood charcoal process. I have had good luck reproducing Colt like colors with nothing more sophisticated than these two ingredients. With this process I feel that the success has more to do with the quenching approach, water temperature and oxygenation, pack temperature, and the ratio of wood to bone charcoal than it does with any secret ingredients that might have been used in the pack. I have posted photos of the process we do in my laboratory at the university where I teach in the past and you can find these in the archives, I routinely make my students do bone and charcoal case hardening every spring and most are very successful which means that almost anyone can do it if they have the appropriate equipment. Have fun, be safe.
 
Hi Bluehawk,


Ye'd said -


Oyeboten...if I remember correctly, charcoal blueing was done by burying the parts into a crucible of charcoal and some chemical...the charcoal was about pea-sized...this was then heated to a certain temp and held there. That's all I can recall about it.


Thank you...makes sense.

I am pretty sure though, that this would indeed have to be done in a sealed container, where, the Container then is brought to and held at a specific Heat, then, slowly cooled.


I believe, that whatever the method or special additives to a reuction condition surroung the parts, the heat must not exceed a quite narrow margain of Temperature if a specific quality of Blue color is desired.

A little more Heat than that, and it shifts into being more of a Black.


Nice mentions 44-henry,


I had not read your Post before commenting on Bluehawk's.


Possibly the various chemistries possible from use of various 'ingredients' within atmospheres in various reduction conditions, could make for differing results from one-another even if Temperatures were the same? or allow very similar results to be acehieved with different 'ingredients' at higher or lower Temperatures?

The only Blueing I have done, was the Liquid Salt Peter kind...an Iron Tank, and it was in 1989, placing the Parts or Frames in to the Hot liquid Nitrate, and pulling them once the Blue was almost 'there' to a final degree since if one waited till one thought it was ideal, one would actually have gone past it.
 
Last edited:
I too enjoyed your post 44Henry...my question is two-fold...is the charcoal from softwood or hardwood and where you teach in the past does that mean you have a time machine?? :what:

at the university where I teach in the past
 
I am out of my depth here on this, but it is interesting!


Could 'Rust Blueing' have been a method used for the eraly Colts?
 
Could 'Rust Blueing' have been a method used for the eraly Colts?

No, or at least highly unlikely. I know the answers to your questions, but the answers are somewhat involved, and would require a long post. Unfortunately at the moment I don't have the time, and some of the answers I'm seeing are way off.

But when I do have the time... ;)
 
I will bow to others as to what Colt did for the finish and how they did it.

However, I was privileged to be present when a vintage Colt cap and ball still in the original factory packaging was opened for the first time since it left the factory over a hundred years prior. Inside the box the revolver was wrapped in what appeared to be oil cloth. When the oil cloth was unwrapped it tended to stick in places. The finish on the revolver was pristine in most places but some of the bluing was lost in patches, presumably where the oil cloth stuck. This was quite a few years ago but I remember the bluing in the good spots looking much like the original Walker above. As I recall the revolver was a civilian model in 36 caliber with a not overly long barrel.
 
With age, Colt's charcoal blue did tend to fleck off except in protected places. What you described is what I'd expect. The grease in the paper or oil cloth had turned to varnish and then the covering was actually glued to the revolver's finish. They should have soaked the wrapped gun in a solvent before trying to unwrap it.
 
Unwrapping

That would be complicated by the fact that the wood grips were also in the wrapping. It wold take some thought before you made your move.
 
The usual procedure is to suspend the revolver muzzle down and then paint on solvent below the stocks. As the wrapping loosens it can be removed with great care, and as the cylinder forward is exposed you can see what you're working with. Unfortunately there is a good chance the varnish on the stocks is damaged, but that can be restored. You have a better chance with an oiled finish (on the wood).
 
Status
Not open for further replies.
Back
Top