Show us a picture of your reloading bench

Here's the outside of mine. Its going in the space where the house meets the garage. About 35' wide. Yep, thats my Man Cave! I'll see if i can get a pic of the inside today. Cant wait to get set up in there!
housethree.jpg
 
Bench

Not much,but does the job. This was my daughters room and she has gone off to college. So no crap please, I know I need to change the color scheme.
 

Attachments

  • 001.jpg
    001.jpg
    234.2 KB · Views: 396
Last edited:
I recently started reloading .223 and .308. Continuing my portable bench theme (I like to move them around the house and reload in the comforts of AC/heat, even while watching the sunset sipping iced tea), I built another portable bench for rifle cartridge sorting/reloading with the Classic Turret press.

Bench is framed with 2x4s/OSB and fastened with 10d nails and 3" drywall screws (4 nails/2 screws at each 2x4 attachment point). Bench top is 2 feet by 4 feet and 32 1/2" high for comfortable sit down reloading. It is 65" to the top shelf for clamp on goose neck lights or for storage of items to keep the bench surface clear. The front 2x4 on the right side is offset to give the press area more space (a 2x4 sized hole was cut in the bench top to allow a single piece 2x4 to be fastened to the bottom/top). The casters are from Harbor Freight furniture dolly and they will easily support the weight of the bench and won't mar the floor. The 2 feet wide bench will roll through all doorways and 4 feet length will clear most hallways when turning into a room (if you have narrow hallways, you'll need to shorten the bench by 3 feet - I also built a shorter 3 feet bench with 4 feet backing and it will clear the narrowest hallways and turn into a room - will post pictures of this smaller bench later).

Under the bench top where the LCT press is mounted is reinforced with two layers of 2x4 nailed/screwed to another 2x4 set vertically like the frame of the bench top (they are fastened at the ends to the bench top frames and screwed to the OSB). The finished bench is very sturdy and the bench won't deflect or move even when sizing thicker LC military .308 cases. Pegboard backing allows for hanging of tools/supplies frequently used to be readily available and plastic storage drawer unit at the left end of the bench keeps reloading items well protected/available (dies, caliper, wrenches and case prep tools, etc.). Bench top is wrapped with heavy fabric from Walmart craft section and stapled into the 2x4s (it took just over 1 yard of material at $2.00 per yard - I recommend the heaviest material you can find with surface that brushes clean with a bench brush).

Case sorting by weight:
The removable sorting bin (8x3) is from Harbor Freight and allows for case sorting/processing by weight.

1. Once fired cases are deprimed with Lee universal depriming die and tumbled.
2. Tumbled cases are sorted by weight (up to 8 different weights) and put in separate weight groups (primarily commercial vs military)
3. Cases are resized, trimmed, case neck chamfered, weighed and placed in the row bins.
5. When I am ready to load, each bin is pulled by case weight and loaded into separate labeled ammo boxes.

attachment.php
attachment.php


attachment.php
attachment.php
 
Last edited:
Here's the 2 feet by 3 feet bench with a 4 feet backing that will make the turn into a room from a narrow hallway (The longer 2'x4' bench is primarily used in the 12'x24' "woman cave" I built for my wife over Christmas).

Construction and dimensions are similar to the above 2'x4' bench except I used a hardwood veneered plywood top finished with polyurethane we used to use as a top for the pool table. Why didn't I just make a 3 feet backing? Well, I would have cut off valuable pegboard space and I wanted space to hang long rifle barrel rods. Even with the two presses mounted at the ends, the 3 feet bench top allows tight turning radius into the reloading room from the hallway.

At both ends where presses are mounted, single 2x4 under the plywood was used to reinforce the bench top. Since the thicker plywood is stiffer than OSB, extra reinforcement was not necessary and I doubt if I even needed the extra 2x4. Although this is a portable castered bench, even resizing the thicker LC .308 cases on the C&H 205 single stage press will not deflect the bench top and there's plenty of weight to not move the bench even when empty.

I use a clamp light to provide light source depending on what I am doing and planning on adding top/bottom shelves with under bench drawer.

attachment.php
attachment.php


attachment.php
attachment.php
 

Attachments

  • BenchX1.jpg
    BenchX1.jpg
    66.6 KB · Views: 4,171
  • BenchX3.jpg
    BenchX3.jpg
    42.4 KB · Views: 2,307
  • BenchX2.jpg
    BenchX2.jpg
    40.4 KB · Views: 4,684
  • BenchX5.jpg
    BenchX5.jpg
    48.2 KB · Views: 3,057
Last edited:
Here's the outside of mine. Its going in the space where the house meets the garage. About 35' wide. Yep, thats my Man Cave! I'll see if i can get a pic of the inside today. Cant wait to get set up in there!

That should hold enough stuff. How far west in KS are you?
 
farmerbuck, I am a newbie venturing into the world of rifle cartridge reloading, and I know that not all bench rest accuracy processes will be applicable for my shooting purposes, but I wanted to have that option, if I wanted to pursue it (As I found out, I am glad I did).

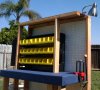
The sorting station/reloading bench came out of frustration. After I got my batch of mixed head stamp once-fired .308 cases (which included a lot of LC brass), I thought it would be easy to separate the batch into lighter commercial and heavier (less internal case volume) military cases. So I got out two coffee cans and my scale then proceeded to weigh the cases. I was expecting a fairly clear separation in weight, but I was not ready for what I found next. The weights were all over the place, even for LC brass (some LC brass dipped way below 175 gr!). I ended up adding several more coffee cans and ended up with these:

- Cases that weighed less than 168 gr
- Cases that weighed between 168-175 gr
- Cases that weighed 175 gr
- Cases that weighed 175-179 gr
- Cases that weighed more than 179 gr

Keep in mind that these are once-fired brass (and I added the "once-fired" to my previous post and reflected it in the process steps). My intent was to simply separate the commercial cases from heavier walled military cases with less internal volume. Well, I am still doing my research as to why such a wide variations in military spec cases to dip way below 175 gr but that's another story and for now, I separated out the really low weight military cases.

I am going to be checking the internal volumes of each weight group next to verify their consistency and further segregate (I have about 1000 cases). Once I have done that, then I plan on resizing/trim and weigh to sort by 1 gr groups into the bins on the sorting table.

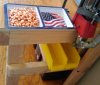
I have done some initial test loading with about 100 cases that weighed right at 175 gr before trimming with H4895/Varget and got just over 1" shot groups. These cases were marked and be kept as a group.

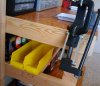
As I venture out to weight groups that vary more (say 168-175 gr group), I will utilize the sorting table bins more as I would group them in 1 gr increments (168, 169, 170, 171, 172, 173, 174, 175) and use up all 8 bins in each row. As I process the cases, I simply need to move each bin up the rows until I get ready to load them. When I pull a bin from the top row, I know that the cases in the bin are from the same weight group pre-trim, with same post trim weight.

Once I compare shot groups from various weight groups, I hope to establish a trend that will allow me to be less detailed in my weight separation, but I am new to this and having fun with the process (I know, I will probably get tired of it soon enough, but at least I will be able to say - Yup, been there and done that). :D

I really was hoping that my two coffee can idea would work out ...
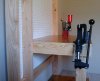
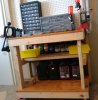
 :rolleyes:
 
Last edited:
weighing brass

bds,
weighing all those cases may be fun now, but at some point you might want to shoot. i know some seriously good shots who never weigh their brass. i've never done it, and it doesn't seem to have effected my shooting much either.
 
quicksilver said:
weighing all those cases may be fun now, but at some point you might want to shoot.
I consider the objective of reloading for accuracy isolating and controlling the variables, hopefully one at a time.

I only need to weigh the once-fired .308 brass one time before I alter the cases by trimming. I consider this one variable. The cases are currently separated into five weight groups (-168, 168-175, 175, 175-179, 179+ gr) and I am currently doing my workup from the 175 gr case group (I have reloaded and shot about 100 rounds so far).

Once I identify the most accurate charges of H4895/Varget/RL15, I am planning to see if same pre-trim weight once-fired cases shoot more accurate than mixed pre-trim weight once-fired cases. Later, on subsequent reloads, I will be segregating the post-trim twice-fired cases by weight as well.

Of course, I'll be letting the accuracy of the shot groups be the final judge. If mixed pre-trim weight once-fired cases produce the same shot group sizes as the same pre-trim weight once-fired cases, then I will conclude that sorting once-fired cases by weight is a waste of time. If mixed post-trim weight twice-fired cases produce the same shot group sizes as the same post-trim weight twice-fired cases, then I will also conclude that sorting twice-fired cases by weight is also a waste of time. But I don't know that right now, as I have not done it yet.

If I see a trend-able difference in shot groups, especially with same head stamp/date LC military cases, then I could conclude that same weight head stamp/date/once-fired/twice-fired/post trim cases produce the most consistent chamber pressure that results in smallest shot groups.

And that's the fun I am having now, proving whether this theory is true or not. And yes, I only need to do this once, unless the shot groups are significantly tighter, then I'll be weighing future once-fired cases as well.

Sorry to deviate from the thread. Perhaps we can take this discussion to the Handloading/Reloading or Rifle Country category. :D
 
Loading Bench

here is our little shop we hope to add on to it this summer. We are upgrading our reloading tools also whe nwe can afford to get a good deal
SANY0350-1.jpg
 
here is our little shop we hope to add on to it this summer. We are upgrading our reloading tools also whe nwe can afford to get a good deal

We all have started out with small area's and older gear and built up as we could... Looks like the mec has loaded a few shells..!
 
Harbor Freight Tools Workbench...

I've seen a number of discussions on reloading boards about the 60" Harbor Freight Tools workbench and its suitability for use as a reloading bench. I only reload handgun ammo so I don't need an aircraft carrier class bench...

What I really needed was more space than the bench had to offer... so... I modified it just a bit..

Knowing the top right hand drawer would become useless, I removed it and cut it down to size. It now holds my calipers and micrometers...

one.jpg

Here's a picture of the rest of the bench, with the hutch I built to more or less match the bench
two.jpg


I used the right hand side of the hutch to build a pegboard...
three.jpg


Another view...
five.jpg

Here's the interior of the cut down drawer...
seven.jpg

It's now a pretty serviceable bench, with room for expansion...
 
Continuation from post #1981-1983.

OK, finished adding the top shelf/light bar and the bottom shelf to the 2'x3' portable castered "sit-down" bench (it's parked in the reloading room but will be rolled to various parts of the house, even out to the patio once the weather warms up). Most frequently used items hang off the pegboard on hooks or are kept in the two drawer units protected. Ohaus 10-10 sits on top of the gray drawer unit and the FA DS-750 is kept inside one of the drawers.

Top shelf accommodates long items and allows infinitely adjustable lighting on the bench (I mounted a power strip on one of the bench legs to power the lights and other electrical devices - like radio/small clip fan). By default, I have each light shining on the two press work space. Bottom shelf height was selected to accommodate the 1/8 lb powder containers and bin placement for comfy sit-down resizing/reloading.

Only things left to install are the under bench drawer and paper towel dispenser.

attachment.php
attachment.php


On the progressive side, two partition bullet tray/finished round catcher is on the bench for easy reach by the left hand while right hand operates the ram lever (case feeder takes care of the cases). Finished rounds are transferred to the yellow bin below. On the single stage side, unsized cases are taken from the left bin and placed on the right bin after being sized.

attachment.php
attachment.php
 

Attachments

  • Bench2a.jpg
    Bench2a.jpg
    43.3 KB · Views: 2,631
  • Ben2b.jpg
    Ben2b.jpg
    61.7 KB · Views: 6,989
  • Bench2d.jpg
    Bench2d.jpg
    54.8 KB · Views: 5,126
  • Bench2c.jpg
    Bench2c.jpg
    47.9 KB · Views: 3,896
Last edited:
Beautiful color on that bench, jrdavidson.

:)
Thanks Maverick223 - I like how it came out.

The wood stain helps iron out the difference in grain between finish-grade pine I used for the shelving, construction-grade ply for the bench, and the treated 4x4 legs.

I've noticed one drawback - the bench top is so dark it hides errant powder grains and makes cleanup a bit harder. I'm looking now for a white top I can glue to the surface that will aid in cleaning.
 
I'm looking now for a white top I can glue to the surface that will aid in cleaning.
Ask and ye shalt receive...a melamine surface (either in sheet, shelf, or even "shelf liner" form should work) is cheap, light colored, and allows you to use dry erase markers to jot down notes, loading info., et cetera.

:)
 
Back
Top