Stock finishing. 99% inletted Richard's stock.

Status
Not open for further replies.
Pics added to my album after first coat of Tru Oil/mineral spirits 50/50 mixture applied 10 hours ago. I have not sanded or rubbed with steel wool yet!

What do you think so far?

Mike
 
Last edited:
It's coming along very nicely. Just take your time and don't rush. Pull the recoil pad and seal the butt of the stock as it will soak up moisture.
 
Pull the recoil pad and seal the butt of the stock as it will soak up moisture.
Not to hijack, but what is the best way to remove a glued on pad (or is there a good way without destroying it)?

:)
 
Not a hijack there Maverick! This is a glued on Pachmeir Decellerator pad. I do not think I am going to attempt that. I paid extra for the pad and for them to install it, $56.00 I think it was. After the first coat, I realized keeping the oil off of the pad was going to be near impossible, so I taped it off with blue masking tape, before applying the second coat..

What do you think of the color? Pretty huh?

Mike
 
Unfortunately I have a stock that is glued on and desperately needs removed (to add weight), but don't know the best way to go about it. I wouldn't remove it if I didn't have to. I think you did right taping it.

You stock looks great, a few flecks, but I'm sure that is just a little dust or debris that will be sanded off before final coats.

:)
 
I think there was still some saw dust in the air from all of that sanding I was doing. I did sand all of that off and wiped down the stock with alcohol before applying another coat of oil. I see much less signs of any specks this morning and the finish looks deeper as well. I will be sanding again after work, then applying another coat. This will be my first full strength coat of oil. the last 2 have had mineral spirits to cut the oil a bit.

Mike
 
I think there was still some saw dust in the air from all of that sanding I was doing.
I figured that much, just thought it was best to mention it so you didn't miss it and cover it up. ;)
 
No, I didn't miss it. Thank you for your concern though! ;)

By the way, I have been racking my brain about a good way to remove your recoil pad. Seems to me I know a good way to do it, I just can remember the product name right now that would help deteriorate the glue. Do you know what kind of glue was used? Brand and product number?

It will come to me. I just need to stop thinking about it and it will hit me. Usually in the middle of the night. I will sit straight up in bed from a dead sleep and blurt it out. :D

I know... I am weird huh?

Mike
 
Not to hijack, but what is the best way to remove a glued on pad (or is there a good way without destroying it)?

The easiest way is to use a miter box and cut at the very edge of the pad. I use a hand-powered saw as it has a very small kerf and the pad can be glued back on.


This is a glued on Pachmeir Decellerator pad. I do not think I am going to attempt that. I paid extra for the pad and for them to install it

I find it amazing that they didn't screw the pad on. Are you sure it is glued? Squeeze the sides together to see if you notice the small cuts for the screw holes.
 
I did squeeze it together to see if there was any holes. I didn't find any. I was surprised too! I may give them a call later today and ask. I really wanted it screwed on, but I was not specific. I will let you know!

Mike
 
The easiest way is to use a miter box and cut at the very edge of the pad. I use a hand-powered saw as it has a very small kerf and the pad can be glued back on.
Thanks for the information, might just end up replacing it with a good screw on pad (if I can find one), besides the original (standard Browning) affords little cushioning for a stout rifle.

Now back to the regular programing...

:)
 
Hey Mav,

I have had really good luck with the limbsaver pads on my other rifles as well as this one I am working on now. I had one on the old stock and it helped quite a bit. They have them brand specific by rifle manufacturer too!

Mike
 
They have them brand specific by rifle manufacturer too!
Not for a 1885 High Wall. :( I haven't decided what to use, but it is on the short list. It will have to be something that looks and performs good, and preferably screwed on. I think that I will have a smith fit it for "insurance reasons".

:)
 
Hey guys.
The next to last step is finished, and I took some more pictures. Then I finished it last night. I will take more pictures when the sun comes up today. Go to:
to view the pics. It is the last 6 pics. I will link a few here for you to see.

Never mind the scope mounts... I had to re-paint them black. They are completed and re-installed on the rifle.

This has been a very rewarding project. Now the big question? Which rifle should I do next? my M1917 or my .243?

The .243 is also a Weatherby Vanguard like this 300 Win Mag. Should I change it up and do the M1917 for a bit of a change? The M1917 is my brush gun. I only want one of the standard grade stocks for it that I will pillar bed and accurize, but it will be my beater go to gun for traipsing through the woods. That would be fun. But then again a cool yellow and black laminate stock for the 243 might be pretty cool too!

I shall leave it up to you fine fellows. I hope I get some responses. :D LOL

Mike
 

Attachments

  • IMG_0446.jpg
    IMG_0446.jpg
    209.2 KB · Views: 18
  • IMG_0448.jpg
    IMG_0448.jpg
    196 KB · Views: 10
  • IMG_0451.jpg
    IMG_0451.jpg
    161.6 KB · Views: 12
Last edited:
Thank you Madcratebuilder! I appreciate it. I sure think it paid off as well!

Maverick,
I took her out to a field with my neighbor and we shot her. I only had 6 of my handloads and a box of Remmy Core Lokt 150Gr SPs. Even though I had only bore sighted the scope, I was on paper only 2" left and 0" high. My friend has a chrony and the factory loads were zooming out there at 3200fps. I made a slight adjustment on the scope and shot 2 more with the factory stuff and then changed to my hand rolled 165Gr Speer SPBTs, and chrony'd them. They shot an average of about 2975fps, which impressed the heck out of me. I have never chrony'd anything before starting to shoot with my friend a few months back. I had guestimated they were going about 3000fps so I was only a little shy of that. But here is the kicker! I shot 2 of my hand rolled and the second hit about .20" to the right of the first shot, and they were both in the bulls eye! I got so excited that I pulled the next three shots low and left. I could not control my breathing! :D LOL I wanted so badly to have that all elusive cloverleaf we all dream of I pulled it!

I have full confidence that this rifle would shoot cloverleafs if it had the right guy behind the wheel, but I am not that guy. I really love shooting it though! I will get more practice now that it does not kick like it did, and will become more and more proficient with it.

That's what it is all about right?

Mike
 
That group is nothing to complain about, though your velocity seems a bit low. I am getting more than 3k fps out of 190gr. bullets with mine. Is this by design (what it shoots best), or have you just begun developing loads for it?

:)
 
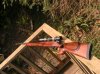
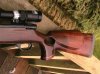
This is a load that I developed for it. This is my go to load for accuracy. If you look at the pictures on my pics page you can see targets listed alphabetically. I took 4 shots with each load in a roundhouse manner. Meaning I shot 1 from load A then 1 from load B and then C etxx then back to a, b, c, etc until all loads were shot. I waited 2 minutes between each shot and 5 minutes between rounds or something like that. If you notice load H,I, and J, gave me the best results. Then I tweaked that to find out that 69.5Gr of H4350 was what my rifle liked the best. I do have a 24" barrel and the chrony was set up 10 feet away from the muzzle. I did not correct the number mathematically. The number I listed above is what the readout on the chrony stated. The Max load using this bullet and this powder according to my reloading book is 70Gr, so please start low and work up if you want to try my load. Know the signs of pressure and be safe.

What kind of powder are you using for your 300 Maverick?

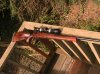
BTW I am fairly new to developing loads, so any help would be appreciated. There is also a pic of my notebook of those loads and their measured group size in red ink. Hopefully you can read it. My writing may need some help.
 
What kind of powder are you using for your 300 Maverick?
I am currently using IMR 4831, but I will be switching over to H-4831SC when I run out of the IMR powder. I plan to give RL-25 a shot next. I am relatively new to loading for my .300WM (fairly new rifle) so I am still perfecting the loads for it. I am using 190gr SMKs for the most part, but am also playing with 208gr. A-Max (for hunting), as well as 240gr. SMKs for longer range. Right now I am using several cases (mostly Winchester), but plan to transition to Norma cases as my supply dries up.

:)
 
How are you getting such a high velocity then? My reloading book says that my H4350 is one of the faster shooting powders. Am I doing something wrong? Or are you loading over listed max?

Mike
 
How are you getting such a high velocity then? My reloading book says that my H4350 is one of the faster shooting powders. Am I doing something wrong? Or are you loading over listed max?
Not exceeding max (though I probably could exceed it quite a bit with the long free-bore), but I do have a 26" bbl, which may account for some of the increase (though it shouldn't be that much).

:)
 
This thread has inspired me to refinish a laminated Mosin stock now....

That's great! You will enjoy it. Be ready for a lot of work! I am done with my rifle and will post some new pictures soon.

I do need some help though!!!

I have 4 places that got "bumped" somehow after about the 10th coat of Tru Oil. This is where I stopped using the Tru Oil. I then lightly roughed up the finish with 0000 steel wool and then hand rubbed it with Stock Sheen. When it looked the way I wanted it to, I just buffed it dry and then added Gun Stock Wax and rubbed in three layers of that and buffed it to the shine I was looking for.

My question is this: Now that I am DONE. How do I go back and "FIX" the bumped areas. They are not scrapes that removed any wood, They are indented crevasses that need to be pulled out. Can this be done after the final finish is on or will I have to remove the finish to fix it?

Please help!!!

Mike
 
I don't think I quite follow you, is it a void in the finish (an air bubble), or a dent in the wood...or something else altogether?

:)
 
Status
Not open for further replies.
Back
Top