jcwit
member
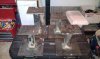
If you are having problems with your hammer type bullet puller with the rubber band binder which holds the collets together, throw it away and replace it with a shellholder. I fits nicely.
I can't take credit for this idea as I read it in a magazine, but it does work and is a lot less agravating than trying to get that rubber band back on.
__________________
Not recommended, but do it if you wish, your pain if something goes wrong. Since when do you believe everything you read?
 ) to swirl the brass around in the shoe box, then scoop out with the litter scoop and deposit on Dehydrator trays. Yep, everyone seems to have one or can find one cheap, since they were popular several years ago. Now you can re-purpose it for brass drying. I set the temp for 90 degrees and run the timer for about 2 hours. (Probably longer than I need but, this is suppose to be a leisurely pursuit, right?) As for the range brass, first thing I do is dump it into a wash pan, add hot water, swish around to get the major crud off, move to a 1 x 8 x 24" long pine board with 2" wood screws screwed in. Set the brass, open end down of course. Let air dry. Crude but adequate. Clean enough to sort anyway.
 :banghead: