Holster Questions

Status
Not open for further replies.

jmar

Member
Joined
Feb 27, 2016
Messages
262
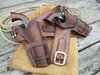
I just made this holster and now that it's time to stain it i started wondering how it was done traditionally. Did they even stain leather back then or did they just leave it raw? In all the movies leather is every shade you can think of. Does anyone know what dye exactly they used? I'm building it to be historically correct so i don't want a color that's fictional, so i assume it'd just be easier and cheaper to use a traditional method. I know it's really ugly but i'm not an experienced leather worker, this is only my 2nd ever leather project. I opted for the double loop pattern, it's dated for the 1870's+ and i'm shooting for the 1860's but there may have been some around.

And now i want to make a holster for my Walker to go with the other one. But the Walker is tricky, people have said it was never carried on person and just on horseback. There's very little images on google. So does anyone know any specific style i should make for it? Any of you have holsters for your walkers?


You might look into 'vinegaroon' dye - basically white vinegar and rust. Not sure how old it is but it has been around quite a while.
 
I am no expert on historical aspects of holsters but from my reading I believe that holsters were rare prior to the Civil War. Most people stuck the revolver or pistol in their waistband or in a sash.

The crossdraw California style holster was among the first non-military holsters available.
 
Do you have any access to black walnuts? A simple dye can be made from boiling the nuts. Use rubber gloves.:thumbup:
 
Do you have any access to black walnuts? A simple dye can be made from boiling the nuts. Use rubber gloves.:thumbup:
Black Walnut dye would be my choice as well.
Just to be specific for anyone who is not familiar, the dye is made from the walnut hulls. The actual nut meats and even the shells are not required.
 
Dyeing leather for anything is a relatively new thing anyway. However some leather goods were dyed as far back as the 1400's .
but mostly in wearing apparel
there was coffee, berries, natural clays that were different hues.
on your posted pics looks pretty good just smooth off the rough edges a but,
one a very sharp razor knife. 2 a hard wood dowel and some water, rub the raw edges hard and fast with the leather just damp.
practice on scrap first. lay the dowel on edge of leather, but slightly on top not direct on edge. as you roll (slide) the dowel the length of the edge, slightly roll it down and over the edge. with practice this will produce a rounded edge and will harden and gloss the edge.
then you can finish with a bit of beeswax which will help harden and gloss. Those are very basic ways.
Remember the Walker was made in 1847 so the holster would of been (and was) basic and simple.
Yes it was primarily a horse pistol. They were issued in pairs to hang from the saddle on on either side.
this link may be helpful
http://www.cochiseleather.com/western-gun-leather-history.aspx
also this link
http://www.jarnaginco.com/leather definitions index.htm
 
Thanks for the replies everyone, i decided to go with vinegaroon. From what i understand it is the most period correct. And is the cheapest and fastest method. I think i'll try another method for the walker holster which i'll start while the vinegaroon ferments for 2 weeks. Maybe i'll try the walnut method if i can find some. Still trying to figure out what style to make the walker holster.
 
Thanks for the replies everyone, i decided to go with vinegaroon. From what i understand it is the most period correct. And is the cheapest and fastest method. I think i'll try another method for the walker holster which i'll start while the vinegaroon ferments for 2 weeks. Maybe i'll try the walnut method if i can find some. Still trying to figure out what style to make the walker holster.


By the way, that's a damn fine looking holster!
 
I hope you know that vinegaroon will make it coal black. You will also need to neutralize the vinegar with a baking soda solution or it will eat the finish right off your guns.

For a period holster I would lean more towards black walnut dye. It takes several months to make really good stuff though.


Dyeing leather for anything is a relatively new thing anyway.
I guess that depends on how you look at it. The ancient Romans dyed their leatherwork.
 
I think during the American expansion period most holsters were just made with natural, russet, or brown skirting leather and oiled.

The Walnut husk stain as was mentioned above is the best thing I've found for making something that looked like it started out as russet leather and has aged a bit with oil, etc.

I use a lot of the black walnut stain, I make the stain from the green husk during the fall each year and make enough to last me all year.

I can try and post a picture of what it looks like but don't know how to post pictures on here.
 
Here is a picture where I've purposely "aged" it a bit with the walnut husk.
 

Attachments

  • DSCN3512.JPG
    DSCN3512.JPG
    264.8 KB · Views: 33
Here is a photo of just stained and not aged. The nice thing about the natural stain is you can play with it and get different looks depending on what you want. I encourage you to give it a try. I believe you'll enjoy working with it on your leather projects.
 

Attachments

  • DSCN3250.JPG
    DSCN3250.JPG
    272.4 KB · Views: 28
Here is a picture where I've purposely "aged" it a bit with the walnut husk.
Amazing job! Since you know your stuff can you give me a little advice on how you work? I feel like my workflow is flawed, what i do first is cut my pattern out of the leather, then i soak it in water and bend it around my gun. After that i mold it tightly and it forms a natural seam area where the two pieces of leather fold over, that's where i make my stitching line. While still wet i poke the holes and stitch it up then i put it in the oven at 170 to dry.

I feel like i'm doing lots wrong. For example now that it's done and i want to stain it i will lose my molded shape i made early on as the leather gets wet... Can you or any other leather worker give me a rough idea on the order to go about things?
 
I hope you know that vinegaroon will make it coal black. You will also need to neutralize the vinegar with a baking soda solution or it will eat the finish right off your guns.

For a period holster I would lean more towards black walnut dye. It takes several months to make really good stuff though.


I guess that depends on how you look at it. The ancient Romans dyed their leatherwork.
Yes i'm aware. Although it is not what i'm aiming for all civil war holsters i've seen are black.
 
By the way, that's a damn fine looking holster!
Thank you!. I can't agree though. The second i was done with my 'new' holster, it already looked like it's been through a year of hard work haha.
 
Amazing job! Since you know your stuff can you give me a little advice on how you work? I feel like my workflow is flawed, what i do first is cut my pattern out of the leather, then i soak it in water and bend it around my gun. After that i mold it tightly and it forms a natural seam area where the two pieces of leather fold over, that's where i make my stitching line. While still wet i poke the holes and stitch it up then i put it in the oven at 170 to dry.

I feel like i'm doing lots wrong. For example now that it's done and i want to stain it i will lose my molded shape i made early on as the leather gets wet... Can you or any other leather worker give me a rough idea on the order to go about things?

jmar, thanks but I don't know if I really know my stuff. You never know it all just learn from experience and trading ideas from others.

As far as getting my pattern size sometimes that's trial and error similar to what you are doing. I'll sometimes just make a first one using some scrap leather in case it needs to be modified, most of the time I'll do some minor modifications after the first one fine tuning a pattern.

File folders work real good to make patterns, set your gun upside down on the seam and carefully roll it to one side and trace the firearm. I've found adding about 5/8 to 3/4 of an inch will get it close to where you need to be and then you can draw the outline of the holster seam and when you fold the file folder together again you can cut both sides out together so it matches.

I have probably hundreds of patterns of various styles for different guns. I do mostly 19th century style reproductions and copies of original 19th century holsters. Some of mine have been made from doing direct measurements and or tracing of original surviving examples. If you don't have that to go by or want something of your own design you'll just have to play with it as you have been doing and as I described above.

As far as molding, I do that after I have it all assembled. The stain will soften it and allow you to stick the gun in it and carefully mold it. I usually dip dye everything so it gets pretty saturated. I don't use an oven or anything I let it dry naturally however I do hang in the sun most of the time when using the natural walnut stain because I like the darker look it gets when it dries in the sunlight. In the winter time I have to hang them in a window so the sunlight can sort of tan it as it dries.

Just continue to have fun with it, I've been doing leather work off and on since I was very young and just in recent years started doing it on a regular bases as a hobby/side job and I still learn little tricks all the time. It's a great hobby.
Thanks for your input, very helpful! I imagine you got to be quick when molding a gun in a vingeroon dye. The thing i don't get is how people have molded and dyed holsters with thread that hasn't been died... I guess they have to make their pattern exact before stitching. If you'd like i'd love to see more 19th century holster designs you've made. Any for big guns like Dragoons or Walkers?
 
Re: Walker Holster If I had all my gear to cut and stitch hide, I'd make a full flap bandoleer rig for the walker with also had a hammer retention strap for open flap carry. You don't want that puppy falling on your toe... Being the geek I am I'd have to rig a belt system on it for 2" garrison belts in the style of the Bianchi 111 Cyclone, straight hang and Cross Draw.
For a finish? I'd go raw hide.let the decades decide the finish. that's just me.
 
"...some leather goods were dyed as far back as the 1400's..." Leather has been dyed since cavemen first started wearing leather. However, for a holster, all dying should be done before you sew it together. Only thing that'll happen when you dye your holster is the thread will not be dyed too. Anybody looking that close needs to buy you dinner first. snicker.
Wood stain doesn't work worth beans, so you need proper leather dye(Fiebing's.). You can get it in any shoe repair shop or Tandy's(who also sell How-to books with patterns. One of 'em tells you how to make your own pattern. Might be How to Make Holsters by Al Stohlman.). Isn't cheap, up here. No idea what it runs Stateside. $4.20 for 4 oz. at Tandy's. That goes a long way.
"...'vinegaroon' dye..." Never heard that name in 30 some years of screwing around with leather dyes on holsters etc. However, it's made out of plain white vinegar, a bit of fine steel wool and black walnut bark. DO NOT, I SAY AGAIN, DO NOT GET VINEGAR BASED DYE ON BLUED STEEL. It'll strip bluing to bare metal. Probably clean the brass nicely though.
Coffee doesn't work well either. Very, very strong coffee gives a very light shade of tan/brown. There are lots of books about using plants etc to make dye, but most of that is for cloth.
 
Amazing job! Since you know your stuff can you give me a little advice on how you work? I feel like my workflow is flawed, what i do first is cut my pattern out of the leather, then i soak it in water and bend it around my gun. After that i mold it tightly and it forms a natural seam area where the two pieces of leather fold over, that's where i make my stitching line. While still wet i poke the holes and stitch it up then i put it in the oven at 170 to dry.
You'll never get a good snug fit doing that. The holster needs to be glued and stitched before wet forming.


Yes i'm aware. Although it is not what i'm aiming for all civil war holsters i've seen are black.
US military holsters were black. Civilian holsters were either oiled and allowed to oxidize in the sun or dyed with walnut dye first.


Thanks for your input, very helpful! I imagine you got to be quick when molding a gun in a vingeroon dye. The thing i don't get is how people have molded and dyed holsters with thread that hasn't been died... I guess they have to make their pattern exact before stitching.
Yeah, that's exactly what we do. I might suggest reading my tutorial or getting Chuck Burrows' video, or both.

http://www.sixgunner.org/holstertutorialp1.html


However, for a holster, all dying should be done before you sew it together.
And why is that?
 
Status
Not open for further replies.
Back
Top