Building a new bench

Status
Not open for further replies.

zdc1775

Member
Joined
Feb 26, 2011
Messages
961
Location
Alabama
Ok I have finally started to get settled in after buying a house and moving in so it’s time to build a reloading bench. While in the apartment I was using a Craftsman bottom tool chest with the press mounted on two 2x10's glued and screwed then clamped to the top. I want something more permanent now.

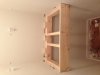
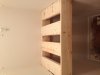
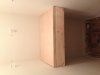
The wife is graciously allowing me to use the walk in closet in the now dining room, former bedroom, as the location. It measures 66” deep and 33” wide with an 8’ ceiling. The walls on two sides are exterior support walls.

My current plan is to build the bench across the back about 20”-24” deep, and then add shelves above and to the sides in the future. My design for the bench is a 2x6 front and back with 2x4 sides and cross braces topped with a 2x6. I would be assembling this frame using 3 1/2“ deck screws and then bolting it to the walls on three sides using four to five inch lag bolts into each stud. Then topping it with doubled up ¾” oak plywood glued and screwed together screwed in through the bottom.

Now the question I am currently planning for it to not have any legs. Do you think this would be strong enough to handle the forces excerpted on it during operation of the press?

Will try to upload a very rough draft of the design I am hoping to use.
 

Attachments

  • Closet Reloading Bench.pdf
    178.1 KB · Views: 202
You'll most likely need a leg (or maybe a cross brave from under the press to wall) under your press. But I'm no carpenter or engineer.

useless signiture
 
Put a 2x4 brace under it at a 45 degree angle. Notch the bottom so it will sit partially on top of a 2x4 scewed into the studs of the wall. You'll pull the wall down before anything else gives lose.

DSC_1141_zpsddaedf95.jpg

(Do ya think I need to clean under there?)
This an L shaped bench in my ham shack. I got 50lb amp on it along with all my radios and a printer. At 170+ lbs I have sat on it and jumped up an down a bit when I first put it in. Yes, you could see the wall moving, my wife liked to freak out when I did it.:what:

Chuck
 
At 33", you will most likely outgrow it soon unless you are only planning to ever use one press. Otherwise, putting the presses on some form of platform so you can switch them out as needed will help make a small space work better. One of my first reloading spaces was in an 8x10 barn style shed with lights and heat. Even the bench of over 6"wide got crowded quickly, so plan your work space layout carefully; otherwise your methods sound and look good
 
At 33", you will most likely outgrow it soon unless you are only planning to ever use one press. Otherwise, putting the presses on some form of platform so you can switch them out as needed will help make a small space work better. One of my first reloading spaces was in an 8x10 barn style shed with lights and heat. Even the bench of over 6"wide got crowded quickly, so plan your work space layout carefully; otherwise your methods sound and look good
I know its small but at least its going to be heated and cooled unlike the garage she wanted me to build it in originally, and I am, for the most part, an extremely organized person so I should be able to manage. I am trying to come up with a way to make the press removable, but just haven't came up with anything I like so far.
Any suggestions?
 
Holy incredible over engineering!! Will it handle stresses of a loading press - yes and then some. It'll work but you can build something far less material and accomplish the same thing.
 
Here is a quick overview of what I built. The link shows a good representation of the 2 base cabinets. Leave a 24-30 in space between the two base cabinets. Once set the outside edges need to be max of 8' wide - because plywood comes in 8' lengths. For the top you can use 3/4" plywood or a 3/4 and a 1/2". I would use AC plywood - its less expensive. The I put a 1/4 in hardboard on over that. The hardboard is only screwed down. That way it can be replaced easily when it gets too beat up. If you want it to last even longer and clean up easier coat the top with a coat or two of varnish or sanding sealer. Wrap the top plywwod/hardboard with ash or maple oak will work but does stand up as well on a work bench. The base cabinets can be seccured to the wall with a 3 -3 1/2 inch drywall screw, 2-3 per cabinet is plenty. This is plenty strong enough for reloading, much easier to move if you ever need to relocate it.

http://thedesignconfidential.com/2010/09/build-it-plans-the-easiest-base-cabinet-ever
 
If you PM me I will help you with this, I had a similar space for years. It is a small area but if you are organized, you can make it work. Climate control is not overrated in my opinion. I added a lock to the closet doors for my own peace of mind.
 
At 33" wide it will be plenty strong enough. You may, or may not, want to add another press later, but you can deal with that if the time comes.
You have what you have to work with, so don't pay any attention to those who say it needs to be 9' long, made of 6x10 kiln dried oak, etc.
 
Small spaces can work very efficiently if a guy does a mock-up of where the equipment gets mounted.

Think ergonomics: clear lines of sight, minimize hand and arm movement, minimize how much your head swivels/tilts back and forth, have everything at the optimal height for your seating/standing stance.
 
Carolinachuck I like your 2x4 brace: a great lightweight way to bind everything together.
Triangles are good engineering.
 
To be able to use what space you have efficiently, consider the following:
A bench top made to accommodate this type of set up needs to be constructed of three layers with insertable pieces to which are mounted the various pieces of equipment needed for our hobby. These inserts are built using a modified wide ‘tongue and groove’ type design made from layered pieces of wood plus bolts with wing nuts. The first layer is a full bench sized solid piece of three quarter inch plywood. The second layer is made with a piece of one half inch K3 or other composition board with cut-outs placed where you want to mount various tools. The third (top) layer is made with another piece of three quarter inch plywood with cut-outs that correspond to the cut-outs in the center board, but smaller than the length and width of the cut out in the center board by one and one half inches on each of all three sides. The tool mounting ‘plates’ consist of one piece of half inch plywood (or aluminum plate) cut to the same size as the cut-out in the center board that is then attached to the underside of a piece of three quarter inch plywood cut to exactly fit the cut-out in the top board. There should be at least one and one half inches of the half inch plywood (or metal plate) extending past each side and across the back end of the top mounting board. Blank mounting boards can be made up so that the bench can be used with a totally flat surface if/when desired. All tool mounting boards and blank inserts can be secured to the bench with flush-top-mounted bolts with wing nuts underneath. This is a neat setup because when you want to change reloaders, neck trimmers, etc., you just slide one out and slide in the other.
 
Complete

Thanks to everyone who helped out. Here are some pictures of the bench completed and in the process of being built. Still need to build shelves but those will come.
 

Attachments

  • bench 1.jpg
    bench 1.jpg
    45.9 KB · Views: 27
  • bench 2.jpg
    bench 2.jpg
    46.4 KB · Views: 21
  • bench 3.jpg
    bench 3.jpg
    37.9 KB · Views: 25
  • bench 4.jpg
    bench 4.jpg
    46.4 KB · Views: 34
Last edited:
If I ever get tired of reloading some day, I can use this to park cars on.

Many 2x4's died in the construction of this bench.

It don't move.

Period.

LY4EDow.jpg

I had to fully disassemble / reassemble it to move it to our new home back in 07.

LUQo2Q7.jpg

(Yeah, it's messy, it got more organized later when I got better 'stuff' to hold my 'stuff' - drawers!)

If you look on the right edge, you can see the bench that holds my Dillon press. There's two layers of 7/8" particle board glued together on a sturdy 2x4 frame, the whole of which is lagged in to the exterior wall's 2x6 studs. IT doesn't move, either.
 
Thanks to everyone who helped out. Here are some pictures of the bench completed and in the process of being built. Still need to build shelves but those will come.

And THAT bench will not move. Ever. Not one bit.

I like your engineering style a lot. :)
 
Status
Not open for further replies.
Back
Top