New Reloading Bench

Status
Not open for further replies.

Barr

Member
Joined
Apr 7, 2006
Messages
634
Location
Upstate SC
New Reloading Bench


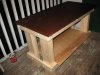
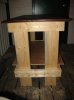
Time has finally come to replace my rickety old 2x4 bench with the new one. Legs are 2x6 double lagged, framing is 2x4, top is 3/4" birch plywood, and bottom shelf is 1/2" birch plywood. Everything is lagged with either 5/16" or 3/8" lag bolts with top glue down as well.

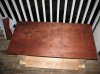
Tried staining the top of the bench for the first time with red oak stain, still have to apply the satin polyurethane finish.

Bench is 24"x48" for semi-portable use in an apt (I can move it when I move).

6 coats of polyurethane on the top, and 3 coats on the bottom. RCBS Trim Pro, Hornady LNL AP, and two Mec 600s mounted.
 

Attachments

  • Reloading Bench 002.jpg
    Reloading Bench 002.jpg
    269.9 KB · Views: 100
  • Reloading Bench 004.jpg
    Reloading Bench 004.jpg
    267.7 KB · Views: 56
  • Reloading Bench 007.jpg
    Reloading Bench 007.jpg
    272.3 KB · Views: 42
  • Reloading Bench 010.jpg
    Reloading Bench 010.jpg
    273.6 KB · Views: 37
Finished Pictures
 

Attachments

  • Picture_005.jpg
    Picture_005.jpg
    266.3 KB · Views: 152
  • Picture_007.jpg
    Picture_007.jpg
    266.4 KB · Views: 78
Barr, I just showed my wife your set up and admired your "Dirty Harry" picture. I've been told that when I clean up my workshop/loading room to look like yours, she'll buy me one. Now you're on my S list. Seriously you did a nice job on your bench and should be proud of it, and I shall continue to work in my den of filth. :)
 
loadedround, you should see the other side of the room. It's a real work in progress. I tried to keep most of the junk out of the picture. I got so tired of the stacks of cardboard boxes I wanted a new bench and included a shelf to get most of the clutter out of the way.
 
Congrats on your ingenuity and effort to create a nice plus useful tool.

As hinted earlier, go light on the clean area posts. Significant others may see you pics and think the rest of the world keeps a clean work area:evil:.
 
Hm... ok, now you've got me thinking. I do have a good drill, actually. So how did you manage the lumber cuts?

The reason i'm so interested - I also live in a space-constrained apt, and the Sauder student desk i'm using is just too flimsy. Your project has me brainstorming again.

thorn
 
In a word, Lowes. I had them precut all of the lumber I would need except for 3-4 pieces that I handcut with a compass saw. Can sketch up some kind of basic plan if anyone is interested. This was kind of a brainstorming exercise how other people had done theirs in the past and what I could come up with myself. I kept asking myself, "How much stronger can I make it without significantly increasing the weight/cost?"

Total cost of the project is around $150 maybe less depending on what you use. I bought a little nicer studs and paid more for the birch plywood. I could have used cheap screws but I used lag bolts to better carry the flexing of the frame. There are over 80 2" cabinet screws in the frame, 12x 3/8" lag bolts, and 30x 5/16" lag bolts. All bolts are countersunk and the top is glued in place as well. There are 120" of 2x6s, 300" of 2x4s, 1x 2'x4' 3/4" sheet of birch, and 1x 2'x4' 1/2" sheet of birch.

I really wanted to wrap the bench in 2x6s but the weight would have went up too much. My 95 lb wife had to be able to carry 1 end to move it around the apt. Another $20 or so in finishes etc. A basic version of this could be cobbled together for $100.
 
Looks good - keep an eye on your top as you work your press to gauge for the wood flexing - I found using two sheets of either 5/8 or 3/4 glued and screwed made a thick enough top to avoid that
 
Status
Not open for further replies.
Back
Top