ReedTX
Member
Thank you. I will look into removing the crimped primer. If anyone has any cost effective methods on how to do that please share them with me.
Nato stamped means: crimped primer and should have been annealed too, not polished off.
Should be good brass if not shot in a MG.
As I said early in this thread, WMA brass isn’t very good to begin with (my experience). I wouldn’t use it.
The std MG fired brass was a lot of work knowing you may not get 1 firing out of it.
I use LC brass in my .308...de-cap with a Lee universal de-caping die mounted in my press...I use Lee for a reason...when you come across a stuborn primer, the de-caping rod will rise up and out of the de-caping locking nut at the top of the die, saving your decaping rod from bending or your die from being ruined.. . ( I went to this set up because I bent the de-caping/sizing rod on my RCBS full length sizing die trying to de-cap some LC brass and ruined the die ,) ...the universal die is not caliber specific...it works on my 7mm, 8mm, 308, 30-06.......then I swage the crimped primer pocket with a Dillon Swage 600 tool...(bench type..look it up.)..then take a hand held case de-buring tool to clean up the mouth of the primer pocket...as there may be some residual brass left over from the swaging process.Thank you. I will look into removing the crimped primer. If anyone has any cost effective methods on how to do that please share them with me.
Removing a crimped primer isn't an issue, it may just take a bit stronger pull on the handle. Repriming a crimped pocket may be a problem, though, because the rim of the primer pocket may now have a small burr. You can use a standard case mouth reamer, or a countersink bit (for screws) to remove the crimp burr when you process your brass. Take off just enough metal to remove the burr, practice on a few cases before doing several hundred, to get the feel. You should just barely see a bevel on the primer pocket rim with a 5x magnifier. The primer pocket on a Nato case is a tiny bit deeper than a standard .308 case, to allow for a crimp. When seating new primers, the face of the primer will sit deep to the surface of the case head (recessed).Thank you. I will look into removing the crimped primer. If anyone has any cost effective methods on how to do that please share them with me.
I also shoot a M1A, and LC is the only brass I use, with the exception of a few WCC Nato stuff now and again. I buy LC once-fired, and through careful use I can get 4 reloads per case before I worry about case head separation. The metal, when sized, doesn't "go inside", it moves up. The case neck will get longer, requiring trimming back to proper length; you also need to watch for movement of the shoulder, which will affect headspace, which is very important in the M1A. A case length gauge is an almost have-to-have for reloading. Drop the sized case in, the neck will stick out if it is too long, and the case head will be "proud" of the other end if the shoulder is set forward too much, or sits deep if the shoulder is pushed back. It will be flush with the rear of the gauge when correct dimension. If the shoulder is pushed back too much, it increases headspace, if set forward it decreases headspace (worse, because it can prevent lockup or cause slam-fires, or out of battery ignition). Make a tool with a very stiff piece of wire, longer than the case enough you can stick it down inside the case and hold on to it. Bend a small 90 degree hook on the end, and use it to feel the inside of the case just above the head. This is where the metal thins out from repeated sizing, and with practice you will feel an annular "dip" inside if the case has thinned very much. Once I can feel the dip, I pitch the case. If you don't load to max on the M1A, you can usually get about 4 reloads from a case (5 total on a new brass case).I load Lake City brass for my .308 M1A .I was having extraction problems so I started sizing twice.one with a standard RCBS die and a second time with an Small base RCBS die. Extraction issue gone However as noted above the thicker brass has to go some where and since it can't stay outside it goes inside. My loads are nowhere near MAX more middle of the road. If you do this start low and work your load back up .It will raise pressures. You could just use the small base die but it is a lot harder on everything.
The easiest way is to use a primer pocket uniforming tool. It is an edged tool like a reamer but with a fluted tip that cuts out anything that isn’t primer pocket. Uniforming then reaming makes for a real pretty piece of brass. Takes about twenty or thirty seconds per piece which is why a lot of folks don’t bother. Me, I botherCrimped primers are removed the same way regular primers are removed. They will generally take more force to actually remove.
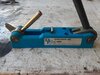
The extra step for you is to removed the crimp. That's a ridge of brass that's been pushed into the top of the primer pocket which held the old primer. Left in place, you will have an issue seating a new primer. There are two ways to remove the crimp: swaging and reaming. A good swager is made by RCBS; no doubt there are others, but I have the RCBS myself. The other way is to use a pocket reamer, such as this one from Lyman.
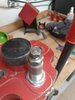
Looking at that picture, are you sure you got the entire primer out? That almost looks like the primer separated, leaving the walls of the primer cup behind in the brass. I've had that happen, and there's no easy way to remove it that I know of.
")