Coltdriver
Member
I acquired a Ruger #1 barrelled action a year or so ago.
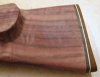
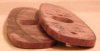
Then I got an unfinished stock from Great American Stocks that is one grade under exibition. They have nice wood but the work required to fit and finish a stock will be apparent if you get one to do yourself.
They are at http://www.gunstocks.com/
The stock was semi inletted.
Rather than risk my crude cutting on this stock I took it to the folks at the Colorado School of Trades Gunsmithing School.
They did a first class job of fitting the stock to the action. The student estimated his actual time at around 45 hours. They charged me less than $60 for the work.
Now I get to go about the task of shaping and finish sanding the stock. I ordered it in a very long lop. It fits me perfectly. Once I get it finished I need to find someone to checker the grip for me. If anyone has a suggestion for a good source let me know.
I am going to inlay some interesting things on the right side of the stock. Its going to be decorated like the old Indian stocks of the West with some brass tacks but some lapis and some other pieces will be inlaid too. I have a friend who is a master furniture maker who will do the inlay work for me.
I'll post a pic or two as we move along with this project.