poolingmyignorance
Member
- Joined
- Jun 4, 2011
- Messages
- 108
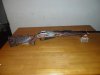
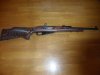
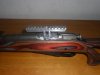
I'd been wanting a laminate featherwieght thumbhole stock for my Mosin for some time. My ultimate goal is to add a scope and do some acurizing mods. Lighter trigger, float the barrel etc. So I ordered stock from Byods stocks, I really wanted something with the blue hues in in the wood, I think that looks really nice. Unfortunately they don't offer that for the mosin. So I ordered what I found to be the next most attractive which they refered to as the Jacaranda. They told me a 3-4 week back order, which was more than fair. But to my surprise I got a tracking number just 8 days later! If finally arrived it was much nicer than the one on the website. Fitting it took a about 30 min of filling a few spots, maybe a 0.001".
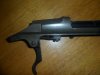
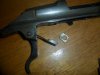
I have no dillusions of making a match grade DMR from this but im certain i can clean it up a bit. Its got a shinny bore with sharp riffling, it is counter bored so I have to chop some and recrown it. Its going to be a long and slow process with lots of trial and error. But thats half the fun. Ill post updates as i make progress. Once I get close I'l bedding the action. For now I simply free floated it, and improved the trigger. I use a combination of a single shim, a slight tweak of the spring and a bit of filing down the disconnector. Result: 3lbs pull, and 1/4" of travel.
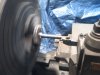
After much research I decied to chop and recrown with an 11degree target crown. Initally I was only going to cut 2 inches off the barrel where the counter bored ended. Unfortunately the steady rest on my lathe only closed to 1.5" and buying a $70 crowning tool for a $100 rifle seemed extreme. Solution? Eleminate the need for the steady rest. Cut the barrel short enough I could work closely to the chuck to elemenate chatter.
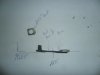
After a few careful mesurments using a TIG rod down the barrle to the bolt face I determined that my barrel was 28.75", where I needed to clamp was right infront of the sight block so that left me 13" to work with...Good thing the barrel extends another 3" behind that! So for safey's sake I cut it at 17 1/4" with a band saw. Chucked her up in the lathe, and ran at about 58 RPM with a No3 Carbide cutting from the bore out to prevent a bur from forming on the I.D of the barrel. Once square cut I repoistioned the cutting tool to 11 degress and again cut from the center out, till I had a nice fat target crown. Then I cranked it up too 300 RPM and did some sanding, then up to 500 rpm for some polishing with machinst scotch brite. (the medium corse red stuff).
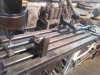
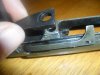
From there it was over to the mill to locate a new spot for the front sight to weld down to. Then because I'm no good with silver solder, it was TIG time! Next will be a complete reblue or maybe duracoat for the whole rifle. I'll post pics of the finished rifle after recoating. And of course preliminary range testing, before I move on to mounting a scope. I'll be sure to do a write up for that process to depending on which route I go.
I have no dillusions of making a match grade DMR from this but im certain i can clean it up a bit. Its got a shinny bore with sharp riffling, it is counter bored so I have to chop some and recrown it. Its going to be a long and slow process with lots of trial and error. But thats half the fun. Ill post updates as i make progress. Once I get close I'l bedding the action. For now I simply free floated it, and improved the trigger. I use a combination of a single shim, a slight tweak of the spring and a bit of filing down the disconnector. Result: 3lbs pull, and 1/4" of travel.
After much research I decied to chop and recrown with an 11degree target crown. Initally I was only going to cut 2 inches off the barrel where the counter bored ended. Unfortunately the steady rest on my lathe only closed to 1.5" and buying a $70 crowning tool for a $100 rifle seemed extreme. Solution? Eleminate the need for the steady rest. Cut the barrel short enough I could work closely to the chuck to elemenate chatter.
After a few careful mesurments using a TIG rod down the barrle to the bolt face I determined that my barrel was 28.75", where I needed to clamp was right infront of the sight block so that left me 13" to work with...Good thing the barrel extends another 3" behind that! So for safey's sake I cut it at 17 1/4" with a band saw. Chucked her up in the lathe, and ran at about 58 RPM with a No3 Carbide cutting from the bore out to prevent a bur from forming on the I.D of the barrel. Once square cut I repoistioned the cutting tool to 11 degress and again cut from the center out, till I had a nice fat target crown. Then I cranked it up too 300 RPM and did some sanding, then up to 500 rpm for some polishing with machinst scotch brite. (the medium corse red stuff).
From there it was over to the mill to locate a new spot for the front sight to weld down to. Then because I'm no good with silver solder, it was TIG time! Next will be a complete reblue or maybe duracoat for the whole rifle. I'll post pics of the finished rifle after recoating. And of course preliminary range testing, before I move on to mounting a scope. I'll be sure to do a write up for that process to depending on which route I go.