AR15 trigger polishing question

Status
Not open for further replies.

thefish

Member
Joined
Feb 17, 2012
Messages
559
Location
Colorado
So I read a few threads about taking the grit out of the AR15 trigger, and polishing the sear face on the trigger and hammer seemed like the ticket.

One thing I did make note of was the warning not to remove any metal as the case hardening is very thin.

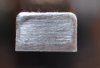
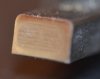
Some guys recommended polishing compound, others sandpaper. So I gave it a shot with Brasso and the Dremel. Well, after 30 minutes or so, the results were not happening, so I did some light polishing with 600 grit sandpaper.

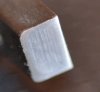
And I mean real light, there was no metal material on the sandpaper whatsoever, just slight discoloration. The face really seems to begin shining the mirror finish I was looking for, however, it seems uneven. The center of the face hasn't started to polish up yet, but the edges are nice and shiny.

My question is, should I keep going? I don't really know how thick the case hardening is, and don't want to ruin it. I understand the engagement area is very small and only at the top, so I wont polish the whole face, just the top 1/3rd.

I was kind of surprised the Brasso and dremel didn't have much effect, but the 600 grit did.

Pics attached.

Thanks in advance.
 

Attachments

  • DSC_8417.JPG
    DSC_8417.JPG
    101.8 KB · Views: 43
  • DSC_8421.jpg
    DSC_8421.jpg
    73.2 KB · Views: 40
  • DSC_8424.jpg
    DSC_8424.jpg
    51.3 KB · Views: 41
This is actually just a trigger from Palmetto state. If I recall, its the Ptac trigger kit, in an Anderson lower.

I was going to experiment with this one, and if it goes well, polish the trigger on my M&P15T and my other PSA build (Anderson lower, PSA premium FCG, PSA premium upper with SS barrel, Magpul MOE stock), and add the JE enterprises yellow spring kit I have on order.
 
Nice pics fish. They tell a lot. The likely reason the polishing is not smooth all the way across is probably because you are are either moving the sear and/or the sandpaper off perfectly flat as you polish. Same thing would happen to me (when I used to polish AR sears). I no longer do that since I have no idea how thick the hardness is on those sears. You may have read my post on the subject here.

But, I would argue that if the hardness is super thin, it will wear off over time anyway as the trigger is used. Cheap components are cheap and it might be tough to make them any good.

Back to your polishing, on stock ARs, the hammer appears to be "cocked" further as the trigger is pulled. I am quite sure that is done for safety and itself is a huge contributor to the pull force necessary to disengage the trigger. Because of that action (sear angle actually), just the very edge of the hammer sear rides or scrapes along a longer portion of the trigger sear. All this is to say is that from your pics you are polishing the most important sear, the trigger sear. The hammer sear should also be smooth, but the edge is the most important part of that sear. Well, also important is the sear edges also need to be perfectly parallel to their axes of rotation. I have seen a few that were not.

I like polishing and changing angles to tune triggers but I will no longer do it on ARs since the quality of the metal is unknown. If the metal quality was known, it may be possible to determine if the polished sears could be re-hardened to make that nice work last. With ARs I guess I will have to pay someone else to do that. What you are doing is interesting but dangerous - be careful.

Lou
 
I literally bought hundreds of the PTAC lower parts kits. I am not exaggerating, probably about 250ish when they were $29.99 at PSA

Some of them were awesome and some of them felt like there was sand in the trigger assembly.

I took a cloth polishing tip for my dremel and some Flitz jewelers polish, rubbed it by hand on the trigger and hammer and lightly hit it with my dremel on a slow-medium speed. Than use a soft cloth with lubircating oil to wipe any excess paste away.

After that nearly all of them were noticeable better. A handful of them were still garbage. One was TERRIBLE. I emailed PSA about it and they actually sent me a PSA branded replacement trigger assembly kit.
 
Last edited:
Not to be offensive but if you want a smooth trigger I would suggest going with a higher quality trigger kit, maybe even an enhanced trigger kit Recoil did an awesome comparion of like 12 of them. Everything from the Geisselle to the Spikes to cheap ones that are only like $50. You likely won't see a ton of improvement since like others have said, part of the issue might be the metal quality as much as the smoothness and angle, etc.


I just recently upgraded to a nickel boron coated trigger kit and BCG on my SBR because of the amount of gas blowback, especially suppressed. The difference between that and the standard (Magnesium Phosphate???) metal is certainly noticeable.
 
Use a stone, not a Dremel for that kind of work. You simply rounded off the edges. The bearing surface needs to be even all the way across and square to the sear. If you don't have the tools or the knowledge it's better to leave it alone.
 
Original AR-15/M-16 fire control parts were reportedly made of sintered steel. Not the best stuff for trying to get a decent trigger pull. No one with much experience will touch them anymore due to the variable case hardening. The over-cock described above is critical for most self loading firearms to keep the hammer from falling as the bolt slams home if the trigger is tuned. The vibration is strong enough to overcome spring pressure and make the hammer slip off the sear when engagement surfaces are altered. With the AR it is far better to bite the bullet and spend your money on a quality unit like Timney, Wilson, or Geissele. Steer clear of Rock River. They don't stand behind their triggers. Not usually a problem and the trigger pull is pretty nice, but when the hammer breaks for no reason, you want the manufacturer to step up.
 
Slowly polish it with a polishing compound or a stone. Check the pull as you.
If you do upgrade the trigger the Rock River is GTG. I have 4 and never had an issue. I would bet I have 20,000 round down range between all of them
 
..and I know of 3 Rock River hammers that broke within a year. All were owned by different members of my former shooting club. Rock River would not even offer a discount on replacement. Since I sold one of them through my shop, I ate the cost of the parts so the shooter could get a new trigger group.
 
The edges are rounded because you are rocking it on the sandpaper.
Or using a soft backing behind the sandpaper?

Whichever, you are doing more harm then good.

rc
 
Hi Guys, thanks for the replies. I'm using a flat piece of glass under the sandpaper, and although in the pics the edges look rounded, they aren't. it's a combination of the lighting, and the lense I have has a ridiculous amount of lack of depth of field (105mm micro-nikor) so it's hard to get a pic that's sharp all the way through. Another is attached. To the naked eye, with a magnifying glass, the edges are all sharp and the same profile where the hammer actually engages the small edge.

At some point I'll look at possibly a trigger upgrade, just wanted to make this one a little better. In any event, it's an easily replaceable part. With this but of polishing, the grit is gone and it feels a million times better.

Thanks again!
 

Attachments

  • DSC_8445.jpg
    DSC_8445.jpg
    35.8 KB · Views: 40
I have never had to deal with Rock River but I own two of their rifles and LOVE them. I agree that there Std trigger kits are awesome. Hell I think there stock trigger kit was better than the upgraded premium Spikes kit I bought and then quickly resold.
 
Don't be afraid to work on an AR trigger as they are cheap enough to replace if it doesn't work out. Use a stone and then polish for a better feel but keep edges sharp and surfaces flat.
 
1. Go slow. No, slower.
2. No power tools. You're trying to polish, not remove metal. Use a stone.
3. Do not change geometry / break or round over any edges.
4. Reassemble and test frequently.

Honestly, the easiest way is to dry-fire the snot out of it. Or just get a Geissele... you'll want to eventually anyway.
 
polished mine w/ fritz, bobbed the hammer, installed pre-travel set screw, and JP yellow springs. It's comparable to other high end drop-in triggers i have.
 
Status
Not open for further replies.
Back
Top