Auto Disc on a LEE Pro 100

Status
Not open for further replies.

Harve Curry

Member
Joined
Jun 22, 2004
Messages
1,756
Location
Black Range of New Mexico
I got a present of a LEE Pro 1000 that is about 20 years old but hardly used. It's even set up for 44 special. So I can leave this press dedicated to that cartridge, use my Dillan 550 for others. This Pro 1000 looks like it will be OK once it's set up and leave it alone.

1).Sometimes it misses a primer feeding ,or the hopper doesn't drop them on it's own keeping the primer ramp full, you have to tap-shake the tray.

2).The auto disc and chart don't jive with actual weight at all. I had to go up 2 size cavities to get 7.5gr Unique with the .95 cavity. Hopper full of powder. the .82 cavity dropped 6.1gr Unique.

Any tips on this machine so I don't make mistakes?
 
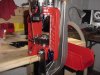
1. If you haven't done it already do a detail strip and clean. Pay particular attention to the indexing parts in the carrier base--if the nylon is stripped, put in new parts, period. Keep a set of spare parts on hand.

2. Clean the primer anvil, spring, etc., and be sure you have the proper size anvil installed for primer size you are using.

3. Scrupulously clean the primer feed trough and lubricate it sparingly with some dry graphite.

4. Make sure that the 'vibrator pin' on the primer feed trough firmly touches the right rear post.

5. The Z-bar on the case feeder may need some slight bending / tweaking to work reliably. Clean the feeder tongue, the feeder, and lubricate the underside of the arm with STP.

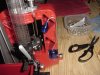
6. For the powder measure--order the Pro / Deluxe Auto disk update kit, or just get a second / Pro Auto disk measure. (Make sure you get the riser and swivel with the upgrade / new measure.)

7. Replace the disc(s) with the Adjustable charge bar. Whichever one you use, make sure the disc / bar is installed in the proper hole / slot to engage the actuator arm.

If this machine really is twenty years old, then the carrier will not have the lug on the carrier to install the manual pull-back on the measure. So, the spring return must be used--and it can hang 'mysteriously.' Typically, that's the result of a worn disc or hopper (or even a bar), and it's a very rare occurance. If you update the measure, the pro hopper has the elastomer wipers in it that deal with this wear much better than the original design--so get some wipers on hand as parts as well. However, develop a reloading procedure that includes scrupulous observation of the disc / bar return .

Set up properly for one caliber and 'left alone' except for maintenance, the Pro 1000 can load lots of good ammo reliably. The single biggest 'fault' with it is, IMO, the 3-die paradigm, with its related primer insertion and powder drop at the same station. A missed primer means a dirty primer subsystem; clean it immediately.

A second issue with the 3-die paradigm is the combined seating-crimping operation. Select the bullet you want to use, take the time to tweak the seater-crimper settings to get it right--and don't change it if you don't have to.

Finally, don't try doing load development on this machine--that's a recipe for disaster. However, since you have the Dillon 550, you can easily do it there.

Any other questions, feel free to ask--

Jim H.
 
Last edited:
Thanks for the advice.
The timing of indexing seems right on.
It does have a stout spring that returns the charge slider. I had to turn the expander die in one full turn to allow the powder actuator to slide a full motion.
I'll call and get those uprgades and will go through the list as you outlined. I didn't know there was a adustable disc.

thanks again, Bill W
 
I have a new P1000 and an old one like Harve's. Congrats on the gift, Harve.

The upgrades mentioned above are good, but not always necessary.

Clean it up. If it works right, you may want to load a few hundred or a thousand to see how it performs. Set up for one cartridge, it may work forever without the need for upgrade.
 
The indexing may be right on--but it can change depending on the momentum developed during the stroking, and as you learn the stroke for this setup.

Even if it is on, do clean the carrier / indexer socket--that's the place powder ends up when a primer is missed, and it can be all crudded up. If you don't have the spare (nylon) parts on hand, just be careful when re-installing the indexer.

I bought mine about one year after they first came out--about 1990. I used it for eight-nine years, then put it away until this time last year. Once cleaned and tweaked, it worked admirably. However, I replaced it on the bench with my Load-Master, mostly because of the 3-die configuration.

It's a good unit--just watch the priming.

Jim H.
 
Any tips on this machine so I don't make mistakes?
1).Sometimes it misses a primer feeding ,

Check for and remove any plastic mold flashing in the primer chute. Dust the tray and chute with a bit of powdered graphite (like you'd put in a lock)

The auto disc and chart don't jive with actual weight at all.
.

Get used to it, or get Lee's adjustable charge bar or micro disk set.
 
I took my Lee Autodisk disks and carefully reamed them to drop what I wanted dropped. I permanantly marked them so Me or nobody else gets confused if something should happen.

I do load development on my Pro1K all the time.

The biggest issue with the Pro1K and being finicky is once you get it set up it works great. Then, you change over to another caliber and have to set it all up again and work the kinks out.

Best answer to this is to get a complete shellplate carrier and die set/turret for each caliber you intend to reload. Then all you do is loosen the allen-head retainer bolt and swap carriers, and swap the turret and dies. Easy as pie and still less expensive than a Dillon toolhead.

I keep a .357 and a .38 Spc turret so I don't have to re-setup when I change. Both take same carrier, obviously.

As far as crimp/seat in one operation, if you expand your brass a little more it's not a problem with lead projectiles.

I don't use a Factory Crimp Die (Obviously, in a 3-hole press) and have never seen the need to. If I had a custom 1911 with a tight chamber it might be necessary.

The best thing to do for maintenance is to clean the ram and dead-primer slot with brake cleaner or something like that, then spray it real good top and bottom with silicon spray, the kind that dries. Also use the silicon spray on the underside of the case slider & bottom of the rail. A little on the "Z"-bar spring and pivot points. Spray the hex-rod top to bottom with silicon spray. After a fresh clean and lube job mine just glides like greased ice.

I also polish the finished round eject chute with a felt bob and a Dremel and spray it with silicon spray, too, and the finished rounds stopped hanging up on the slide.

Also if you can, take a hole saw and drill a largish hole in the tabletop under your press, right in the middle, and attach a screw-top jar under the table. An old peanut butter jar, well cleaned, works great. Drill the same size hole in the lid of the jar and screw it to the underside of the bench with the holes lined up, screw the jar into the lid, and presto, a primer catcher so you don't have to unbolt the press to clean up the primer pile.
 
the next thing I'm planning on doing to mine is drilling a hole next to to the bullet seating die for a bright single bulb LED light so I can see and make sure there is powder in the case before I place the bullet.

I would agree that set it up and leave it alone and it should work fine.
 
I do everything evan price listed above, except I use a Micro-Adjustable disk instead of reamed disks, and I use different lubricants on my press (grease on the ram and all the parts below the shellplate, powdered graphite on everything above the shellplate). Otherwise, everything evan discovered about the P1000 is the same as my experience over the last 10 years.

I use one particular shellplate carrier for 9mm, 40s&w, .223, and 380auto by changing the shellplate only. Timing screw adjustment is easily accomplished. Everything else on the shellplate carrier is the same for these 4 calibers, with a separate turret on top for each.

Other calibers get their own shellplate carriers and turrets. Changing calibers is a breeze.

If I ever decide to use the Factory Crimp Die (like .30-30 or 44mag) I use an old single station press separately. I can crimp 20 rounds in one minute on the single station.

I no longer use the Lee table for the disks. It ain't anywhere close to the actual weight of powder dropped. Ain't anywhere close.

Finally, I have an LED light like rrflyer mentions. It works great, right between the powder drop and the bullet seating position. Highly recommended.
 
ants...

could you post pics of your light?

im trying to decide if I want to drill from the side or the top.
 
Can anyone tell me the procedure for tweaking the V shaped spring that regulates the primer feed. Problem is it doesn't let the primer onto the push rod because it's not getting the right movement from the shell indicator V spring.
I read nothing about that in LEE'S instruction sheet.
 
rrflyer, I don't have a camera, but the LED light is duct taped to the back side of the head. It has a flexible neck so I can point it directly down into the case. The light only cost $3 at a gun show.

Harve, the v spring only works one way. If it doesn't work, try flipping it over. However, often the priming mechanism fails to deliver a primer due to debris in the system. Try pushing and pulling the priming punch manually from underneath the shellplate carrier. If the primer still doesn't slide onto the top of the punch, it's not a spring problem.
 
LED lights, called bookreaders, got them 2 for $3.00 at Walgreens. They come with extra set of batteries too. The flexible neck leads are great. I was going to wire them to a small transformer, but after 2 months, they still work on the original set of batteries. I cut the hood off the one on the powder side for clearance on the bullet feeder, cut the clippie off the base and hot glued it to the Loadmaster frame. The other one was not critical on space over the primer slider so I left the hood on the lamp. Lets me see that a primer slides into the chute so I don't miss a prime. Lights + hotglue = about $3.50. I removed the primer trough so you could see the back one.
 

Attachments

  • 004.JPG
    004.JPG
    133.9 KB · Views: 10
  • 006.JPG
    006.JPG
    145.7 KB · Views: 9
Status
Not open for further replies.
Back
Top