
Reloadron
Contributing Member
The following information is aimed at the new hand loader, the individual just getting started in rolling their own ammunition themselves. However, any input and added information from the well seasoned hand loader is most welcome and appreciated.
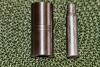
There currently exist a plethora of case gauges available to the hand loader. It becomes important for the hand loader to understand what these gauges will and of more importance will not do when considering buying a case gauge. Years ago gauges like this weren’t available to the hand loader leaving us to fabricate our own gauges and methods to measure case characteristics. Today case gauges in a variety of designs are readily available from a dozen or more manufacturers who cater to the shooting sports. Working from the least expensive designs to the higher end designs we can start with the basic case length and headspace gauge. Gauges like this are made by a host of manufacturers, L.E. Wilson, Forrester, Lyman and many others.


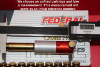
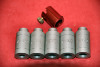
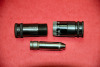
The above images illustrate a few examples of what is commonly referred to as a “Case Gauge”. When purchasing such a gauge make sure the case gauge you purchase measures the features you wish to measure. The majority of these gauges provide two characteristics of the case. They provide a Go/NoGo indication of the case base to shoulder datum and the case overall length. There are variations that are cut like a chamber to include the case diameter characteristic but the majority does not provide this data. I say they provide a Go/NoGo indication because this type gauge does not provide any quantitative values (no numeric values) about the case being measured.
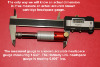
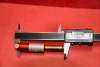
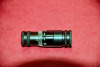
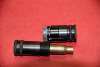
Another case gauge design which does provide quantitative (we get real numeric values) is the design pictured below. While the below gauges are Hornady Lock-N-Load Headspace Gage 5 Bushing Set with Comparator just as previously mentioned this same or similar design can be found by other manufacturers.

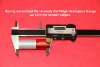
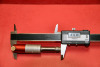
The downside of the above is while when used with a good caliper they give a numeric value but the numbers are sort of skewed. The collets have a slight bevel which mates with the case shoulder. Below is an image of using one in conjunction with a true 1.630’ actual chamber headspace gauge. Note the gauge is reading 1.624” of a full 0.006” below the actual true reading it should be.

The gauge does however function well for its intended use. The idea being to fire a measured case, after firing resize the case to be about 0.002” below the measured value of the fired case. This is commonly called “bumping” the shoulder back and more on that term later. Just do not believe when using the gauge that any numbers you get are anything like your chamber headspace dimension.
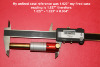
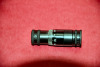
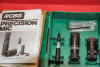
A gauge I happen to really like is the RCBS Precision Mic set.

My personal experience is this gauge affords real measurement numbers and does so accurately. I only want to focus on the case measuring ability at this time. The above gauge is the .308 Winchester version and again using an actual headspace gauge for a comparison check we see that using this gauge in accordance with manufacturer’s instructions the gauge reads a true 1.630” or in the image 0.0 which acquaints to 1.630”.

A note about terms I have used here.
Headspace:
The distance from the face of the closed breech of a firearm to the surface in the chamber on which the cartridge case seats. 1. BELT: A type of chamber design in which the cartridge seats in the chamber on an enlarged band ahead of the extractor groove of the cartridge body. 2. MOUTH: A type of chamber design in which the cartridge seats in the chamber on the mouth of the cartridge case. 3. RIMLESS: A type of chamber design in which the cartridge seats in the chamber on the shoulder of the cartridge case. 4. RIMMED: A type of chamber design in which the cartridge seats in the chamber on the rim or flange of the cartridge case.
Headspace Gauge:
A device used in a firearm to determine the distance between the breech face and the chamber surface on which the cartridge seats. Also called Breeching Plug.
Just for further clarification.

Currently many manufacturers are marketing their case gauges as I illustrated above as headspace gauges. While these gauges do not fit the actual SAAMI Glossary as being correct the term is none the less being widely used without discrimination. My objective is merely to point out a few gauges and their use as well as good and not so good points. I am not seeking a war on semantics.
Another popular term being used is bumping the shoulder back. Now if we take a fired case and scribe a perfect line around the case shoulder right on the case body and case shoulder start juncture and then we full length resize the case we will find our scribed line has actually moved up on the case shoulder. The argument becomes it is not possible to bump a shoulder back on a case which has full body case support which is exactly what a resizing die does. So what is really happening? So how is the new shoulder which is closer to the case head formed? As the case is full length sized, a small amount of case material is moved toward the mouth, with the a bit of the old body now forming the base of the new shoulder, and the base of the neck now containing a bit of the "old" shoulder. And as a result of that sizing process, the neck may have grown enough to need trimming. That said a simple Google of “bumping the shoulder back” will bring up countless hits so again a term which is being widely accepted in the shooting community.
Happy Measuring....
Ron
There currently exist a plethora of case gauges available to the hand loader. It becomes important for the hand loader to understand what these gauges will and of more importance will not do when considering buying a case gauge. Years ago gauges like this weren’t available to the hand loader leaving us to fabricate our own gauges and methods to measure case characteristics. Today case gauges in a variety of designs are readily available from a dozen or more manufacturers who cater to the shooting sports. Working from the least expensive designs to the higher end designs we can start with the basic case length and headspace gauge. Gauges like this are made by a host of manufacturers, L.E. Wilson, Forrester, Lyman and many others.
The above images illustrate a few examples of what is commonly referred to as a “Case Gauge”. When purchasing such a gauge make sure the case gauge you purchase measures the features you wish to measure. The majority of these gauges provide two characteristics of the case. They provide a Go/NoGo indication of the case base to shoulder datum and the case overall length. There are variations that are cut like a chamber to include the case diameter characteristic but the majority does not provide this data. I say they provide a Go/NoGo indication because this type gauge does not provide any quantitative values (no numeric values) about the case being measured.
Another case gauge design which does provide quantitative (we get real numeric values) is the design pictured below. While the below gauges are Hornady Lock-N-Load Headspace Gage 5 Bushing Set with Comparator just as previously mentioned this same or similar design can be found by other manufacturers.
The downside of the above is while when used with a good caliper they give a numeric value but the numbers are sort of skewed. The collets have a slight bevel which mates with the case shoulder. Below is an image of using one in conjunction with a true 1.630’ actual chamber headspace gauge. Note the gauge is reading 1.624” of a full 0.006” below the actual true reading it should be.
The gauge does however function well for its intended use. The idea being to fire a measured case, after firing resize the case to be about 0.002” below the measured value of the fired case. This is commonly called “bumping” the shoulder back and more on that term later. Just do not believe when using the gauge that any numbers you get are anything like your chamber headspace dimension.
A gauge I happen to really like is the RCBS Precision Mic set.
My personal experience is this gauge affords real measurement numbers and does so accurately. I only want to focus on the case measuring ability at this time. The above gauge is the .308 Winchester version and again using an actual headspace gauge for a comparison check we see that using this gauge in accordance with manufacturer’s instructions the gauge reads a true 1.630” or in the image 0.0 which acquaints to 1.630”.
A note about terms I have used here.
Headspace:
The distance from the face of the closed breech of a firearm to the surface in the chamber on which the cartridge case seats. 1. BELT: A type of chamber design in which the cartridge seats in the chamber on an enlarged band ahead of the extractor groove of the cartridge body. 2. MOUTH: A type of chamber design in which the cartridge seats in the chamber on the mouth of the cartridge case. 3. RIMLESS: A type of chamber design in which the cartridge seats in the chamber on the shoulder of the cartridge case. 4. RIMMED: A type of chamber design in which the cartridge seats in the chamber on the rim or flange of the cartridge case.
Headspace Gauge:
A device used in a firearm to determine the distance between the breech face and the chamber surface on which the cartridge seats. Also called Breeching Plug.
Just for further clarification.
Currently many manufacturers are marketing their case gauges as I illustrated above as headspace gauges. While these gauges do not fit the actual SAAMI Glossary as being correct the term is none the less being widely used without discrimination. My objective is merely to point out a few gauges and their use as well as good and not so good points. I am not seeking a war on semantics.
Another popular term being used is bumping the shoulder back. Now if we take a fired case and scribe a perfect line around the case shoulder right on the case body and case shoulder start juncture and then we full length resize the case we will find our scribed line has actually moved up on the case shoulder. The argument becomes it is not possible to bump a shoulder back on a case which has full body case support which is exactly what a resizing die does. So what is really happening? So how is the new shoulder which is closer to the case head formed? As the case is full length sized, a small amount of case material is moved toward the mouth, with the a bit of the old body now forming the base of the new shoulder, and the base of the neck now containing a bit of the "old" shoulder. And as a result of that sizing process, the neck may have grown enough to need trimming. That said a simple Google of “bumping the shoulder back” will bring up countless hits so again a term which is being widely accepted in the shooting community.
Happy Measuring....
Ron
Attachments
-
 CG1.png575.2 KB · Views: 125
 -
 CG3.png772.1 KB · Views: 123
 -
 CG2.png674.5 KB · Views: 122
 -
 Case%20Gauge%20Casting.png1 MB · Views: 129
 -
 CG5.png716.1 KB · Views: 123
 -
 CG4.png751.3 KB · Views: 126
 -
 CG6.png704 KB · Views: 122
 -
 CG10.png711.1 KB · Views: 121
 -
 CG9.png766.8 KB · Views: 124
 -
 CG8.png763.1 KB · Views: 125
 -
 CG7.png709.1 KB · Views: 124
 -
 CG12.png704.1 KB · Views: 123
 -
 CG11.png703.9 KB · Views: 127
Last edited by a moderator:
 ?
?


